Loading...
Loading...
Loading...
Loading...
Loading...
Loading...
Loading...
Loading...
Loading...
Loading...
Loading...
Loading...
Loading...
Loading...
Loading...
Loading...
Loading...
Loading...
Loading...
Loading...
Loading...
Loading...
Loading...
Loading...
Loading...
Loading...
Loading...
Loading...
Loading...
Loading...
Loading...
Loading...
Loading...
Loading...
Loading...
Loading...
Loading...
Loading...
Loading...
Loading...
Loading...
Loading...
Loading...
Loading...
Loading...
Loading...
Loading...
Loading...
Loading...
Loading...
Loading...
Loading...
Loading...
Loading...
Loading...
Loading...
Loading...
Loading...
Loading...
Loading...
Loading...
Loading...
Loading...
Loading...
Loading...
Loading...
Loading...
Loading...
Loading...
Loading...
Loading...
Loading...
Loading...
Loading...
Loading...
Loading...
Loading...
Loading...
Loading...
Loading...
Loading...
Loading...
Loading...
Loading...
Loading...
Loading...
Loading...
Loading...
Loading...
Loading...
Loading...
Loading...
Loading...
Loading...
Loading...
Loading...
Loading...
Loading...
Loading...
Loading...
Immuta integrates with your data platforms so you can register your data and effectively manage access controls on that data.
This section includes guidance for connecting your data platform and keeping it synced with Immuta.
This reference guide outlines the features, policies, and audit capabilities supported by each integration.
The guides in these sections include information about how to connect your data platform to Immuta.
This reference guide outlines the actions and features that trigger Immuta queries in your remote platform that may incur cost.
Immuta integrates with your data platforms so you can register your data and effectively manage access controls on that data. This section includes concept, reference, and how-to guides for registering and managing data sources and your connections.
In this integration, Immuta generates policy-enforced views in a schema in your configured Azure Synapse Analytics Dedicated SQL pool for tables registered as Immuta data sources.
This guide outlines how to integrate Azure Synapse Analytics with Immuta.
: Configure the integration in Immuta.
: This guide describes the design and components of the integration.
: This guide describes the prerequisites, supported features, and limitations of the integration.
The how-to guides linked on this page illustrate how to integrate Azure Synapse Analytics with Immuta. See the reference guide for information about the Azure Synapse Analytics integration.
Requirement: A running Dedicated SQL pool
Connect your technology
These guides provide instructions on getting your data set up in Immuta.
: Configure an Azure Synapse Analytics integration with Immuta so that Immuta can create policy protected views for your users to query.
: This will register your data objects into Immuta and allow you to start dictating access through global policies.
: Use domains to segment your data and assign responsibilities to the appropriate team members. These domains will then be used in policies.
Register your users
These guides provide instructions on getting your users set up in Immuta.
: Bring the IAM your organization already uses and allow Immuta to register your users for you.
Add data metadata
These guides provide instructions on getting your data metadata set up in Immuta.
: Bring the external catalog your organization already uses and allow Immuta to continually sync your tags with your data sources for you.
Start using the Governance app
These guides provide instructions on using the Governance app for the first time.
: Once you add your data metadata to Immuta, you can immediately create policies that utilize your tags and apply to your tables. Subscription policies can be created to dictate access to data sources.
To migrate from the private preview version of table grants (available before September 2022) to the GA version, complete the steps below.
Navigate to the App Settings page.
Click Integration Settings in the left panel, and scroll to the Global Integrations Settings section.
Click Save. Wait for about 1 minute per 1000 users. This gives time for Immuta to drop all the previously created user roles.
Use the Enable Snowflake table grants tutorial to re-enable the feature.
Configure audit: Once you have your data sources and users, and policies granting them access, you can set up audit export. This will export the audit logs from policy changes and tagging updates.
This page provides a tutorial for enabling the Azure Synapse Analytics integration on the Immuta app settings page. To configure this integration via the Immuta API, see the Integrations API getting started guide.
For an overview of the integration, see the Azure Synapse Analytics overview documentation.
A running Dedicated SQL pool is required.
If you are using the OAuth authentication method,
Ensure that Microsoft Entra ID is on the same account as the Azure Synapse Analytics workspace and dedicated SQL pool.
.
Select Accounts in this organizational directory only as the account type.
Click the App Settings icon in the left sidebar.
Click the Integrations tab.
Click the +Add Integration button and select Azure Synapse Analytics from the dropdown menu.
You have two options for configuring your Azure Synapse Analytic environment:
: Grant Immuta one-time use of credentials to automatically configure your environment and the integration.
: Run the Immuta script in your Azure Synapse Analytics environment yourself to configure the integration.
Enter the username and password in the Privileged User Credentials section.
Select Manual.
Download, fill out the appropriate fields, and run the bootstrap master script and bootstrap script linked in the Setup section. Note: The master script is not required if you're using the OAuth authentication method.
Select the authentication method:
Click Save.
.
Click the App Settings icon in the left sidebar.
Navigate to the Integrations tab and click the down arrow next to the Azure Synapse Analytics Integration.
Edit the field you want to change. Note any field shadowed is not editable, and the integration must be disabled and re-installed to change it.
Immuta requires temporary, one-time use of credentials with specific permissions.
When performing edits to an integration, Immuta requires temporary, one-time use of credentials of a Superuser or a user with the Manage GRANTS permission
Alternatively, you can download the Edit Script from your Azure Synapse Analytics configuration on the Immuta app settings page and run it in Azure Synapse Analytics.
Click the App Settings icon in the left sidebar.
Navigate to the Integrations tab and click the down arrow next to the Azure Synapse Analytics Integration.
Click the checkbox to disable the integration.
This integration enforces policies on Databricks securables registered in the legacy Hive metastore. Once these securables are registered as Immuta data sources, users can query policy-enforced data on Databricks clusters.
The guides in this section outline how to integrate Databricks Spark with Immuta.
This getting started guide outlines how to integrate Databricks with Immuta.
: Manually update your cluster to reflect changes in the Immuta init script or cluster policies.
: Register a Databricks library with Immuta as a trusted library to avoid Immuta security manager errors when using third-party libraries.
: This guide describes the design and components of the integration.
: This guide provides an overview of the Immuta features that provide security for your users and Databricks clusters and that allow you to prove compliance and monitor for anomalies.
: This guide provides an overview of registering Databricks securables and protecting them with Immuta policies.
If a Databricks cluster needs to be manually updated to reflect changes in the Immuta init script or cluster policies, you can remove and set up your integration again to get the updated policies and init script.
Log in to Immuta as an Application Admin.
Click the App Settings icon in the navigation menu and scroll to the Integration Settings section.
Your existing Databricks Spark integration should be listed here; expand it and note the configuration values. Now select Remove to remove your integration.
Click Add Integration and select Databricks Integration to add a new integration.
Enter your Databricks Spark integration settings again as configured previously.
Click Add Integration to add the integration, and then select Configure Cluster Policies to set up the updated cluster policies and init script.
Select the cluster policies you wish to use for your Immuta-enabled Databricks clusters.
Automatically push cluster policies and the init script (recommended) or manually update your cluster policies.
Automatically push cluster policies
Select Automatically Push Cluster Policies and enter your privileged Databricks access token. This token must have privileges to write to cluster policies.
Restart any Databricks clusters using these updated policies for the changes to take effect.
Databricks Libraries API: Installing trusted libraries outside of the Databricks Libraries API (e.g., ADD JAR ...) is not supported.
In the Databricks Clusters UI, install your third-party library .jar or Maven artifact with Library Source Upload, DBFS, DBFS/S3, or Maven. Alternatively, use the Databricks libraries API.
In the Databricks Clusters UI, add the IMMUTA_SPARK_DATABRICKS_TRUSTED_LIB_URIS property as a Spark environment variable and set it to your artifact's URI. To specify more than one trusted library, comma delimit the URIs:
For Maven artifacts, the URI is maven:/<maven_coordinates>, where <maven_coordinates> is the Coordinates field found when clicking on the installed artifact on the Libraries tab in the Databricks Clusters UI. Here's an example of an installed artifact:
In this example, you would add the following Spark environment variable:
For jar artifacts, the URI is the Source field found when clicking on the installed artifact on the Libraries tab in the Databricks Clusters UI. For artifacts installed from DBFS or S3, this ends up being the original URI to your artifact. For uploaded artifacts, Databricks will rename your .jar and put it in a directory in DBFS. Here's an example of an installed artifact:
Restart the cluster.
Once the cluster is up, execute a command in a notebook. If the trusted library installation is successful, you should see driver log messages like this:
This page outlines the configuration for setting up project UDFs, which allow users to set their current project in Immuta through Spark. For details about the specific functions available and how to use them, see the Use Project UDFs (Databricks) page.
Use project UDFs in Databricks Spark
Currently, caches are not all invalidated outside of Databricks because Immuta caches information pertaining to a user's current project. Consequently, this feature should only be used in Databricks.
Lower the web service cache timeout in Immuta:
Click the App Settings icon and scroll to the HDFS Cache Settings section.
Lower the Cache TTL of HDFS user names (ms) to 0.
Raise the cache timeout on your Databricks cluster: In the Spark environment variables section, set the IMMUTA_CURRENT_PROJECT_CACHE_TIMEOUT_SECONDS and IMMUTA_PROJECT_CACHE_TIMEOUT_SECONDS to high values (like 10000).
Note: These caches will be invalidated on cluster when a user calls immuta.set_current_project, so they can effectively be cached permanently on cluster to avoid periodically reaching out to the web service.
This page provides guidelines for troubleshooting issues with the Databricks Spark integration and resolving Py4J security and Databricks trusted library errors.
For easier debugging of the Databricks Spark integration, follow the recommendations below.
Enable cluster init script logging:
In the cluster page in Databricks for the target cluster, navigate to Advanced Options -> Logging.
Change the Destination from NONE to DBFS and change the path to the desired output location. Note: The unique cluster ID will be added onto the end of the provided path.
View the Spark UI on your target Databricks cluster: On the cluster page, click the Spark UI tab, which shows the Spark application UI for the cluster. If you encounter issues creating Databricks data sources in Immuta, you can also view the JDBC/ODBC Server portion of the Spark UI to see the result of queries that have been sent from Immuta to Databricks.
The validation and debugging notebook is designed to be used by or under the guidance of an Immuta support professional. Reach out to your Immuta representative for assistance.
Import the notebook into a Databricks workspace by navigating to Home in your Databricks instance.
Click the arrow next to your name and select Import.
Once you have executed commands in the notebook and populated it with debugging information, export the notebook and its contents by opening the File menu, selecting Export, and then selecting DBC Archive.
Error Message: py4j.security.Py4JSecurityException: Constructor <> is not allowlisted
Explanation: This error indicates you are being blocked by Py4J security rather than the Immuta Security Manager. Py4J security is strict and generally ends up blocking many ML libraries.
Solution: Turn off Py4J security on the offending cluster by setting IMMUTA_SPARK_DATABRICKS_PY4J_STRICT_ENABLED=false
Check the driver logs for details. Some possible causes of failure include
One of the Immuta-configured trusted library URIs does not point to a Databricks library. Check that you have configured the correct URI for the Databricks library.
For trusted Maven artifacts, the URI must follow this format: maven:/group.id:artifact-id:version.
Databricks failed to install a library. Any Databricks library installation errors will appear in the Databricks UI under the Libraries tab.
The Databricks Spark integration is one of two integrations Immuta offers for Databricks.
In this integration, Immuta installs an Immuta-maintained Spark plugin on your Databricks cluster. When a user queries data that has been registered in Immuta as a data source, the plugin injects policy logic into the plan Spark builds so that the results returned to the user only include data that specific user should see.
The reference guides in this section are written for Databricks administrators who are responsible for setting up the integration, securing Databricks clusters, and setting up users:
: This guide includes information about what Immuta creates in your Databricks environment and securing your Databricks clusters.
: Consult this guide for information about customizing the Databricks Spark integration settings.
: Consult this guide for information about connecting data users and setting up user impersonation.
: This guide provides a list of Spark environment variables used to configure the integration.
: This guide describes ephemeral overrides and how to configure them to reduce the risk that a user has overrides set to a cluster (or multiple clusters) that aren't currently up.
When you enable Unity Catalog, Immuta automatically migrates your existing Databricks data sources in Immuta to reference the legacy hive_metastore catalog to account for Unity Catalog's three-level hierarchy. New data sources will reference the Unity Catalog metastore you create and attach to your Databricks workspace.
Because the hive_metastore catalog is not managed by Unity Catalog, existing data sources in the hive_metastore cannot have Unity Catalog access controls applied to them. Data sources in the Hive Metastore must be managed by the Databricks Spark integration.
To allow Immuta to administer Unity Catalog access controls on that data, move the data to Unity Catalog and re-register those tables in Immuta by completing the steps below. If you don't move all data before configuring the integration, metastore magic will protect your existing data sources throughout the migration process.
Ensure that all Databricks clusters that have Immuta installed are stopped and the Immuta configuration is removed from the cluster. Immuta-specific cluster configuration is no longer needed with the Databricks Unity Catalog integration.
Move all data into Unity Catalog before configuring Immuta with Unity Catalog. Existing data sources will need to be re-created after they are moved to Unity Catalog and the Unity Catalog integration is configured.
.
Navigate to the App Settings page.
Scroll to the Global Integrations Settings section.
Opt to change the Role Prefix. Snowflake table grants creates a new Snowflake role for each Immuta user. To ensure these Snowflake role names do not collide with existing Snowflake roles, each Snowflake role created for Snowflake table grants requires a common prefix. When using multiple Immuta accounts within a single Snowflake account, the Snowflake table grants role prefix should be unique for each Immuta account. The prefix must adhere to and be less than 50 characters. Once the configuration is saved, the prefix cannot be modified; however, the Snowflake table grants feature can be disabled and re-enabled to change the prefix.
Finish configuring your integration by following one of these guidelines:
New Snowflake integration: Set up a new Snowflake integration by following the .
Existing Snowflake integration (automatic setup): You will be prompted to enter connection information for a Snowflake user. Immuta will execute the migration to Snowflake table grants using a connection established with this Snowflake user. The Snowflake user you provide here must have Snowflake privileges to run these .
Snowflake table grants private preview migration
To migrate from the private preview version of Snowflake table grants (available before September 2022) to the generally available version of Snowflake table grants, follow the steps in the .
Immuta is compatible with Snowflake Secure Data Sharing. Using both Immuta and Snowflake, organizations can share the policy-protected data of their Snowflake database with other Snowflake accounts with Immuta policies enforced in real time.
Prerequisites:
Required Permission: Immuta: GOVERNANCE
to fit your organization's compliance requirements.
It's important to understand that subscription policies are not relevant to Snowflake data shares, because the act of sharing the data is the subscription policy. Data policies can be enforced on the consuming account from the producer account on a share following these instructions.
Required Permission: Immuta: USER_ADMIN
To register the Snowflake data consumer in Immuta,
.
to match the account ID for the data consumer. This value is the output on the data consumer side when SELECT CURRENT_ACCOUNT() is run in Snowflake.
for your organization's policies.
Required Permission: Snowflake ACCOUNTADMIN
To share the policy-protected data source,
of the Snowflake table that has been registered in Immuta.
Grant reference usage on the Immuta database to the share you created:
Replace the content in angle brackets above with the name of your Immuta database and Snowflake data share.
In this integration, Immuta generates policy-enforced views in your configured Redshift schema for tables registered as Immuta data sources.
This guide outlines how to integrate Redshift with Immuta.
: Configure the integration in Immuta.
: Configure Redshift Spectrum in Immuta.
: This guide describes the design and components of the integration.
: This guide describes the prerequisites, supported features, and limitations of the integration.
This integration allows you to manage and access data in your Databricks account across all of your workspaces. With Immuta’s Databricks Unity Catalog integration, you can write your policies in Immuta and have them enforced automatically by Databricks across data in your Unity Catalog metastore.
This getting started guide outlines how to integrate Databricks Unity Catalog with Immuta.
: Migrate from the legacy Databricks Spark integrations to the Databricks Unity Catalog integration.
: This guide describes the design and components of the integration.
Immuta integrates with your data platforms so you can register your data and effectively manage access controls on that data.
This section includes concept, reference, and how-to guides for registering and managing data.
This section includes reference and how-to guides for configuring Immuta in order to manage data through a single connection between Immuta and your data platform.
This section covers concepts related to registering your data objects in Immuta as data sources.
A data source is how data owners expose their data across their organization to other Immuta users. Throughout this process, the data is not copied. Instead, Immuta uses metadata from the data source to determine how to expose the data. An Immuta data source is a virtual representation of data that exists in a remote data platform.
This section includes reference and how-to guides for registering and managing data sources.
This reference guide describes Immuta data sources and their major components.
These how-to guides illustrate how to register data in Immuta.
The guides in this section illustrate how to manage and edit data sources and data dictionaries.
The reference and how-to guides in this section describe schema monitoring and illustrate how to configure it for your integration.
This upgrade step is necessary if you meet both of the following criteria:
You have the Snowflake low row access policy mode enabled in private preview.
You have user impersonation enabled.
If you do not meet this criteria, follow the instructions on the .
To upgrade to the generally available version of the feature, on the app settings page and then re-enable it.
When a data source is exposed, policies are dynamically enforced on the data, appropriately redacting and masking information depending on the attributes or groups of the user accessing the data. Once the data source is exposed and subscribed to, the data can be accessed in a consistent manner, allowing reproducibility and collaboration.
This section includes how-to guides for registering data sources in Immuta:
This page describes the Azure Synapse Analytics integration, through which Immuta applies policies directly in Azure Synapse Analytics. For a tutorial on configuring Azure Synapse Analytics see the .
The Azure Synapse Analytics is a policy push integration that allows Immuta to apply policies directly in Azure Synapse Analytics Dedicated SQL pools without the need for users to go through a proxy. Instead, users can work within their existing Synapse Studio and have per-user policies dynamically applied at query time.
The how-to guides linked on this page illustrate how to integrate Databricks Spark with Immuta.
Requirements
If Databricks Unity Catalog is enabled in a Databricks workspace, you must use an when you set up the Databricks Spark integration to create an Immuta-enabled cluster.
If Databricks Unity Catalog is not enabled in your Databricks workspace, you must disable Unity Catalog in your Immuta tenant before proceeding with your configuration of Databricks Spark:
This page outlines how to enable access to DBFS in Databricks for non-sensitive data. Databricks administrators should place the desired configuration in the Spark environment variables.
This Databricks feature mounts DBFS to the local cluster filesystem at /dbfs. Although disabled when using process isolation, this feature can safely be enabled if raw, unfiltered data is not stored in DBFS and all users on the cluster are authorized to see each other’s files. When enabled, the entirety of DBFS essentially becomes a scratch path where users can read and write files in /dfbs/path/to/my/file
In the context of the Databricks Spark integration, Immuta uses the term ephemeral to describe data sources where the associated compute resources can vary over time. This means that the compute bound to these data sources is not fixed and can change. All Databricks data sources in Immuta are ephemeral.
Ephemeral overrides are specific to each data source and user. They effectively bind cluster compute resources to a data source for a given user. Immuta uses these overrides to determine which cluster compute to use when connecting to Databricks for various maintenance operations.
The operations that use the ephemeral overrides include
Visibility checks on the data source for a particular user. These checks assess how to apply row-level policies for specific users.
Delta Lake API reference guide
When using Delta Lake, the API does not go through the normal Spark execution path. This means that Immuta's Spark extensions do not provide protection for the API. To solve this issue and ensure that Immuta has control over what a user can access, the Delta Lake API is blocked.
Spark SQL can be used instead to give the same functionality with all of Immuta's data protections.
Below is a table of the Delta Lake API with the Spark SQL that may be used instead.
The how-to guides linked on this page illustrate how to integrate Databricks Unity Catalog with Immuta. See the for information about the Databricks Unity Catalog integration.
Requirements:
Unity Catalog and attached to a Databricks workspace. Immuta supports configuring a single metastore for each configured integration, and that metastore may be attached to multiple Databricks workspaces.
Unity Catalog enabled on your Databricks cluster or SQL warehouse. All SQL warehouses have Unity Catalog enabled if your workspace is attached to a Unity Catalog metastore.
The how-to guides linked on this page illustrate how to integrate Snowflake with Immuta. See the for information about the Snowflake integration.
Requirements
Snowflake enterprise edition
Access to a Snowflake account that can create a Snowflake user
Snowflake with low row access policy mode enabled will soon be required
Support for disabling this feature has been deprecated. You must have Snowflake low row access policy mode and enabled for your integration to continue working. Furthermore, (which require table grants to be disabled) will be unavailable. See the for EOL dates.
The Snowflake low row access policy mode improves query performance in Immuta's Snowflake integration by decreasing the number of Immuta creates and by using table grants to manage user access.
Immuta is compatible with . Using both Immuta and Snowflake, organizations can share the policy-protected data of their Snowflake database with other Snowflake accounts with Immuta policies enforced in real time. This integration gives data consumers a live connection to the data and relieves data providers of the legal and technical burden of creating static data copies that leave their Snowflake environment.
Requirements:
Snowflake Enterprise Edition or higher
Immuta's
Connections allow you to register your data objects in a technology through a single connection, making data registration more scalable for your organization. Instead of registering schema and databases individually, you can register them all at once and allow Immuta to monitor your data platform for changes so that data sources are added and removed automatically to reflect the state of data on your data platform.
Register a connection:
Connections are an improvement from the existing process for not only onboarding your data sources but also managing the integration. However, there are some differences between the two processes that should be noted and understood before you start with the upgrade.
API changes: See the for a complete breakdown of the APIs that will not work once you begin the upgrade. These changes will mostly affect users with automated API calls around schema monitoring and data source registration.
Automated data source names: Previously, you could name data sources manually. However, data sources from connections are automatically named using the information (database, schema, table) and casing from your data platform. For example, on Snowflake this will typically mean that my_table
If you have Snowflake low row access policy mode enabled in private preview and have impersonation enabled, see these . Otherwise, query performance will be negatively affected.
Click the App Settings icon in the sidebar and scroll to the Global Integration Settings section.
Select Apply Policies to push the cluster policies and init script again.
Click Save and Confirm to deploy your changes.
Manually update cluster policies
Download the init script and the new cluster policies to your local computer.
Click Save and Confirm to save your changes in Immuta.
Log in to your Databricks workspace with your administrator account to set up cluster policies.
Get the path you will upload the init script (immuta_cluster_init_script_proxy.sh) to by opening one of the cluster policy .json files and looking for the defaultValue of the field init_scripts.0.dbfs.destination. This should be a DBFS path in the form of dbfs:/immuta-plugin/hostname/immuta_cluster_init_script_proxy.sh.
Click Data in the left pane to upload your init script to DBFS to the path you found above.
To find your existing cluster policies you need to update, click Compute in the left pane and select the Cluster policies tab.
Edit each of these cluster policies that were configured before and overwrite the contents of the JSON with the new cluster policy JSON you downloaded.
Stats collection triggered by a specific user.
Validating a custom WHERE clause policy against a data source. When owners or governors create custom WHERE clause policies, Immuta uses compute resources to validate the SQL in the policy. In this case, the ephemeral overrides for the user writing the policy are used to contact a cluster for SQL validation.
High cardinality column detection. Certain advanced policy types (e.g., minimization) in Immuta require a high cardinality column, and that column is computed on data source creation. It can be recomputed on demand and, if so, will use the ephemeral overrides for the user requesting computation.
An ephemeral override request can be triggered when a user queries the securable corresponding to a data source in a Databricks cluster with the Spark plug-in configured. The actual triggering of this request depends on the configuration settings.
Ephemeral overrides can also be set for a data source in the Immuta UI by navigating to the data source page, clicking on the data source actions button, and selecting Ephemeral overrides from the dropdown menu.
Ephemeral override requests made from a cluster for data sources and users where ephemeral overrides were set in the UI will not be successful.
If ephemeral overrides are never set (either through the user interface or the cluster configuration), the system will continue to use the connection details directly associated with the data source, which are set during data source registration.
Ephemeral overrides can be problematic in environments that have a dedicated cluster to handle maintenance activities, since ephemeral overrides can cause these operations to execute on a different cluster than the dedicated one.
To reduce the risk that a user has overrides set to a cluster (or multiple clusters) that aren't currently up, complete one of the following actions:
Direct all clusters' HTTP paths for overrides to a cluster dedicated for metadata queries using the IMMUTA_EPHEMERAL_HOST_OVERRIDE_HTTPPATH Spark environment variable.
Disable ephemeral overrides completely by setting the IMMTUA_EPHEMERAL_HOST_OVERRIDE Spark environment variable to false.
Ephemeral overrides best practices
Disable ephemeral overrides for clusters when using multiple workspaces and dedicate a single cluster to serve queries from Immuta in a single workspace.
If you use multiple E2 workspaces without disabling ephemeral overrides, avoid applying the where user row-level policy to data sources.
Register a Snowflake connection: Register a connection with a Snowflake account and register the data objects within it.
Register a Databricks Unity Catalog connection: Register a connection with a Databricks Unity Catalog metastore and register the data objects within it.
Register a Trino connection: Register a connection with a Trino or Starburst cluster and register the data objects within it.
Manage a connection:
Manage connection settings: Change the object sync settings and manage user permissions for the connection.
Run object sync on a connection or object: Trigger object sync manually for the entire connection or a single object to sync your remote data platform objects with Immuta.
Use the connection upgrade manager: Complete the upgrade path from the existing integrations and data sources to a connection.
Connections reference guide: This reference guide discusses the major concepts, design, and settings of connections.
Upgrading to connections: This reference guide discusses the differences when upgrading from the existing integrations and data sources to a connection.
Click Data and select the Connections tab in the navigation menu.
Click the more actions menu for the connection you want and select Run Object Sync.
Opt to click the checkbox to Also scan all disabled data objects.
Click Run Object Sync.
Click Data and select the Connections tab in the navigation menu.
Select the connection.
Click the more actions menu in the Action column for the database you want to sync and select Run Object Sync.
Opt to click the checkbox to Also scan all disabled data objects.
Click Run Object Sync.
Click Data and select the Connections tab in the navigation menu.
Select the connection.
Select the database.
Click the more actions menu in the Action column for the schema you want to sync and select Run Object Sync.
Opt to click the checkbox to Also scan all disabled data objects.
Click Run Object Sync.
You can run object sync from the data source health check or from the connection,
Click Data and select the Connections tab in the navigation menu.
Select the connection.
Select the database.
Select the schema
Click the more actions menu in the Action column for the data object you want to sync and select Run Object Sync.
Opt to click the checkbox to Also scan all disabled data objects.
Click Run Object Sync
Run R and Scala spark-submit jobs on Databricks: Run R and Scala spark-submit jobs on your Databricks cluster.
DBFS access: Access DBFS in Databricks for non-sensitive data.
Troubleshooting: Resolve errors in the Databricks Spark configuration.
Accessing data: This guide provides an overview of how Databricks users access data registered in Immuta.
Existing Snowflake integration (manual setup): Immuta will display a link to a migration script you must run in Snowflake and a link to a rollback script for use in the event of a failed migration. Important: Execute the migration script in Snowflake before clicking Save on the app settings page.
This method requires that the data consumer account is registered as an Immuta user with the Snowflake user name equal to the consuming account.
At that point, the user that represents the account being shared with can have the appropriate attributes and groups assigned to them, relevant to the data policies that need to be enforced. Once that user has access to the share in the consuming account (not managed by Immuta), they can query the share with the data policies from the producer account enforced because Immuta is treating that account as if they are a single user in Immuta.
For a tutorial on this workflow, see the Using Snowflake Data Sharing page.
Using Immuta with Snowflake Data Sharing allows the sharer to
Only need limited knowledge of the context or goals of the existing policies in place: Because the sharer is not editing or creating policies to share their data, they only need a limited knowledge of how the policies work. Their main responsibility is making sure they properly represent the attributes of the data consumer (the account being shared to).
Leave policies untouched.
My Connection.MY_DATABASE.MY_SCHEMA.MY_TABLEIf you are leveraging Immuta APIs, you may need to adjust code to allow for the new data source names.
Schema projects phased out: With integrations, many settings and the connection info for data sources were controlled in the schema project. This functionality is no longer needed with connections and now you can control connection details in a central spot.
New hierarchy display: With integrations, tables were brought in as data sources and presented as a flat list on the data source list page. With connections, databases and schemas are displayed as objects too.
Change from schema monitoring to object sync: Object metadata synchronization between Immuta and your data platform is no longer optional but always required:
If schema monitoring is off before the upgrade: Once the connection is registered, everything the system user can see will be pulled into Immuta and, if it didn't already exist in Immuta, it will be a disabled object. These disabled objects exist so you can see them, but policy is not protecting the objects, and they will not appear as data sources.
If schema monitoring is on before the upgrade: Once the connection is registered, everything the system user can see will be pulled into Immuta. If it already existed in Immuta, it will be an enabled object and continue to appear as data source.
Enabling a connection will enable all databases, schemas, and tables in the hierarchy: If the connection is disabled after completing your upgrade to connections, only enable the host if you want to enable all databases, schemas, and tables within it.
Enabling a table that is ordinarily disabled will elevate it to a data source. Immuta will then apply data and subscription policies on that data source.
Click the Enable Snowflake Low Row Access Policy Mode checkbox to enable the feature.
Confirm to allow Immuta to automatically disable impersonation for the Snowflake integration. If you do not confirm, you will not be able to enable Snowflake low row access policy mode.
Click Save.
If you already have a Snowflake integration configured, you don't need to reconfigure your integration. Your Snowflake policies automatically refresh when you enable Snowflake low row access policy mode.
Configure your Snowflake integration. Note that you will not be able to enable project workspaces or user impersonation with Snowflake low row access policy mode enabled.
Click Save and Confirm your changes.
Starburst (Trino) integration configuration guide: Configure the integration in Immuta.
Map read and write access policies to Starburst (Trino) privileges: Configure how read and write access subscription policies translate to Starburst (Trino) privileges and apply to Starburst (Trino) data sources.
Trino connection reference guide: This guide describes the design and components of the integration when registered with a connection.
Starburst (Trino) integration reference guide: This guide describes the design and components of the integration.
DBFS FUSE mount limitation: This feature cannot be used in environments with E2 Private Link enabled.
For example,
In Python,
Note: This solution also works in R and Scala.
To enable the DBFS FUSE mount, set this configuration in the Spark environment variables: IMMUTA_SPARK_DATABRICKS_DBFS_MOUNT_ENABLED=true.
Mounting a bucket
Users can mount additional buckets to DBFS that can also be accessed using the FUSE mount.
Mounting a bucket is a one-time action, and the mount will be available to all clusters in the workspace from that point on.
Mounting must be performed from a non-Immuta cluster.
Scratch paths will work when performing arbitrary remote filesystem operations with fs magic or Scala dbutils.fs functions. For example,
To support %fs magic and Scala DBUtils with scratch paths, configure
To use dbutils in Python, set this configuration: immuta.spark.databricks.py4j.strict.enabled=false.
This section illustrates the workflow for getting a file from a remote scratch path, editing it locally with Python, and writing it back to a remote scratch path.
Get the file from remote storage:
Make a copy if you want to explicitly edit localScratchFile, as it will be read-only and owned by root:
Write the new file back to remote storage:
GRANT REFERENCE_USAGE ON DATABASE "<Immuta database of the provider account>" TO SHARE "<DATA_SHARE>";dbutils.fs.cp(s3ScratchFile, "file://{}".format(localScratchFile))shutil.copy(localScratchFile, localScratchFileCopy)
with open(localScratchFileCopy, "a") as f:
f.write("Some appended file content")dbutils.fs.cp("file://{}".format(localScratchFileCopy), s3ScratchFile)%sh echo "I'm creating a new file in DBFS" > /dbfs/my/newfile.txt%python
with open("/dbfs/my/newfile.txt", "w") as f:
f.write("I'm creating a new file in DBFS")%fs put -f s3://my-bucket/my/scratch/path/mynewfile.txt "I'm creating a new file in S3"
%scala dbutils.fs.put("s3://my-bucket/my/scratch/path/mynewfile.txt", "I'm creating a new file in S3")<property>
<name>immuta.spark.databricks.scratch.paths</name>
<value>s3://my-bucket/my/scratch/path</value>
</property>%python
import os
import shutil
s3ScratchFile = "s3://some-bucket/path/to/scratch/file"
localScratchDir = os.environ.get("IMMUTA_LOCAL_SCRATCH_DIR")
localScratchFile = "{}/myfile.txt".format(localScratchDir)
localScratchFileCopy = "{}/myfile_copy.txt".format(localScratchDir)Opt to check the Enable Impersonation box and customize the Impersonation Role name as needed. This will allow users to natively impersonate another user. Once you finish configuring the integration, you can grant the IMPERSONATE_USER permission to Immuta users. See the Managing users and permissions guide for instructions.
Opt to update the User Profile Delimiters. This will be necessary if any of the provided symbols are used in user profile information.
Username and Password: Enter the username and password in the Immuta System Account Credentials section. The username and password provided must be the credentials that were set in the bootstrap master script when you created the user.
Entra ID OAuth Client Secret: The values below can be found on the overview page of the application you created in Microsoft Entra ID. Before you enter this information, ensure you have completed the prerequisites for OAuth authentication listed above.
Display Name: This must match the name of the OAuth application you registered.
Tenant Id
Client Id
Client Secret: Enter the Value of the secret, not the secret ID.
Use the authentication method and credentials you provided when initially configuring the integration.
Click Save.
Click Save.
In this example, you would add the following Spark environment variable:
IMMUTA_SPARK_DATABRICKS_TRUSTED_LIB_URIS=maven:/com.github.immuta.hadoop.immuta-spark-third-party-maven-lib-test:2020-11-17-144644This integration works on a per-Dedicated-SQL-pool basis: all of Immuta's policy definitions and user entitlements data need to be in the same pool as the target data sources because Dedicated SQL pools do not support cross-database joins. Immuta creates schemas inside the configured Dedicated SQL pool that contain policy-enforced views that users query.
When the integration is configured, the Application Admin specifies the
Immuta database: This is the pre-existing database Immuta uses. Immuta will create views from the tables contained in this database, and all schemas and views created by Immuta will exist in this database, such as the schemas immuta_system, immuta_functions, and the immuta_procedures that contain the tables, views, UDFs, and stored procedures that support the integration.
Immuta schema: The schema that Immuta manages. All views generated by Immuta for tables registered as data sources will be created in this schema.
User profile delimiters: Since Azure Synapse Analytics dedicated SQL pools do not support array or hash objects, certain user access information is stored as delimited strings; the Application Admin can modify those delimiters to ensure they do not conflict with possible characters in strings.
For a tutorial on configuring the integration see the Azure Synapse Integration page.
Synapse data sources are represented as views and are under one schema instead of a database, so their view names are a combination of their schema and table name, separated by an underscore.
For example, with a configuration that uses IMMUTA as the schema in the database dedicated_pool, the view name for the data source dedicated_pool.tpc.case would be dedicated_pool.IMMUTA.tpc_case.
You can see the view information on the data source details page under Connection Information.
This integration uses webhooks to keep views up-to-date with the corresponding Immuta data sources. When a data source or policy is created, updated, or disabled, a webhook is called that creates, modifies, or deletes the dynamic view in the Immuta schema. Note that only standard views are available because Azure Synapse Analytics Dedicated SQL pools do not support secure views.
The status of the integration is visible on the integrations tab of the Immuta application settings page. If errors occur in the integration, a banner will appear in the Immuta UI with guidance for remediating the error.
The definitions for each status and the state of configured data platform integrations is available in the response schema of the integrations API. However, the UI consolidates these error statuses and provides detail in the error messages.
An Immuta Application Administrator configures the Azure Synapse Analytics integration, registering their initial Synapse Dedicated SQL pool with Immuta.
Immuta creates Immuta schemas inside the configured Synapse Dedicated SQL pool.
A Data Owner registers Azure Synapse Analytics tables in Immuta as data sources. A Data Owner, Data Governor, or Administrator creates or changes a policy or user in Immuta.
Data source metadata, tags, user metadata, and policy definitions are stored in Immuta's Metadata Database.
The Immuta Web Service calls a stored procedure that modifies the user entitlements or policies and updates data source view definitions as necessary.
An Azure Synapse Analytics user who is subscribed to the data source in Immuta in Azure Synapse Analytics and sees policy-enforced data.
Navigate to the App Settings page and click Integration Settings.
Uncheck the Enable Unity Catalog checkbox.
Click Save.
Connect your technology
These guides provide instructions for getting your data set up in Immuta.
: Use domains to segment your data and assign responsibilities to the appropriate team members. These domains will then be used in policies, audit, and identification.
Register your users
These guides provide instructions on setting up your users in Immuta.
: Connect the IAM your organization already uses and allow Immuta to register your users for you.
Add data metadata
These guides provide instructions on getting your data metadata set up in Immuta for use in policies.
: Connect the external catalog your organization already uses and allow Immuta to continually sync your tags with your data sources for you.
Protect and monitor data access
These guides provide instructions on authoring policies and auditing data access.
: Once you add your data metadata to Immuta, you can immediately create policies that utilize your tags and apply to your tables. Subscription policies can be created to dictate access to data sources.
DeltaTable.convertToDelta
CONVERT TO DELTA parquet./path/to/parquet/
DeltaTable.delete
DELETE FROM [table_identifier delta./path/to/delta/] WHERE condition
DeltaTable.generate
GENERATE symlink_format_manifest FOR TABLE [table_identifier delta./path/to/delta]
DeltaTable.history
DESCRIBE HISTORY [table_identifier delta./path/to/delta] (LIMIT x)
See here for a complete list of the Delta SQL Commands.
When a table is created in a project workspace, you can merge a different Immuta data source from that workspace into that table you created.
Create a temporary view of the Immuta data source you want to merge into that table.
Use that temporary view as the data source you add to the project workspace.
Run the following command:
Connect your technology
These guides provide instructions on getting your data set up in Immuta.
Register your Databricks Unity Catalog connection: Using a single setup process, connect Databricks Unity Catalog to Immuta. This will register your data objects into Immuta and allow you to start dictating access through global policies.
: Use domains to segment your data and assign responsibilities to the appropriate team members. These domains will then be used in policies, audit, and identification.
Connections are generally available on all 2025.1+ tenants. If you do not have connections enabled on your tenant, and using the legacy workflow.
Register your users
These guides provide instructions on getting your users set up in Immuta.
: Bring the IAM your organization already uses and allow Immuta to register your users for you.
Add data metadata
These guides provide instructions on getting your data metadata set up in Immuta.
: Bring the external catalog your organization already uses and allow Immuta to continually sync your tags with your data sources for you.
Start using the Governance app
These guides provide instructions on using the Governance app for the first time.
: Once you add your data metadata to Immuta, you can immediately create policies that utilize your tags and apply to your tables. Subscription policies can be created to dictate access to data sources.
Connect your technology
These guides provide instructions on getting your data set up in Immuta.
Register your Snowflake connection: Using a single setup process, connect Snowflake to Immuta. This will register your data objects into Immuta and allow you to start dictating access through global policies.
Organize your data sources into domains and assign domain permissions to accountable teams: Use domains to segment your data and assign responsibilities to the appropriate team members. These domains will then be used in policies, audit, and identification.
Connections are generally available on all 2025.1+ tenants. If you do not have connections enabled on your tenant, and using the legacy workflow.
Register your users
These guides provide instructions on getting your users set up in Immuta.
Connect an IAM: Bring the IAM your organization already uses and allow Immuta to register your users for you.
Map external user IDs from Snowflake to Immuta: Ensure the user IDs in Immuta, Snowflake, and your IAM are aligned so that the right policies impact the right users.
Add data metadata
These guides provide instructions on getting your data metadata set up in Immuta.
Connect an external catalog: Bring the external catalog your organization already uses and allow Immuta to continually sync your tags with your data sources for you.
: Identification allows you to automate data tagging using identifiers that detect certain data patterns.
Start using the Governance app
These guides provide instructions on using the Governance app for the first time.
Author a global subscription policy: Once you add your data metadata to Immuta, you can immediately create policies that utilize your tags and apply to your tables. Subscription policies can be created to dictate access to data sources.
: Data metadata can also be used to create data policies that apply to data sources as they are registered in Immuta. Data policies dictate what data a user can see once they are granted access to a data source. Using catalog and identification applied tags you can create proactive policies, knowing that they will apply to data sources as they are added to Immuta with the automated tagging.
: Once you have your data sources and users, and policies granting them access, you can set up audit export. This will export the audit logs from user queries, policy changes, and tagging updates.
Immuta manages access to Snowflake tables by administering Snowflake row access policies and column masking policies on those tables, allowing users to query them directly in Snowflake while policies are enforced.
Without Snowflake low row access policy mode enabled, row access policies are created and administered by Immuta in the following scenarios:
Table grants are disabled and a subscription policy that does not automatically subscribe everyone to the data source is applied. Immuta administers Snowflake row access policies to filter out all the rows to restrict access to the entire table when the user doesn't have privileges to query it. However, if table grants are disabled and a subscription policy is applied that grants everyone access to the data source automatically, Immuta does not create a row access policy in Snowflake. See the subscription policies page for details about these policy types.
Purpose-based policy is applied to a data source. A row access policy filters out all the rows of the table if users aren't acting under the purpose specified in the policy when they query the table.
Row-level security policy is applied to a data source. A row access policy filters out rows querying users don't have access to.
is enabled. A row access policy is created for every Snowflake table registered in Immuta.
Snowflake low row access policy mode is enabled by default to reduce the number of row access policies Immuta creates and improve query performance. Snowflake low row access policy mode requires
user impersonation to be disabled. User impersonation diminishes the performance of interactive queries because of the number of row access policies Immuta creates when it's enabled.
Project-scoped purpose exceptions for Snowflake integrations allow you to apply purpose-based policies to Snowflake data sources in a project. As a result, users can only access that data when they are working within that specific project.
This feature allows masked columns to be joined across data sources that belong to the same project. When data sources do not belong to a project, Immuta uses a unique salt per data source for hashing to prevent masked values from being joined. (See the Why use masked joins? guide for an explanation of that behavior.) However, once you add Snowflake data sources to a project and enable masked joins, Immuta uses a consistent salt across all the data sources in that project to allow the join.
For more information about masked joins and enabling them for your project, see the Masked joins section of documentation.
Project workspaces are not compatible with this feature.
Impersonation is not supported when the Snowflake low row access policy mode is enabled.
Private preview: The Amazon S3 integration is available to select accounts. Contact your Immuta representative for details.
Navigate to the My Data Sources page in Immuta.
Click New Data Source.
Select the S3 tile in the data platform section.
Select your AWS Account/Region from the dropdown menu.
Opt to select a to which data sources will be assigned.
Opt to add default tags to the data sources.
Click Next.
The prefix field is populated with the base path. Add to this prefix to create a data source for a prefix, bucket, or object.
If the data source prefix ends in a wildcard (*), it protects all items starting with that prefix. For example, a base location of s3:// and a data source prefix surveys/2024* would protect paths like s3://surveys/2024-internal/research-dept.txt or s3://surveys/2024-customer/april/us.csv.
Click Add Prefix, and then click Next.
Verify that your prefixes are correct and click Complete Setup.
This page describes the Azure Synapse integration, configuration options, and features. See the Azure Synapse integration page for a tutorial on enabling the integration and these features through the app settings page.
A running dedicated SQL pool
The Azure Synapse Analytics integration supports the following authentication methods to configure the integration and create data sources:
Username and password: Immuta supports SQL authentication with username and password for Azure Synapse Analytics. See the for details.
OAuth authentication with Microsoft Entra ID: You can use this authentication method to register data sources or configure the Azure Synapse Analytics integration using the . To use this authentication method, OAuth must be set up via . See the for details about using OAuth authentication with Microsoft Entra ID.
Immuta cannot ingest tags from Synapse, but you can connect any of these to work with your integration.
Impersonation allows users to query data as another Immuta user in Azure Synapse Analytics. To enable user impersonation, see the .
A user can to a single Immuta tenant.
Immuta does not support the following masking types in this integration because of limitations with dedicated SQL pools (linked below). Any column assigned one of these masking types will be masked to NULL:
Reversible Masking: Synapse UDFs currently only support SQL, but Immuta needs to execute code (such as JavaScript or Python) to support this masking feature. See the .
Format Preserving Masking: Synapse UDFs currently only support SQL, but Immuta needs to execute code (such as JavaScript or Python) to support this masking feature. See the .
Immuta offers two integrations for Databricks:
Databricks Unity Catalog integration: This integration supports working with database objects registered in Unity Catalog.
Databricks Spark integration: This integration supports working with database objects registered in the legacy Hive metastore.
To determine which integration you should use, evaluate the following elements:
Cluster runtime
Databricks Runtime 11.3 and newer: See the list below to determine which integration is supported for your data's location.
Location of data: Where is your data?
Databricks metastore magic allows you to migrate your data from the Databricks legacy Hive metastore to the Unity Catalog metastore while protecting data and maintaining your current processes in a single Immuta instance.
Databricks metastore magic is for organizations who intend to use the , but must still protect tables in the Hive metastore until they can migrate all of their data to Unity Catalog.
Unity Catalog support is enabled in Immuta.
Databricks has two built-in metastores that contain metadata about your tables, views, and storage credentials:
Legacy Hive metastore: Created at the workspace level. This metastore contains metadata of the registered securables in that workspace available to query.
Unity Catalog metastore: Created at the account level and is attached to one or more Databricks workspaces. This metastore contains metadata of the registered securables available to query. All clusters on that workspace use the configured metastore and all workspaces that are configured to use a single metastore share those securables.
Databricks allows you to use the legacy Hive metastore and the Unity Catalog metastore simultaneously. However, Unity Catalog does not support controls on the Hive metastore, so you must attach a Unity Catalog metastore to your workspace and move existing databases and tables to the attached Unity Catalog metastore to use the governance capabilities of Unity Catalog.
Immuta's Databricks Spark integration and Unity Catalog integration enforce access controls on the Hive and Unity Catalog metastores, respectively. However, because these metastores have two distinct security models, users were discouraged from using both in a single Immuta instance before metastore magic; the Databricks Spark integration and Unity Catalog integration were unaware of each other, so using both concurrently caused undefined behavior.
Metastore magic reconciles the distinct security models of the legacy Hive metastore and the Unity Catalog metastore, allowing you to use multiple metastores (specifically, the Hive metastore or alongside Unity Catalog metastores) within a Databricks workspace and single Immuta instance and keep policies enforced on all your tables as you migrate them. The diagram below shows Immuta enforcing policies on registered tables across workspaces.
In clusters A and D, Immuta enforces policies on data sources in each workspace's Hive metastore and in the Unity Catalog metastore shared by those workspaces. In clusters B, C, and E (which don't have Unity Catalog enabled in Databricks), Immuta enforces policies on data sources in the Hive metastores for each workspace.
With metastore magic, the Databricks Spark integration enforces policies only on data in the Hive metastore, while the Unity Catalog integration enforces policies on tables in the Unity Catalog metastore.
To enforce plugin-based policies on Hive metastore tables and Unity Catalog native controls on Unity Catalog metastore tables, enable the and the Databricks Unity Catalog integration. Note that some Immuta policies are not supported in the Databricks Unity Catalog integration. See the for details.
Databricks SQL cannot run the Databricks Spark plugin to protect tables, so Hive metastore data sources will not be policy enforced in Databricks SQL.
To enforce policies on data sources in Databricks SQL, use to manually lock down Hive metastore data sources and the Databricks Unity Catalog integration to protect tables in the Unity Catalog metastore. Table access control is enabled by default on SQL warehouses, and any Databricks cluster without the Immuta plugin must have table access control enabled.
Once a Databricks securable is registered in Immuta as a data source and you are subscribed to that data source, you must access that data through SQL:
df = spark.sql("select * from immuta.table")import org.apache.spark.sql.SparkSession
%sql
select * from immuta.tablelibrary(SparkR)
df <- SparkR::sql(With R, you must load the SparkR library in a cell before accessing the data.
See the sections below for more guidance on accessing data using Delta Lake, direct file reads in Spark for file paths, and user impersonation.
When using Delta Lake, the API does not go through the normal Spark execution path. This means that Immuta's Spark extensions do not provide protection for the API. To solve this issue and ensure that Immuta has control over what a user can access, the Delta Lake API is blocked.
Spark SQL can be used instead to give the same functionality with all of Immuta's data protections. See the for a list of corresponding Spark SQL calls to use.
In addition to supporting direct file reads through workspace and scratch paths, Immuta allows direct file reads in Spark for file paths. As a result, users who prefer to interact with their data using file paths or who have existing workflows revolving around file paths can continue to use these workflows without rewriting those queries for Immuta.
When reading from a path in Spark, the Immuta Databricks Spark plugin queries the Immuta Web Service to find Databricks data sources for the current user that are backed by data from the specified path. If found, the query plan maps to the Immuta data source and follows existing code paths for policy enforcement.
Users can read data from individual parquet files in a sub-directory and partitioned data from a sub-directory (or by using a where predicate). Expand the blocks below to view examples of reading data using these methods.
To read from an individual file, load a partition file from a sub-directory:
To read partitioned data from a sub-directory, load a parquet partition from a sub-directory:
Alternatively, load a parquet partition using a where predicate:
Direct file reads for Immuta data sources only apply to data sources created from tables, not data sources created from views or queries.
If more than one data source has been created for a path, Immuta will use the first valid data source it finds. It is therefore not recommended to use this integration when more than one data source has been created for a path.
In Databricks, multiple input paths are supported as long as they belong to the same data source.
User impersonation allows Databricks users to query data as another Immuta user. To impersonate another user, see the .
Once your data platform integration is configured, Immuta periodically runs queries in that data platform to orchestrate policies or implement various features. Depending on your configuration, data platform cost model, and data platform query load, there may be incremental cost incurred when various Immuta features are enabled. The actions and features that trigger Immuta queries in your remote platform are listed below.
Configuring an integration or registering a connection: Immuta uses compute resources to set up the integration in the data platform. After the integration is configured, Immuta runs periodic validation queries to ensure the integration is still healthy. By default, this simple SELECT query is run once per hour to validate that the credentials, connection information, and network configuration are all functional.
Registering data objects and data sources: Immuta uses compute resources to register data objects and data sources. If schema monitoring is enabled when registering a data source, Immuta uses the compute warehouse that was employed during the initial data source registration to periodically monitor the schema for changes. To adjust the schedule of the schema monitoring job to reduce cost, see the . Additionally, these actions will use compute resources:
Data object or data source disabled
Data object or data source enabled
Data object or data source deleted
Policy applied to a data source: Immuta uses compute resources to orchestrate policies in the data platform. Consider registering data before creating global policies. Immuta does not apply a subscription policy on registered data unless an existing global policy applies to it, which allows Immuta to only pull metadata instead of also applying policies when data sources are created. Registering data before policies are created reduces the workload and the compute resources needed; Immuta will only perform a grant for the user who registered the data source. The following actions that trigger updates to policies will also use compute resources:
External user ID modifications
Group name changes
Scheduled audit ingest or manually-triggered audit ingest (clicking the Load Audit Events button): Generally, the data platform cost from enabling query audits is directly related to warehouse uptime governed by the audit frequency and average query compute cost. During query audit retrieval, Immuta runs standard query operations (e.g., SELECT) against the system views and does not use other data transfer methods that incur additional data egress costs. For example, during query audit retrieval for Snowflake, Immuta will use the Snowflake warehouse that was configured during integration registration to query the Snowflake system views. If this warehouse is stopped, Immuta will start it.
: To evaluate your data, Immuta generates a SQL query to execute in the remote technology. The query result contains the column name and the matching identifiers, and Immuta applies tags to the appropriate columns.
This evaluating and tagging process occurs when identification runs, which happens from the following events:
A new data source is created.
is enabled and a new data source is detected.
The how-to guides linked on this page illustrate how to integrate Starburst (Trino) with Immuta. See the reference guide for information about the Starburst (Trino) integration.
Connect your technology
These guides provide instructions on getting your data set up in Immuta.
: Using a single setup process, connect Trino to Immuta. This will register your data objects into Immuta and allow you to start dictating access through global policies.
: Use domains to segment your data and assign responsibilities to the appropriate team members. These domains will then be used in policies, audit, and identification.
Connections are generally available on all 2026.1+ tenants. If you do not have connections enabled on your tenant, reach out to your Immuta support professional.
Register your users
These guides provide instructions on getting your users set up in Immuta.
: Bring the IAM your organization already uses and allow Immuta to register your users for you.
Add data metadata
These guides provide instructions on getting your data metadata set up in Immuta.
: Bring the external catalog your organization already uses and allow Immuta to continually sync your tags with your data sources for you.
Start using the Governance app
These guides provide instructions on using the Governance app for the first time.
: Once you add your data metadata to Immuta, you can immediately create policies that utilize your tags and apply to your tables. Subscription policies can be created to dictate access to data sources.
The warehouse you select when configuring the Snowflake integration uses compute resources to set up the integration, register data sources, orchestrate policies, and run jobs like identification. Snowflake credit charges are based on the size of and amount of time the warehouse is active, not the number of queries run.
This document prescribes how and when to adjust the size and scale of clusters for your warehouse to manage workloads so that you can use Snowflake compute resources the most cost effectively.
In general, increase the size of and number of clusters for the warehouse to handle heavy workloads and multiple queries. Workloads are typically lighter after data sources are onboarded and policies are established in Immuta, so compute resources can be reduced after those workloads complete.
The Snowflake integration uses warehouse compute resources to sync policies created in Immuta to the Snowflake objects registered as data sources and, if enabled, to run and . Follow the guidelines below to adjust the warehouse size and scale according to your needs.
Increase the of and of clusters for the warehouse during large policy syncs, updates, and changes.
Enable to optimize resource use in Snowflake. In the Snowflake UI, the lowest auto suspend time setting is 5 minutes. However, through SQL query, you can set auto_suspend to 61 seconds (since the minimum uptime for a warehouse is 60 seconds). For example,
Identification uses compute resources for each table it runs on. Consider when registering data sources if you have an
For more details and guidance about warehouse sizing, see the .
Even after your integration is configured, data sources are registered, and policies are established, changes to those data sources or policies may initiate heavy workloads. Follow the guidelines below to adjust your warehouse size and scale according to your needs.
Review your to identify query performance and bottlenecks.
Check how many credits queries have consumed:
After reviewing query performance and cost, implement to adjust your warehouse.
Immuta manages access to Snowflake tables by administering Snowflake row access policies and column masking policies on those tables, allowing users to query tables directly in Snowflake while dynamic policies are enforced.
This getting started guide outlines how to integrate your Snowflake account with Immuta.
: Migrate to using Snowflake table grants in your Snowflake integration.
: Manage integration settings or delete your existing Snowflake integration.
: This reference guide describes the design and features of the Snowflake integration.
: Organizations can share the policy-protected data of their Snowflake database with other Snowflake accounts with Immuta policies enforced in real time. This guide describes the components of using Immuta with Snowflake data shares.
: Snowflake column lineage specifies how data flows from source tables or columns to the target tables in write operations. When Snowflake lineage tag propagation is enabled in Immuta, Immuta automatically applies tags added to a Snowflake table to its descendant data source columns in Immuta so you can build policies using those tags to restrict access to sensitive data.
The how-to guides linked on this page illustrate how to integrate Redshift with Immuta. See the reference guide for information about the Redshift integration.
Requirement: Redshift cluster with an RA3 node is required for the multi-database integration. For other instance types, you may configure a single-database integration using one of the Redshift Spectrum options.
Connect your technology
These guides provide instructions on getting your data set up in Immuta.
: Configure a Redshift integration with Immuta so that Immuta can create policy protected views for your users to query.
: This will register your data objects into Immuta and allow you to start dictating access through global policies.
s: Use domains to segment your data and assign responsibilities to the appropriate team members. These domains will then be used in policies and identification.
Register your users
These guides provide instructions on getting your users set up in Immuta.
: Bring the IAM your organization already uses and allow Immuta to register your users for you.
Add data metadata
These guides provide instructions on getting your data metadata set up in Immuta.
: Bring the external catalog your organization already uses and allow Immuta to continually sync your tags with your data sources for you.
Start using the Governance app
These guides provide instructions on using the Governance app for the first time.
: Once you add your data metadata to Immuta, you can immediately create policies that utilize your tags and apply to your tables. Subscription policies can be created to dictate access to data sources.
Private preview: This feature is available to select accounts. Contact your Immuta representative for details.
Snowflake Enterprise Edition
Snowflake X-Large or Large warehouse is strongly recommended
Make a request to the Immuta V2 API , as the Immuta UI does not support creating more than 1000 data sources. The following options must be specified in your request to ensure the maximum performance benefits of bulk data source creation. The Skip Stats Job tag is only required if you are using ; otherwise, Snowflake data sources automatically skip the stats job.
Specifying disableSensitiveDataDiscovery as true ensures that will not be applied when the new data sources are created in Immuta, regardless of how it is configured for the Immuta tenant. Disabling identification improves performance during data source creation.
Applying the Skip Stats Job tag using the tableTag value will ensure that some jobs that are not vital to data source creation are skipped, specifically the fingerprint and high cardinality check jobs.
When the Snowflake bulk data source creation feature is configured, the create data source endpoint operates asynchronously and responds immediately with a bulkId that can be used for monitoring progress.
To monitor the progress of the background jobs for the bulk data source creation, make the following request using the bulkId from the response of the previous step:
The response will contain a list of job states and the number of jobs currently in each state. If errors were encountered during processing, a list of errors will be included in the response:
With these recommended configurations, bulk creating 100,000 Snowflake data sources will take between six and seven hours for all associated jobs to complete.
Private preview: This feature is available to select accounts. Contact your Immuta representative to enable this feature.
Contact your Immuta representative to enable this feature in your Immuta tenant.
Navigate to the App Setting page and click the Integration tab.
Click +Add Integration and select Snowflake from the dropdown menu.
Complete the Host, Port, and Default Warehouse fields.
.
The Snowflake lineage sync endpoint triggers the lineage ingestion job that allows Immuta to propagate Snowflake tags added through lineage to Immuta data sources.
Copy the example and replace the Immuta URL and API key with your own.
Change the payload attribute values to your own, where
tableFilter (string): This regular expression determines which tables Immuta will ingest lineage for. Enter a regular expression that excludes /
Once the sync job is complete, you can complete the following steps:
When the Databricks Spark plugin is running on a Databricks cluster, all Databricks users running jobs or queries are either a privileged user or a non-privileged user:
Privileged users: Privileged users can effectively read from and write to any table or view in the cluster Metastore, or any file path accessible by the cluster, without restriction. Privileged users are either or users specified in . Any user writing queries or jobs impersonating another user is a non-privileged user, even if they are impersonating a privileged user.
Privileged users have effective authority to read from and write to any securable in the cluster metastore or file path, because in almost all cases Databricks clusters running with the Immuta Spark plug-in installed have disabled . However, if Hive metastore table access control is enabled on the cluster, privileged users will have the authority granted to them that is specified by table access control.
Allow Immuta to create secure views of your external tables through one of these methods:
that contains the external tables: Instead of creating an immuta database that manages all schemas and views created when Redshift data is registered in Immuta, the integration adds the Immuta-managed schemas and views to an existing database in Redshift
and re-create all of your external tables in that database.
This page provides an overview of the Redshift integration in Immuta. For a tutorial detailing how to enable this integration, see the .
Redshift is a policy push integration that allows Immuta to apply policies directly in Redshift. This allows data analysts to query Redshift views directly instead of going through a proxy and have per-user policies dynamically applied at query time.
Snowflake with table grants enabled will soon be required
Support for disabling this feature has been deprecated. You must have table grants and enabled for your integration to continue working. Furthermore, (which require table grants to be disabled) will be unavailable. See the for EOL dates.
Snowflake table grants simplifies the management of privileges in Snowflake when using Immuta. Instead of having to manually grant users access to tables registered in Immuta, you allow Immuta to manage privileges on your Snowflake tables and views according to subscription policies. Then, users subscribed to a data source in Immuta can view and query the Snowflake table, while users who are not subscribed to the data source cannot view or query the Snowflake table.
To or a Snowflake integration, you have two options:
Automatic: Grant Immuta one-time use of credentials with the following privileges to automatically edit or remove the integration:
CREATE DATABASE ON ACCOUNT WITH GRANT OPTION
Connections allow you to register your data objects in a technology through a single connection, making data registration more scalable for your organization. Instead of registering schema and databases individually, you can register them all at once and allow Immuta to monitor your data platform for changes so that data sources are added and removed automatically to reflect the state of data on your data platform.
IMMUTA_SPARK_DATABRICKS_TRUSTED_LIB_URIS=maven:/my.group.id:my-package-id:1.2.3TrustedLibraryUtils: Successfully found all configured Immuta configured trusted libraries in Databricks.
TrustedLibraryUtils: Wrote trusted libs file to [/databricks/immuta/immutaTrustedLibs.json]: true.
TrustedLibraryUtils: Added trusted libs file with 1 entries to spark context.
TrustedLibraryUtils: Trusted library installation complete.IMMUTA_SPARK_DATABRICKS_TRUSTED_LIB_URIS=dbfs:/immuta/bstabile/jars/immuta-spark-third-party-lib-test.jarAutomatic table registration: All unregistered tables that the configured credentials have access to will be registered into Immuta in a disabled state. All tables and schemas under this connection with schema monitoring on will continue to be monitored with object sync.
Simplified table names: All data source names will now reflect the connection and hierarchy. If your tables were not already named this way, the names will be changed.
Fewer API endpoints: When this upgrade begins, a select number of data and integration API endpoints will be blocked for this connection and its tables. See the documentation, linked below, for a complete list of the impacted endpoints.
For a more in-depth look at the differences, see the Upgrading to a connection guide and Before you begin page.
Your integrations will continue to work throughout the upgrade process with zero downtime.
Post upgrade, some configuration options will now be part of the connection menu: credentials, enabling, and disabling. The Snowflake and Databricks Unity Catalog integrations will continue to be visible in the Integrations tab on the Immuta app settings page, but Trino integrations will only exist in connections.
Most likely, since there are a number of API changes in regard to data sources and integrations. See the API changes guide for details about each affected API endpoint and the substitute.
No, the Immuta system user still requires the same privileges in your data platform. See the Upgrading to a connection guide for more details.
Connections support upgrading from legacy Snowflake, Databricks Unity Catalog, or Trino technologies. See the Upgrading to a connection guide for more details and reach out to your Immuta support professional if you are interested in the upgrade.
Configure audit: Once you have your data sources and users, and policies granting them access, you can set up audit export. This will export the audit logs from user queries, policy changes, and tagging updates.
If the data source prefix ends without a wildcard (*), it protects a single object. For example, a base location path of s3:// and a data source prefix of research-data/demographics would only protect the object that exactly matches s3://research-data/demographics.
Regex: The built in string replace function does not support full regex. See the Synapse Documentation for details.
The delimiters configured when enabling the integration cannot be changed once they are set. To change the delimiters, the integration has to be disabled and re-enabled.
If the generated view name is more than 128 characters, then the view name is shortened to 128 characters. This could cause collisions between view names if the shortened version is the same for two different data sources.
For proper updates, the dedicated SQL pools have to be running when changes are made to users or data sources in Immuta.
❌
❌
✅
❌
✅
Policy modifications
Tags changing on data sources
User attributes changing
Users being added to or removed from groups
Column detection is enabled and new columns are detected. Here, identification will only run on new columns, and no existing tags will be removed or changed.
A user manually triggers identification to run from the data source health check menu, domain page, or through the API.

Legacy Hive metastore: Databricks recommends that you migrate all data from the legacy Hive metastore to Unity Catalog. However, when this migration is not possible, use the Databricks Spark integration to protect securables registered in the Hive metastore.
Unity Catalog: To protect securables registered in the Unity Catalog metastore, use the Databricks Unity Catalog integration.
Legacy Hive metastore and Unity Catalog: If you need to work with database objects registered in both the legacy Hive metastore and in Unity Catalog, metastore magic allows you to use both integrations.

Configure audit: Once you have your data sources and users, and policies granting them access, you can set up audit export. This will export the audit logs from user queries, policy changes, and tagging updates.
Configure audit: Once you have your data sources and users, and policies granting them access, you can set up audit export. This will export the audit logs from user queries, policy changes, and tagging updates.
Configure audit: Once you have your data sources and users, and policies granting them access, you can set up audit export. This will export the audit logs from policy changes and tagging updates.
CSV-backed tables are not currently supported.
Loading a delta partition from a sub-directory is not recommended by Spark and is not supported in Immuta. Instead, use a where predicate:
spark.read.format("parquet").load("s3:/my_bucket/path/to/my_parquet_table/partition_column=01/my_file.parquet")spark.read.format("parquet").load("s3:/my_bucket/path/to/my_parquet_table/partition_column=01")spark.read.format("parquet").load("s3:/my_bucket/path/to/my_parquet_table").where("partition_column=01")Read partitioned data from a sub-directoryDeltaTable.merge
MERGE INTO
DeltaTable.update
UPDATE [table_identifier delta./path/to/delta/] SET column = valueWHERE (condition)
DeltaTable.vacuum
VACUUM [table_identifier delta./path/to/delta]
Register data before creating global policies. Immuta does not apply a subscription policy on registered data unless an existing global policy applies to it, which allows Immuta to only pull metadata instead of also applying policies when data sources are created. Registering data before policies are created reduces the workload and the Snowflake compute resources needed.
Begin onboarding with a small dataset of tables, and then review and monitor query performance in the Snowflake Query Monitor. Adjust the virtual warehouse accordingly to handle heavier loads.
Schema monitoring uses the compute warehouse that was employed during the initial ingestion to periodically monitor the schema for changes. If you expect a low number of new tables or minimal changes to the table structure, consider scaling down the warehouse size.
Resize the warehouse after after data sources are registered and policies are established. For example,
Enable Query Audit.
Enable Lineage and complete the following fields:
Ingest Batch Sizes: This setting configures the number of rows Immuta ingests per batch when streaming Access History data from your Snowflake instance.
Table Filter: This filter determines which tables Immuta will ingest lineage for. Enter a regular expression that excludes / from the beginning and end to filter tables. Without this filter, Immuta will attempt to ingest lineage for every table on your Snowflake instance.
Tag Filter: This filter determines which tags to propagate using lineage. Enter a regular expression that excludes / from the beginning and end to filter tags. Without this filter, Immuta will ingest lineage for every tag on your Snowflake instance.
Select Manual or Automatic Setup and follow the steps in this guide to configure the Snowflake integration
batchSize (integer): This parameter configures the number of rows Immuta ingests per batch when streaming Access History data from your Snowflake instance. Minimum 1.
lastTimestamp (string): Setting this parameter will only return lineage events later than the value provided. Use a format like 2022-06-29T09:47:06.012-07:00.
Non-privileged users: Non-privileged users are any users who are not privileged users, and all authorization for non-privileged users is determined by Immuta policies.
Whether a user is a privileged user or a non-privileged user, for a given query or job, is cached once first determined, based on IMMUTA_SPARK_ACL_PRIVILEGED_TIMEOUT_SECONDS environment variable. This caching can be disabled entirely by setting the value of that environment variable to 0.
Usernames in Databricks must match the usernames in the connected Immuta tenant. By default, the Immuta Spark plugin checks the Databricks username against the username within Immuta's internal IAM to determine access. However, you can integrate your existing IAM with Immuta and use that instead of the default internal IAM. Ideally, you should use the same identity manager for Immuta that you use for Databricks. See the Immuta support matrix page for a list of supported identity providers and protocols.
It is possible within Immuta to have multiple users share the same username if they exist within different IAMs. In this case, the cluster can be configured to look up users from a specified IAM. To do this, the value of theIMMTUA_USER_MAPPING_IAMID Spark environment variable must be updated to be the targeted IAM ID configured within the Immuta tenant. The targeted IAM ID can be found on the App settings page. Each Databricks cluster can only be mapped to one IAM.
Databricks user impersonation allows a Databricks user to impersonate an Immuta user. With this feature,
the Immuta user who is being impersonated does not have to have a Databricks account, but they must have an Immuta account.
the Databricks user who is impersonating an Immuta user does not have to be associated with Immuta. For example, this could be a service account.
When acting under impersonation, the Databricks user loses their privileged access, so they can only access the tables the Immuta user has access to and only perform DDL commands when that user is acting under an allowed circumstance (such as workspaces, scratch paths, or non-Immuta reads/writes).
Use the IMMUTA_SPARK_DATABRICKS_ALLOWED_IMPERSONATION_USERS Spark environment variable to enable user impersonation.
Scala clusters
Immuta discourages use of this feature with Scala clusters, as the proper security mechanisms were not built to account for user isolation limitations in Scala clusters. Instead, this feature was developed for the BI tool use case in which service accounts connecting to the Databricks cluster need to impersonate Immuta users so that policies can be enforced.
Prevent users from changing impersonation user in a given session
If your BI tool or other service allows users to submit arbitrary SQL or issue SET commands, set IMMUTA_SPARK_DATABRICKS_SINGLE_IMPERSONATION_USER to true to prevent users from changing their impersonation user once it has been set for a given Spark session.
Audited queries include an impersonationUser field, which identifies the Databricks user impersonating the Immuta user:
# Not recommended by Spark and not supported in Immuta
spark.read.format("delta").load("s3:/my_bucket/path/to/my_delta_table/partition_column=01")
# Recommended by Spark and supported in Immuta.
spark.read.format("delta").load("s3:/my_bucket/path/to/my_delta_table").where("partition_column=01")
MERGE INTO delta_native.target_native as target
USING immuta_temp_view_data_source as source
ON target.dr_number = source.dr_number
WHEN MATCHED THEN
UPDATE SET target.date_reported = source.date_reportedALTER WAREHOUSE "WH_NAME" SET WAREHOUSE_SIZE = 'XSMALL' AUTO_SUSPEND = 61 AUTO_RESUME = TRUE MIN_CLUSTER_COUNT = 1 MAX_CLUSTER_COUNT = 2 SCALING_POLICY = 'STANDARD' COMMENT = '';ALTER WAREHOUSE "INTEGRATION_WH" SET WAREHOUSE_SIZE = 'XSMALL' AUTO_SUSPEND = 120 AUTO_RESUME = TRUE MIN_CLUSTER_COUNT = 1 MAX_CLUSTER_COUNT = 2 SCALING_POLICY = 'STANDARD'; SELECT h.* FROM "SNOWFLAKE"."ACCOUNT_USAGE"."QUERY_HISTORY" h
INNER JOIN "SNOWFLAKE"."ACCOUNT_USAGE"."SESSIONS" s
ON s.session_id = h.session_id
WHERE GET(parse_json(s.client_environment), 'APPLICATION') = 'IMMUTA' limit 25;"options": {
"disableSensitiveDataDiscovery": true,
"tableTags": [
"Skip Stats Job"
]
}curl \
--request POST \
--header "Content-Type: application/json" \
--header "Authorization: Bearer dea464c07bd07300095caa8" \
--data @example_payload.json
https://your-immuta-url.com/jobs?bulkId=<your-bulkId>{
"total":"99893",
"completed":"99892",
"failed":"0",
"pending":"1",
"errors":null
}curl -X 'POST' \
'https://www.organization.immuta.com/lineage/ingest/snowflake' \
-H 'accept: application/json' \
-H 'Content-Type: application/json' \
-H 'Authorization: 846e9e43c86a4ct1be14290d95127d13f' \
-d '{
"tableFilter": "MY_DATABASE\\MY_SCHEMA\\..*",
"batchSize": 1,
"lastTimestamp": "2022-06-29T09:47:06.012-07:00"
}'{
"id": "query-a20e-493e-id-c1ada0a23a26",
"dateTime": "1639684812845",
"month": 1463,
"profileId": 4,
"userId": "[email protected]",
"dataSourceId": 1,
"dataSourceName": "Hr Data",
"count": 1,
"recordType": "spark",
"success": true,
"component": "dataSource",
"accessType": "query",
"query": "Relation[id#2644,first_name#2645,last_name#2646,email#2647,gender#2648,race#2649,ssn#2650,dept#2651,job#2652,skills#2653,salary#2654,type#2655] parquet\n",
"extra": {
"databricksWorkspaceID": "0",
"maskedColumns": {},
"metastoreTables": [
"demo.hr_data"
],
"clusterName": "your-cluster-name",
"pathUris": [
"dbfs:/user/hive/warehouse/demo.db/hr_data"
],
"queryText": "select * from demo.hr_data limit 10;",
"queryLanguage": "sql",
"clusterID": "your-171358-cluster-id",
"impersonationUser": "[email protected]"
},
"dataSourceTableName": "demo_hr_data",
"createdAt": "2021-12-16T20:00:12.850Z",
"updatedAt": "2021-12-16T20:00:12.850Z"
}Enable Snowflake table grants: Enable Snowflake table grants and configure the Snowflake role prefix.
Use Snowflake data sharing with Immuta: Use Snowflake data sharing with table grants or project workspaces.
Snowflake low row access policy mode: Enable Snowflake low row access policy mode.
: Configure your Snowflake integration to automatically apply tags added to a Snowflake table to its descendant data source columns in Immuta.
Snowflake low row access policy mode: The Snowflake low row access policy mode improves query performance in Immuta's Snowflake integration. To do so, this mode decreases the number of Snowflake row access policies Immuta creates and uses table grants to manage user access. This guide describes the design and requirements of this mode.
Snowflake table grants: Snowflake table grants simplifies the management of privileges in Snowflake when using Immuta. Instead of manually granting users access to tables registered in Immuta, you allow Immuta to manage privileges on your Snowflake tables and views according to subscription policies. This guide describes the components of Snowflake table grants and how they are used in Immuta's Snowflake integration.
Warehouse sizing recommendations: Adjust the size and scale of clusters for your warehouse to manage workloads so that you can use Snowflake compute resources the most cost effectively.
A Redshift cluster with an AWS row-level security patch applied. Contact Immuta for guidance.
The enable_case_sensitive_identifier parameter must be set to false (default setting) for your Redshift cluster.
The Redshift role used to run the Immuta bootstrap script must have the following privileges when configuring the integration to
Use an existing database:
ALL PRIVILEGES ON DATABASE for the database you configure the integration with, as you must manage grants on that database.
.
Click the App Settings icon in the left sidebar.
Click the Integrations tab.
Click the +Add Integration button and select Redshift from the dropdown menu.
Complete the Host and Port fields.
Enter the name of the database you created the external schema in as the Immuta Database. This database will store all secure schemas and Immuta-created views.
Opt to check the Enable Impersonation box and customize the Impersonation Role name as needed. This will allow users to natively impersonate another user. Once you finish configuring the integration, you can grant the IMPERSONATE_USER permission to Immuta users. See the for instructions.
Select Manual and download both of the bootstrap scripts from the Setup section. The specified role used to run the bootstrap needs to have the following privileges:
ALL PRIVILEGES ON DATABASE for the database you configure the integration with, as you must manage grants on that database.
CREATE USER
Run the bootstrap script (Immuta database) in the Redshift database that contains the external schema.
Choose your authentication method, and enter the credentials from the bootstrap script for the Immuta_System_Account.
Click Save.
Click the App Settings icon in the left sidebar.
Click the Integrations tab.
Click the +Add Integration button and select Redshift from the dropdown menu.
Complete the Host and Port fields.
Enter an Immuta Database. This is a new database where all secure schemas and Immuta created views will be stored.
Opt to check the Enable Impersonation box and customize the Impersonation Role name as needed. This will allow users to natively impersonate another user. Once you finish configuring the integration, you can grant the IMPERSONATE_USER permission to Immuta users. See the for instructions.
Select Manual and download both of the bootstrap scripts from the Setup section. The specified role used to run the bootstrap needs to have the following privileges:
ALL PRIVILEGES ON DATABASE for the database you configure the integration with, as you must manage grants on that database.
CREATE DATABASE
Run the bootstrap script (initial database) in the Redshift initial database.
Run the bootstrap script (Immuta database) in the new Immuta Database in Redshift.
Choose your authentication method, and enter the credentials from the bootstrap script for the Immuta_System_Account.
Click Save.
Then, add your external tables to the Immuta database.
The Redshift integration will create views from the tables within the database specified when configured. Then, the user can choose the name for the schema where all the Immuta generated views will reside. Immuta will also create the schemas immuta_system, immuta_functions, and immuta_procedures to contain the tables, views, UDFs, and stored procedures that support the integration. Immuta then creates a system role and gives that system account the following privileges:
ALL PRIVILEGES ON DATABASE IMMUTA_DB
ALL PRIVILEGES ON ALL SCHEMAS IN DATABASE IMMUTA_DB
USAGE ON FUTURE PROCEDURES IN SCHEMA IMMUTA_DB.IMMUTA_PROCEDURES
USAGE ON LANGUAGE PLPYTHONU
Additionally the PUBLIC role will be granted the following privileges:
USAGE ON DATABASE IMMUTA_DB
TEMP ON DATABASE IMMUTA_DB
USAGE ON SCHEMA IMMUTA_DB.IMMUTA_PROCEDURES
USAGE ON SCHEMA IMMUTA_DB.IMMUTA_FUNCTIONS
USAGE ON FUTURE FUNCTIONS IN SCHEMA IMMUTA_DB.IMMUTA_FUNCTIONS
USAGE ON SCHEMA IMMUTA_DB.IMMUTA_SYSTEM
SELECT ON TABLES TO public
Immuta supports the Redshift integration as both multi-database and single-database integrations. In either integration type, Immuta supports a single integration with secure views in a single database per cluster.
If using a multi-database integration, you must use a Redshift cluster with an RA3 node because Immuta requires cross-database views.
If using a single-database integration, all Redshift cluster types are supported. However, because cross-database queries are not supported in any types other than RA3, Immuta's views must exist in the same database as the raw tables. Consequently, the steps for configuring the integration for Redshift clusters with external tables differ slightly from those that don't have external tables. Allow Immuta to create secure views of your external tables through one of these methods:
configure the integration with an existing database that contains the external tables: Instead of creating an immuta database that manages all schemas and views created when Redshift data is registered in Immuta, the integration adds the Immuta-managed schemas and views to an existing database in Redshift.
configure the integration by creating a new immuta database and re-create all of your external tables in that database.
SQL statements are used to create all views, including a join to the secure view: immuta_system.user_profile. This secure view is a select from the immuta_system.profile table (which contains all Immuta users and their current groups, attributes, projects, and a list of valid tables they have access to) with a constraint immuta__userid = current_user() to ensure it only contains the profile row for the current user. The immuta_system.user_profile view is readable by all users, but will only display the data that corresponds to the user executing the query.
The Redshift integration uses webhooks to keep views up-to-date with Immuta data sources. When a data source or policy is created, updated, or disabled, a webhook will be called that will create, modify, or delete the dynamic view. The immuta_system.profile table is updated through webhooks when a user's groups or attributes change, they switch projects, they acknowledge a purpose, or when their data source access is approved or revoked. The profile table can only be read and updated by the Immuta system account.
The status of the integration is visible on the integrations tab of the Immuta application settings page. If errors occur in the integration, a banner will appear in the Immuta UI with guidance for remediating the error.
The definitions for each status and the state of configured data platform integrations is available in the response schema of the integrations API. However, the UI consolidates these error statuses and provides detail in the error messages.
An Immuta Application Administrator configures the Redshift integration and registers Redshift warehouse and databases with Immuta.
Immuta creates a database inside the configured Redshift ecosystem that contains Immuta policy definitions and user entitlements.
A Data Owner registers Redshift tables in Immuta as data sources.
A Data Owner, Data Governor, or Administrator or user in Immuta.
Data source metadata, tags, user metadata, and policy definitions are stored in Immuta's Metadata Database.
The Immuta Web Service calls a stored procedure that modifies the user entitlements or policies.
A Redshift user who is subscribed to the data source in Immuta directly in Redshift through the immuta database and sees policy-enforced data.
Redshift Spectrum (Redshift external tables) allows Redshift users to query external data directly from files on Amazon S3. Because cross-database queries are not supported in Redshift Spectrum, Immuta's views must exist in the same database as the raw tables. Consequently, the steps for configuring the integration for Redshift clusters with external tables differ slightly from those that don't have external tables. Allow Immuta to create secure views of your external tables through one of these methods:
configure the integration with an existing database that contains the external tables: Instead of creating an immuta database that manages all schemas and views created when Redshift data is registered in Immuta, the integration adds the Immuta-managed schemas and views to an existing database in Redshift
configure the integration by creating a new immuta database and re-create all of your external tables in that database.
Once the integration is configured, Data Owners must register Redshift Spectrum data sources using the Immuta CLI or V2 API.
Enabling Snowflake table grants gives the following privileges to the Immuta Snowflake role:
MANAGE GRANTS ON ACCOUNT allows the Immuta Snowflake role to grant and revoke SELECT privileges on Snowflake tables and views that have been added as data sources in Immuta.
CREATE ROLE ON ACCOUNT allows for the creation of a Snowflake role for each user in Immuta, enabling fine-grained, attribute-based access controls to determine which tables are available to which individuals.
Since table privileges are granted to roles and not to users in Snowflake, Immuta's Snowflake table grants feature creates a new Snowflake role for each Immuta user. This design allows Immuta to manage table grants through fine-grained access controls that consider the individual attributes of users.
Each Snowflake user with an Immuta account will be granted a role that Immuta manages. The naming convention for this role is <IMMUTA>_USER_<username>, where
<IMMUTA> is the prefix you specified when enabling the feature on the Immuta app settings page.
<username> is the user's Immuta username.
Users are granted access to each Snowflake table or view automatically when they are subscribed to the corresponding data source in Immuta.
Users have two options for querying Snowflake tables that are managed by Immuta:
Use the role that Immuta creates and manages. (For example, USE ROLE IMMUTA_USER_<username>. See the section above for details about the role and name conventions.) If the current active primary role is used to query tables, USAGE on a Snowflake warehouse must be granted to the Immuta-managed Snowflake role for each user.
USE SECONDARY ROLES ALL, which allows users to use the privileges from all roles that they have been granted, including IMMUTA_USER_<username>, in addition to the current active primary role. Users may also set a value for DEFAULT_SECONDARY_ROLES as an object property on a Snowflake user. To learn more about primary roles and secondary roles in Snowflake, see .
Immuta uses an algorithm to determine the most optimal way to group users in a role hierarchy in order to optimize the number of GRANTs (or REVOKES) executed in Snowflake. This is done by determining the least amount of possible permutations of access across tables and users based on the policies in place; then, those become intermediate roles in the hierarchy that each user is added to, based on the intermediate roles they belong to.
As an example, take the below users and data sources they have access to. To do this naively by individually granting every user to the tables they have access to would result in 37 grants:
Conversely, using the Immuta algorithm, we can optimize the number of grants in the same scenario down to 29:
It’s important to consider a few things here:
If the permutations of access are small, there will be a huge optimization realized (very few intermediate roles). If every user has their own unique permutation of access, the optimization will be negligible (an intermediate role per user). It is most common that the number of permutations of access will be many multiples smaller than the actual user count, so there should be large optimizations. In other words, a much smaller number of intermediate roles and the number of total overall grants reduced, since the tables are granted to roles and roles to users.
This only happens once up front. After that, changes are incremental based on policy changes and user attribute changes (smaller updates), unless there’s a policy that makes a sweeping change across all users. The addition of new users who have access becomes much more straightforward also due to the fact above. User’s access will be granted via the intermediate role, and, therefore, a lot of the work is front loaded in the intermediate role creation.
Project workspaces are not supported when Snowflake table grants is enabled.
If an Immuta tenant is connected to an external IAM and that external IAM has a username identical to another username in Immuta's built-in IAM, those users will have the same Snowflake role, leading both to see the same data.
Sometimes the role generated can contain special characters such as @ because it's based on the user name configured from your identity manager. Because of this, it is recommended that any code references to the Immuta-generated role be enclosed with double quotes.
CREATE ROLE ON ACCOUNT WITH GRANT OPTION
CREATE USER ON ACCOUNT WITH GRANT OPTION
MANAGE GRANTS ON ACCOUNT WITH GRANT OPTION
Manual: Run the Immuta script in your Snowflake environment as a user with the following privileges to edit or remove the integration:
CREATE DATABASE ON ACCOUNT WITH GRANT OPTION
CREATE ROLE ON ACCOUNT WITH GRANT OPTION
CREATE USER ON ACCOUNT WITH GRANT OPTION
MANAGE GRANTS ON ACCOUNT WITH GRANT OPTION
APPLY MASKING POLICY ON ACCOUNT WITH GRANT OPTION
APPLY ROW ACCESS POLICY ON ACCOUNT WITH GRANT OPTION
Select one of the following options for editing your integration:
Click the App Settings icon in the navigation menu.
Click the Integrations tab and click the down arrow next to the Snowflake integration.
Edit the field you want to change or check a checkbox of a feature you would like to enable. Note any field shadowed is not editable, and the integration must be disabled and re-installed to change it.
From the Select Authentication Method Dropdown, select either Username and Password or Key Pair Authentication:
Username and Password option: Complete the Username, Password, and Role fields.
Key Pair Authentication option:
Click Save.
Click the App Settings icon in the navigation menu.
Click the Integrations tab and click the down arrow next to the Snowflake integration.
Edit the field you want to change or check a checkbox of a feature you would like to enable. Note any field shadowed is not editable, and the integration must be disabled and re-installed to change it.
Click edit script to download the script, and then run it in Snowflake.
Click Save.
Select one of the following options for deleting your integration:
Click the App Settings icon in the navigation menu.
Click the Integrations tab and click the down arrow next to the Snowflake integration.
Click the checkbox to disable the integration.
Enter the Username, Password, and Role that was entered when the integration was configured.
Click Save.
Cleaning up your Snowflake environment Until you manually run the cleanup script in your Snowflake environment, Immuta-managed roles and Immuta policies will still exist in Snowflake.
Click the App Settings icon in the navigation menu.
Click the Integrations tab and click the down arrow next to the Snowflake integration.
Click the checkbox to disable the integration.
Click cleanup script to download the script.
Click Save.
Run the cleanup script in Snowflake.
This may take time to complete with a large number of child objects.
When enabling a parent object, this is limited to parent objects with under 100,000 child objects.
You can check the status of the job with the gear icon in the UI, which will be spinning if jobs are active, or use the bulkId to call the /jobs API.
Click Data in the navigation menu and select Connections.
Navigate to the connection and go to the level of data object you want to change the status of.
Go to the Settings tab and change the Data Object switch to the status you want:
Disable: The data object will be disabled until manually changed. Policies will not impact the data object.
Enable: The data object will be enabled until manually changed. If the data object is also a data source, policies will impact the data source.
Inherit: The data object will automatically inherit the status of the parent data object. So if it is a table data object, it will inherit the status of the parent schema data object.
Review your changes and click Save Changes.
To update the status using the API, see the Connections API guide.
Databricks Unity Catalog behavior
If you enable a data object and it has no subscription policy set on it, Immuta will REVOKE access to the data in Databricks for all Immuta users, even if they had been directly granted access to the table in Unity Catalog.
If you disable a Unity Catalog data source in Immuta, all existing grants and policies on that object will be removed in Databricks for all Immuta users. All existing grants and policies will be removed, regardless of whether they were set in Immuta or in Unity Catalog directly.
If a user is not registered in Immuta, Immuta will have no effect on that user's access to data in Unity Catalog.
See the for more details.
Click Data in the navigation menu and select Connections.
Navigate to the connection and go to the level of data object you want to change the settings of.
Go to the Settings tab and change the Object Sync switch to the status you want:
Disable: All new data objects found within this data object will be registered in a disabled state. Policies will not impact disabled objects.
Enable: All new data objects found within this data object will be registered in an enabled state. If the data object is also a data source, policies will impact the data source.
Inherit: All new data objects found within the data object will be registered as the same status as the data object.
Review your changes and click Save Changes.
To update the status using the API, see the Connections API guide.
Databricks Unity Catalog behavior
If you enable a data object and it has no subscription policy set on it, Immuta will REVOKE access to the data in Databricks for all Immuta users, even if they had been directly granted access to the table in Unity Catalog.
If you disable a Unity Catalog data source in Immuta, all existing grants and policies on that object will be removed in Databricks for all Immuta users. All existing grants and policies will be removed, regardless of whether they were set in Immuta or in Unity Catalog directly.
If a user is not registered in Immuta, Immuta will have no effect on that user's access to data in Unity Catalog.
See the for more details.
Click Data in the navigation menu and select Connections.
Navigate to the connection and go to the level of data object you want to assign permissions to.
Go to the Permissions tab and click + Add Permissions.
Choose how to assign the permission:
Individual Users: Select this option from the dropdown and then search for individual users to grant the permission to.
Users in Group: Select this option from the dropdown and then search for groups to grant the permission to.
Choose the permission to assign:
Data Owner permission to allow them to manage a data object and its child objects.
Review your changes and click Grant Permissions.
To assign permissions using the API, see the Connections API guide.
This guide illustrates how to run R and Scala spark-submit jobs on Databricks, including prerequisites and caveats.
spark-submitBefore you can run spark-submit jobs on Databricks, complete the following steps.
Initialize the Spark session:
Enter these settings into the R submit script to allow the R script to access Immuta data sources, scratch paths, and workspace tables: immuta.spark.acl.assume.not.privileged="true" and spark.hadoop.immuta.databricks.config.update.service.enabled="false".
spark submit JobTo create the R spark-submit job,
Go to the Databricks jobs page.
Create a new job, and select Configure spark-submit.
Set up the parameters:
Note: The path dbfs:/path/to/script.R
Before you can run spark-submit jobs on Databricks you must initialize the Spark session with the settings outlined below.
Configure the Spark session with immuta.spark.acl.assume.not.privileged="true" and spark.hadoop.immuta.databricks.config.update.service.enabled="false".
Note: Stop your Spark session (spark.stop()) at the end of your job or the cluster will not terminate.
The spark submit job needs to be launched using a different classloader which will point at the designated user JARs directory. The following Scala template can be used to handle launching your submit code using a separate classloader:
spark-submit JobTo create the Scala spark-submit job,
Build and upload your JAR to dbfs/S3/ABFS where the cluster has access to it.
Select Configure spark-submit, and configure the parameters:
Note: The fully-qualified class name of the class whose main function will be used as the entry point for your code in the --class parameter.
The user mapping works differently from notebooks because spark-submit clusters are not configured with access to the Databricks SCIM API. The cluster tags are read to get the cluster creator and match that user to an Immuta user.
Privileged users (Databricks admins and allowlisted users) must be tied to an Immuta user and given access through Immuta to access data through spark-submit jobs because the setting immuta.spark.acl.assume.not.privileged="true" is used.
Immuta offers several features to provide security for your users and Databricks clusters and to prove compliance and monitor for anomalies.
Immuta supports the following authentication methods to configure the Databricks Spark integration and register data sources:
OAuth machine-to-machine (M2M): Immuta uses the to integrate with , which allows Immuta to authenticate with Databricks using a client secret. Once Databricks verifies the Immuta service principal’s identity using the client secret, Immuta is granted a temporary OAuth token to perform token-based authentication in subsequent requests. When that token expires (after one hour), Immuta requests a new temporary token. See the for more details.
Personal access token (PAT): This token gives Immuta temporary permission to push the cluster policies to the configured Databricks workspace and overwrite any cluster policy templates previously applied to the workspace when configuring the integration or to register securables as Immuta data sources.
The built-in Immuta IAM can be used as a complete solution for authentication and fine-grained user entitlement. However, you can connect your existing identity management provider to Immuta to use that system for authentication and fine-grained user entitlement instead.
Each of the supported identity providers includes a specific set of configuration options that enable Immuta to communicate with the IAM system and map the users, permissions, groups, and attributes into Immuta.
See the guide for a list of supported providers and details.
See the for details and instructions on mapping Databricks user accounts to Immuta.
See the for more information about transmission of policy decision data, encryption of data in transit and at rest, and encryption key management.
Non-administrator users on an Immuta-enabled Databricks cluster must not have access to view or modify Immuta configuration, as this poses a security loophole around Immuta policy enforcement. allow you to securely apply environment variables to Immuta-enabled clusters.
Databricks secrets can be used in the environment variables configuration section for a cluster by referencing the secret path instead of the actual value of the environment variable.
See the for details and instructions on using Databricks secrets.
There are limitations to isolation among users in Scala jobs on a Databricks cluster. When data is broadcast, cached (spilled to disk), or otherwise saved to SPARK_LOCAL_DIR, it's impossible to distinguish between which user’s data is composed in each file/block. To address this vulnerability, Immuta suggests that you
limit Scala clusters to Scala jobs only and
require equalized projects, which will force all users to act under the same set of attributes, groups, and purposes with respect to their data access. This requirement guarantees that data being dropped into SPARK_LOCAL_DIR will have policies enforced and that those policies will be homogeneous for all users on the cluster. Since each user will have access to the same data, if they attempt to manually access other users' cached/spilled data, they will only see what they have access to via equalized permissions on the cluster. If project equalization is not turned on, users could dig through that directory and find data from another user with heightened access, which would result in a data leak.
See the for more details and configuration instructions.
Immuta provides auditing features and governance reports so that data owners and governors can monitor users' access to data and detect anomalies in behavior.
You can view the information in these audit logs on or for long-term backup and processing with log data processors and tools. This capability fosters convenient integrations with log monitoring services and data pipelines.
Immuta captures the code or query that triggers the Spark plan in Databricks, making audit records more useful in assessing what users are doing.
To audit what triggers the Spark plan, Immuta hooks into Databricks where notebook cells and JDBC queries execute and saves the cell or query text. Then, Immuta pulls this information into the audits of the resulting Spark jobs.
Immuta will audit queries that come from interactive notebooks, notebook jobs, and JDBC connections, but will not audit . Furthermore, Immuta only audits Spark jobs that are associated with Immuta tables. Consequently, Immuta will not audit a query in a notebook cell that does not trigger a Spark job, unless
See the page for examples of saved queries and the resulting audit records. To exclude query text from audit events, see the page.
Immuta supports auditing all queries run on a Databricks cluster, regardless of whether users touch Immuta-protected data or not.
See the for details and instructions.
When a query is run by a user impersonating another user, the extra.impersonationUser field in the audit log payload is populated with the Databricks username of the user impersonating another user. The userId field will return the Immuta username of the user being impersonated:
See the for details about user impersonation.
Immuta governance reports allow users with the GOVERNANCE Immuta permission to use a natural language builder to instantly create reports that delineate user activity across Immuta. These reports can be based on various entity types, including users, groups, projects, data sources, purposes, policy types, or connection types.
See the page for a list of report types and guidance.
This page illustrates how to configure the Redshift integration on the Immuta app settings page. To configure this integration via the Immuta API, see the Integrations API getting started guide.
For instructions on configuring Redshift Spectrum, see the Redshift Spectrum guide.
A Redshift cluster with an RA3 node is required for the multi-database integration. You must use a Redshift RA3 instance type because Immuta requires cross-database views, which are only supported in Redshift RA3 instance types. For other instance types, you may configure a single-database integration using one of the .
For automated installations, the credentials provided must be a Superuser or have the ability to create databases and users and modify grants.
The must be set to false (default setting) for your Redshift cluster.
Click the App Settings icon in the left sidebar.
Click the Integrations tab.
Click the +Add Integration button and select Redshift from the dropdown menu.
You have two options for configuring your Redshift environment:
: Grant Immuta one-time use of credentials to automatically configure your Redshift environment and the integration.
: Run the Immuta script in your Redshift environment yourself to configure your environment and the integration.
Immuta requires temporary, one-time use of credentials with specific privileges
When performing an automated installation, Immuta requires temporary, one-time use of credentials with the following privileges:
CREATE DATABASE
Select Automatic.
Enter an Initial Database from your Redshift integration for Immuta to use to connect.
Use the dropdown menu to select your Authentication Method.
Required privileges
The specified role used to run the bootstrap needs to have the following privileges:
CREATE DATABASE
Select Manual and download both of the bootstrap scripts from the Setup section.
Run the bootstrap script (initial database) in the Redshift initial database.
Run the bootstrap script (Immuta database) in the new Immuta Database in Redshift.
Click Save.
.
Click the App Settings icon in the left sidebar.
Navigate to the Integrations tab and click the down arrow next to the Redshift Integration.
Edit the field you want to change. Note any field shadowed is not editable, and the integration must be disabled and re-installed to change it.
Required privileges
When performing edits to an integration, Immuta requires temporary, one-time use of credentials of a Superuser or a user with the following permissions:
Create Databases
Disabling Redshift Spectrum
Disabling the Redshift integration is not supported when you set the fields nativeWorkspaceName, nativeViewName, and nativeSchemaName to Disabling the integration when these fields are used in metadata ingestion causes undefined behavior.
Click the App Settings icon in the left sidebar.
Navigate to the Integrations tab and click the down arrow next to the Redshift Integration.
Click the checkbox to disable the integration.
Connections allow you to register your data objects in a technology through a single connection, instead of registering data sources and an integration separately.
This feature is available to all 2025.1+ tenants. Contact your Immuta representative to enable this feature.
APPLICATION_ADMIN Immuta permission
The Snowflake user registering the connection and running the script must have the following privileges:
CREATE DATABASE ON ACCOUNT WITH GRANT OPTION
No Snowflake integration configured in Immuta. If your Snowflake integration is already configured on the app settings page, follow the .
Complete the following actions in Snowflake:
. Immuta will use this system account continuously to orchestrate Snowflake policies and maintain state between Immuta and Snowflake.
with a minimum of the following privileges:
USAGE on all databases and schemas with registered data sources.
To register a Snowflake connection, follow the instructions below.
Click Data and select the Connections tab in the navigation menu.
Click the + Add Connection button.
Select the Snowflake data platform tile.
This page describes the Redshift integration, configuration options, and features. For a tutorial to enable this integration, see the installation guide.
For automated installations, the credentials provided must be a Superuser or have the ability to create databases and users and modify grants.
Redshift datashares
Redshift Serverless
For configuration and data source registration instructions, see the .
The Redshift integration supports the following authentication methods to configure the integration and create data sources:
Username and Password: Users can authenticate with their Redshift username and password.
AWS Access Key: Users can authenticate with an .
Immuta cannot ingest tags from Redshift, but you can connect any of these to work with your integration.
Required Redshift privileges
Setup User:
OWNERSHIP ON GROUP IMMUTA_IMPERSONATOR_ROLE
Impersonation allows users to query data as another Immuta user in Redshift. To enable user impersonation, see the .
Users can enable multiple with a single Immuta tenant.
The host of the data source must match the host of the connection for the view to be created.
When using multiple Redshift integrations, a user has to have the same user account across all hosts.
Case sensitivity of database, table, and column identifiers is not supported. The must be set to false (default setting) for your Redshift cluster to configure the integration and register data sources.
For most policy types in Redshift, Immuta uses SQL clauses to implement enforcement logic; however Immuta uses Python UDFs in the Redshift integration to implement the following masking policies:
Masking using a regular expression
Reversible masking
Format-preserving masking
Randomized response
The number of Python UDFs that can run concurrently per Redshift cluster is limited to one-fourth of the total concurrency level for the cluster. For example, if the Redshift cluster is configured with a concurrency of 15, a maximum of three Python UDFs can run concurrently. After the limit is reached, Python UDFs are queued for execution within workload management queues.
The SVL_QUERY_QUEUE_INFO view in Redshift, which is visible to a Redshift superuser, summarizes details for queries that spent time in a workload management (WLM) query queue. Queries must be completed in order to appear as results in the SVL_QUERY_QUEUE_INFO view.
If you find that queries on Immuta-built views are spending time in the workload management (WLM) query queue, you should either edit your Redshift cluster configuration to increase concurrency, or use fewer of the masking policies which leverage Python UDFs. For more information on increasing concurrency, see the Redshift docs on implementing .
Data owners expose their data across their organization to other users by registering that data in Immuta as a data source. When data is registered, Immuta does not affect existing policies on those tables in the remote system (unless an existing global policy in Immuta applies to the data source), so users who had access to a table before it was registered can still access that data without interruption.
When data sources support nested columns, these columns get parsed into a nested Data Dictionary. Below is a list of data sources that support nested columns:
S3
Azure Blob
Databricks sources with
When complex types are enabled, Databricks data sources can have columns that are arrays, maps, or structs that can be nested.
There are various roles users and groups can play relating to each data source. These roles are managed through the members tab of the data source. Roles include the following types:
Owners: Those who create and manage new data sources and their users, documentation, and .
Subscribers: Those who have access to the data source data. With the appropriate data accesses and attributes, these users and groups can view files, run queries, and generate analytics against the data source data. All users and groups granted access to a data source have subscriber status.
Experts: Those who are knowledgeable about the data source data and can elaborate on it. They are responsible for managing the data source's documentation and tags and descriptions.
See for a tutorial on modifying user roles.
The data dictionary provides information about the columns within the data source, including column names and value types.
Dictionary columns are automatically generated when the data source is created. However, data owners and experts can and .
The data dictionary displays icons on columns that have a masking policy applied to them. The appearance of these icons varies depending on the permission of the user.
Governors and data owners
If you have the GOVERNANCE permission or are the data source owner, the data dictionary column icons will appear in these ways:
No icon: No masking policy applies to the column.
Yellow eye: A masking policy applies to the column, but the column is unmasked for the current user because they meet the exception criteria for the policy.
Red eye: A policy on the column masks it for the current user.
All other users
The data dictionary column icons will appear in these ways for all other users:
No icon: Either no masking policy applies to the column or a masking policy applies to the column, but the column is unmasked for the current user because they meet the exception criteria for the policy.
Red eye: A policy on the column masks it for the current user.
The following events related to data sources are audited and can be found on the audit page in the UI:
: A data source is created.
: A data source is deleted.
: A data source is disabled.
Complete the Username field.
When using a private key, enter the private key file password in the Additional Connection String Options. Use the following format: PRIV_KEY_FILE_PWD=<your_pw>
Click Key Pair (Required), and upload a Snowflake key pair file.
Complete the Role field.
CREATE USERGRANT TEMP ON DATABASE
Create a new database:
CREATE DATABASE
CREATE USER
GRANT TEMP ON DATABASE
REVOKE ALL PRIVILEGES ON DATABASE
GRANT TEMP ON DATABASE
CREATE USER
GRANT TEMP ON DATABASE
Enter an Immuta Database. This is a new database where all secure schemas and Immuta created views will be stored.
Opt to check the Enable Impersonation box and customize the Impersonation Role name as needed. This will allow users to natively impersonate another user. Once you finish configuring the integration, you can grant the IMPERSONATE_USER permission to Immuta users. See the Managing users and permissions guide for instructions.
CREATE USER
REVOKE ALL PRIVILEGES ON DATABASE
GRANT TEMP ON DATABASE
MANAGE GRANTS ON ACCOUNT
These privileges will be used to create and configure a new IMMUTA database within the specified Redshift instance. The credentials are not stored or saved by Immuta, and Immuta doesn’t retain access to them after initial setup is complete.
You can create a new account for Immuta to use that has these privileges, or you can grant temporary use of a pre-existing account. By default, the pre-existing account with appropriate privileges is a Superuser. If you create a new account, it can be deleted after initial setup is complete.
Alternatively, you can create the IMMUTA database within the specified Redshift instance without giving Immuta user credentials for a Superuser using the manual setup option.
Username and Password: Enter the Username and Password of the privileged user.
AWS Access Key: Enter the Database User, Access Key ID, and Secret Key. Opt to enter in the Session Token.
CREATE USER
REVOKE ALL PRIVILEGES ON DATABASE
GRANT TEMP ON DATABASE
MANAGE GRANTS ON ACCOUNT
Choose your authentication method, and enter the information of the newly created account.
Enter Username and Password.
Click Save.
Modify grants
Alternatively, you can download the Edit Script from your Redshift configuration on the Immuta app settings page and run it in Redshift.
Click Save.
CREATE GROUP
Immuta System Account:
GRANT EXECUTE ON PROCEDURE grant_impersonation
GRANT EXECUTE ON PROCEDURE revoke_impersonation
❌
❌
✅
❌
✅
DatasourceAppliedToProject: A data source is added to a project.
DatasourceRemovedFromProject: A data source is removed from a project.
DatasourceCatalogSynced: An external catalog is linked and synced for the data source.
DatasourceGlobalPolicyApplied: A global policy is applied to a data source.
DatasourceGlobalPolicyConflictResolved: A policy conflict between two global policies on a data source is resolved.
DatasourceGlobalPolicyDisabled: A global policy is disabled on a data source.
DatasourceGlobalPolicyRemoved: A global policy is removed from a data source.
LocalPolicyCreated: A local policy is created on a data source.
LocalPolicyUpdated: A local policy is updated on a data source.
SubscriptionCreated: A user is subscribed to a data source or project.
SubscriptionDeleted: A user's subscription to a data source or project is removed.
SubscriptionRequestApproved: A user's request to subscribe to a data source or project is approved.
SubscriptionRequestDenied: A user's request to subscribe to a data source or project is denied.
SubscriptionRequested: A user requests to subscribe to a data source or project.
SubscriptionUpdated: A user's subscription to a data source or project is updated.
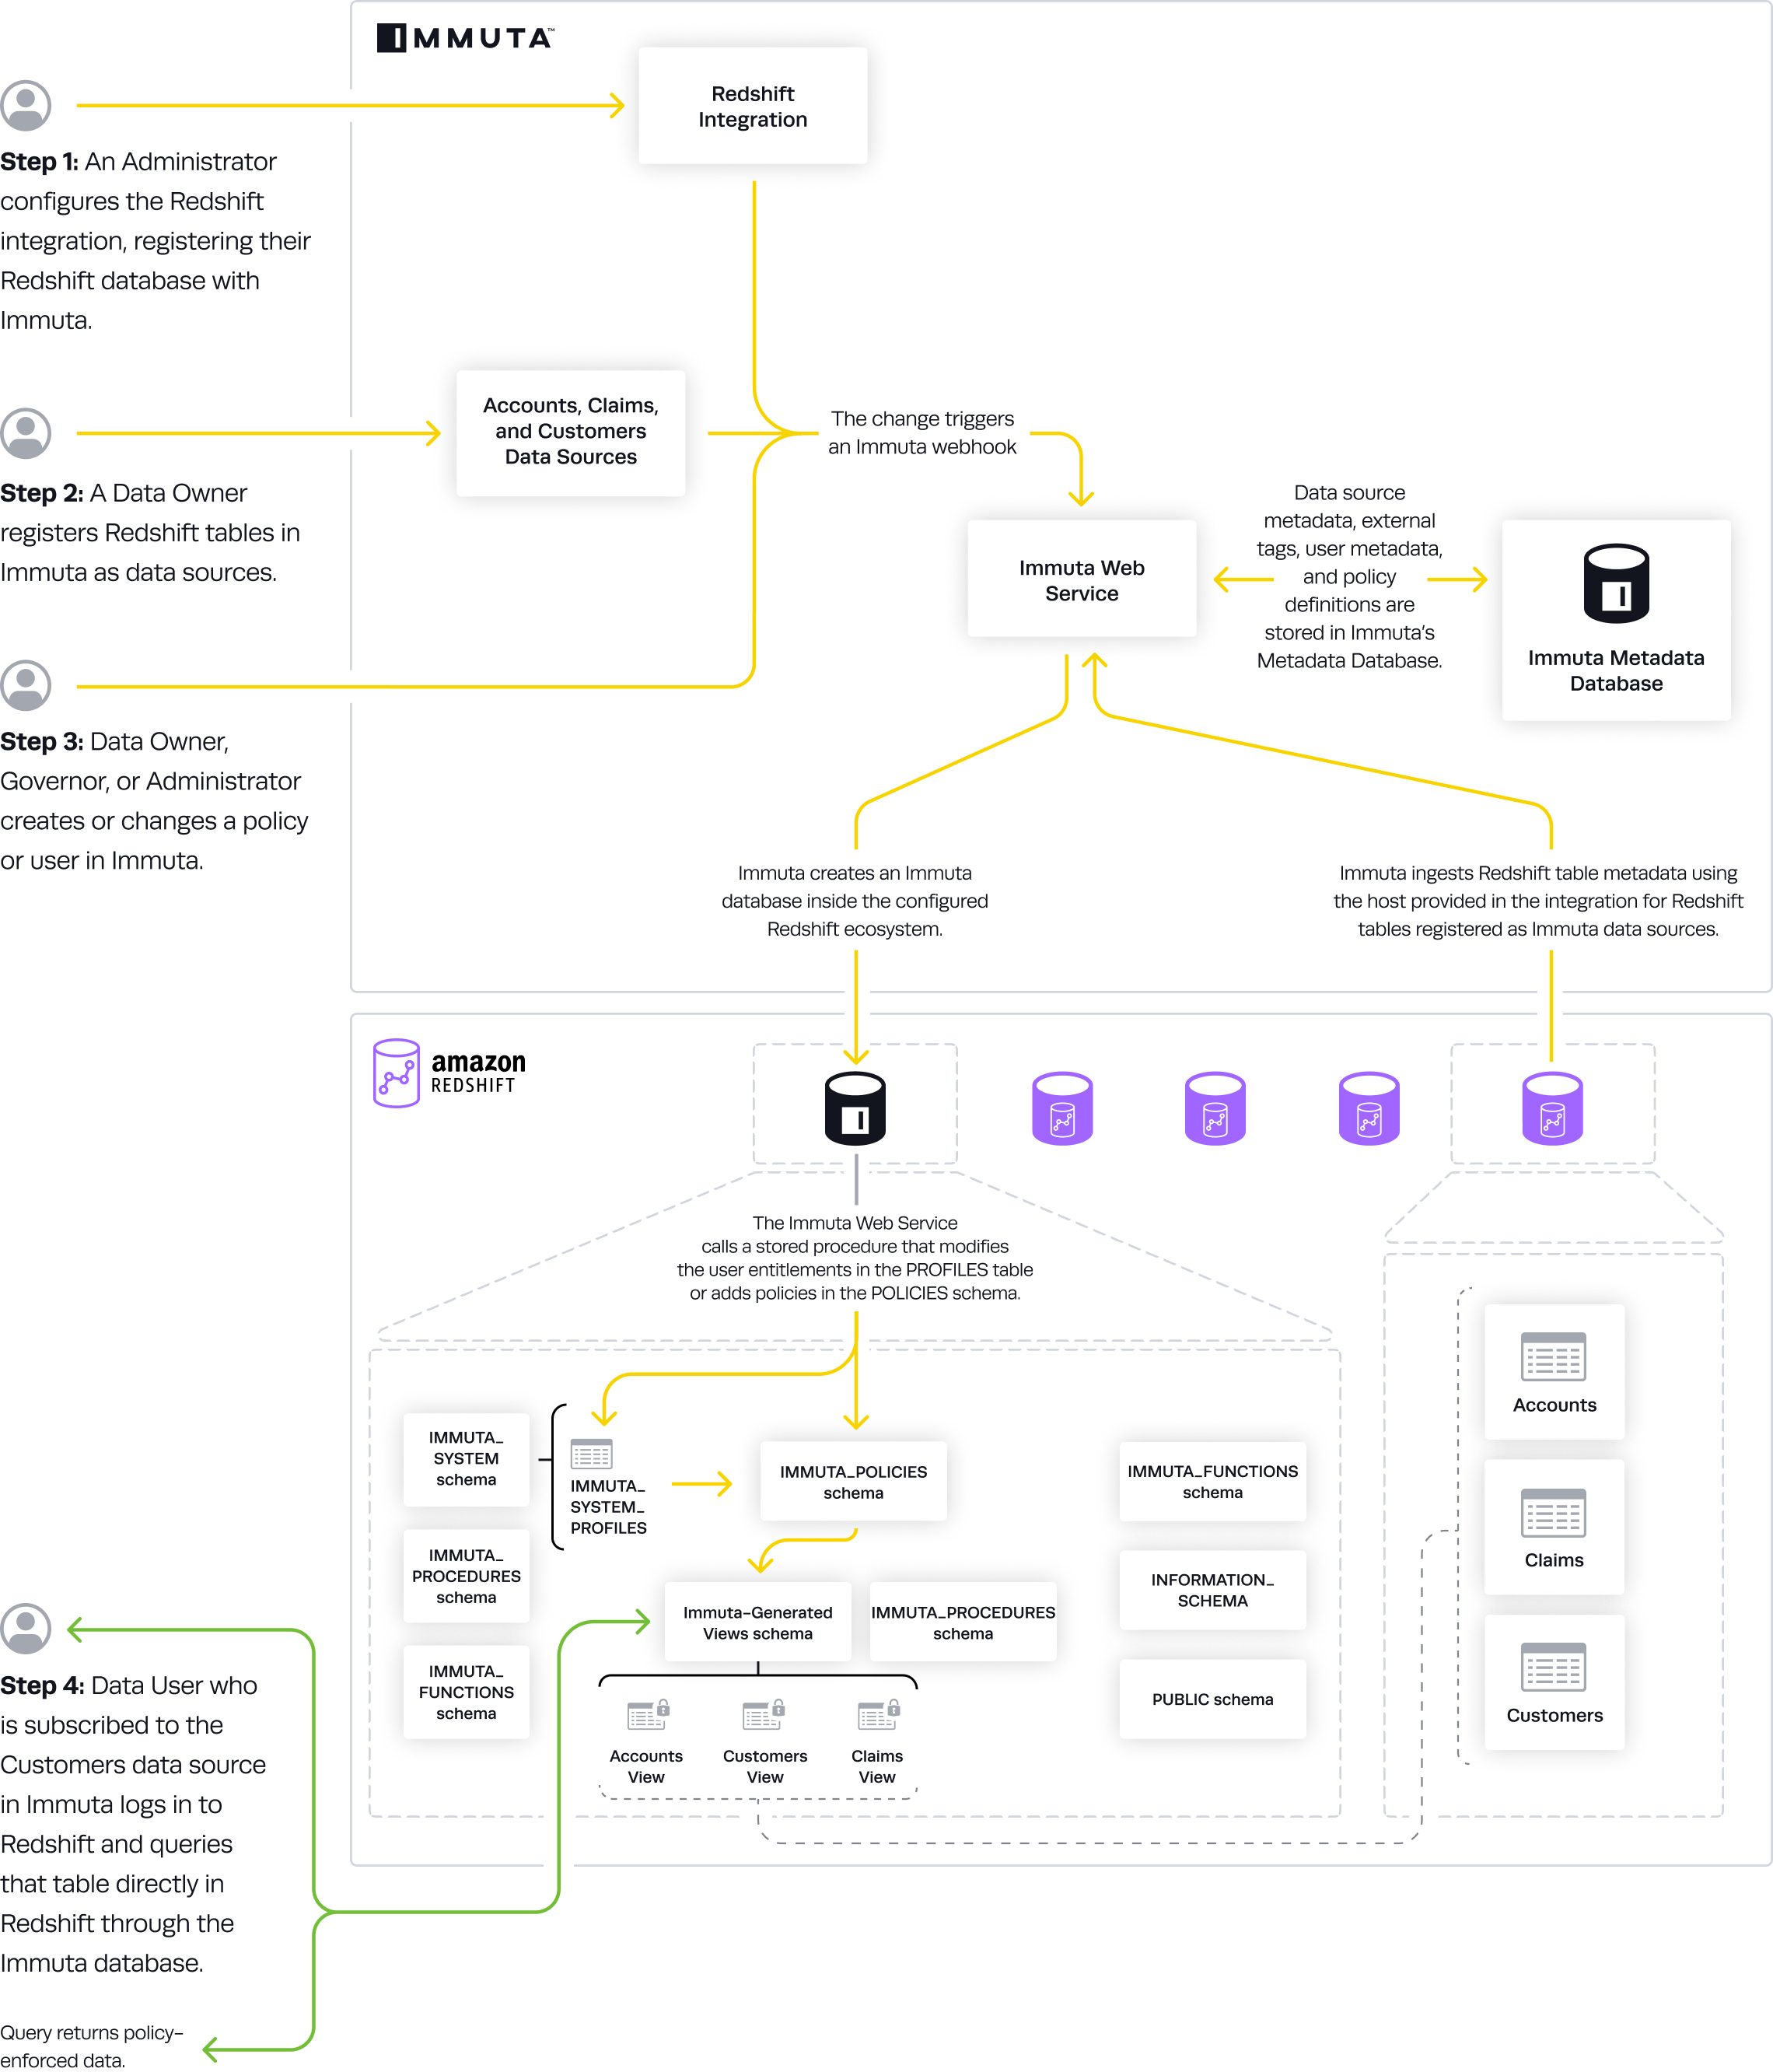
dbfs/S3/ABFS to give the Databricks cluster access to it.Because of how some user properties are populated in Databricks, load the SparkR library in a separate cell before attempting to use any SparkR functions.
Edit the cluster configuration, and change the Databricks Runtime to be a supported version.
Configure the Environment Variables section as you normally would for an Immuta cluster.
dbfs:/path/to/code.jar can be in S3 or ABFS (on Azure Databricks) assuming the cluster is configured with access to that path.Edit the cluster configuration, and change the Databricks Runtime to a supported version.
Include IMMUTA_INIT_ADDITIONAL_JARS_URI=dbfs:/path/to/code.jar in the "Environment Variables" (where dbfs:/path/to/code.jar is the path to your jar) so that the jar is uploaded to all the cluster nodes.
immuta.api.key setting with an Immuta API key generated on the Immuta profile page.Currently when an API key is generated it invalidates the previous key. This can cause issues if a user is using multiple clusters in parallel, since each cluster will generate a new API key for that Immuta user. To avoid these issues, manually generate the API key in Immuta and set the immuta.api.key on all the clusters or use a specified job user for the submit job.
{
"id": "query-a20e-493e-id-c1ada0a23a26",
[...]
"userId": "<immuta_username>",
[...]
"extra": {
[...]
"impersonationUser": "<databricks_username>"
}
[...]
} [
"--conf","spark.driver.extraJavaOptions=-Djava.security.manager=com.immuta.security.ImmutaSecurityManager -Dimmuta.security.manager.classes.config=file:///databricks/immuta/allowedCallingClasses.json -Dimmuta.spark.encryption.fpe.class=com.immuta.spark.encryption.ff1.ImmutaFF1Service",
"--conf","spark.executor.extraJavaOptions=-Djava.security.manager=com.immuta.security.ImmutaSecurityManager -Dimmuta.security.manager.classes.config=file:///databricks/immuta/allowedCallingClasses.json -Dimmuta.spark.encryption.fpe.class=com.immuta.spark.encryption.ff1.ImmutaFF1Service",
"--conf","spark.databricks.repl.allowedLanguages=python,sql,scala,r",
"dbfs:/path/to/script.R",
"arg1", "arg2", "..."
] [
"--conf","spark.driver.extraJavaOptions=-Djava.security.manager=com.immuta.security.ImmutaSecurityManager -Dimmuta.security.manager.classes.config=file:///databricks/immuta/allowedCallingClasses.json -Dimmuta.spark.encryption.fpe.class=com.immuta.spark.encryption.ff1.ImmutaFF1Service",
"--conf","spark.executor.extraJavaOptions=-Djava.security.manager=com.immuta.security.ImmutaSecurityManager -Dimmuta.security.manager.classes.config=file:///databricks/immuta/allowedCallingClasses.json -Dimmuta.spark.encryption.fpe.class=com.immuta.spark.encryption.ff1.ImmutaFF1Service",
"--conf","spark.databricks.repl.allowedLanguages=python,sql,scala,r",
"--class","org.youorg.package.MainClass",
"dbfs:/path/to/code.jar",
"arg1", "arg2", "..."
]package com.example.job
import java.net.URLClassLoader
import java.io.File
import org.apache.spark.sql.SparkSession
object ImmutaSparkSubmitExample {
def main(args: Array[String]): Unit = {
val jarDir = new File("/databricks/immuta/jars/")
val urls = jarDir.listFiles.map(_.toURI.toURL)
// Configure a new ClassLoader which will load jars from the additional jars directory
val cl = new URLClassLoader(urls)
val jobClass = cl.loadClass(classOf[ImmutaSparkSubmitExample].getName)
val job = jobClass.newInstance
jobClass.getMethod("runJob").invoke(job)
}
}
class ImmutaSparkSubmitExample {
def getSparkSession(): SparkSession = {
SparkSession.builder()
.appName("Example Spark Submit")
.enableHiveSupport()
.config("immuta.spark.acl.assume.not.privileged", "true")
.config("spark.hadoop.immuta.databricks.config.update.service.enabled", "false")
.getOrCreate()
}
def runJob(): Unit = {
val spark = getSparkSession
try {
val df = spark.table("immuta.<YOUR DATASOURCE>")
// Run Immuta Spark queries...
} finally {
spark.stop()
}
}
}CREATE ROLE ON ACCOUNT WITH GRANT OPTION
CREATE USER ON ACCOUNT WITH GRANT OPTION
MANAGE GRANTS ON ACCOUNT WITH GRANT OPTION
APPLY MASKING POLICY ON ACCOUNT WITH GRANT OPTION
APPLY ROW ACCESS POLICY ON ACCOUNT WITH GRANT OPTION
REFERENCES on all tables and views registered in Immuta.
SELECT on all tables and views registered in Immuta.
Grant the new Snowflake role to the system account you just created.
Host: The URL of your Snowflake account.
Port: Your Snowflake port.
Warehouse: The warehouse the Immuta system account user will use to run queries and perform Snowflake operations.
Immuta Database: The new, empty database for Immuta to manage. This is where system views, user entitlements, row access policies, column-level policies, procedures, and functions managed by Immuta will be created and stored.
Display Name: The display name represents the unique name of your connection and will be used as prefix in the name for all data objects associated with this connection. It will also appear as the display name in the UI and will be used in all API calls made to update or delete the connection. Avoid the use of periods (.) or
Click Next.
Select an authentication method from the dropdown menu and enter the authentication information for the Immuta system account you created. Enter the Role with the listed privileges, then continue to enter the authentication information:
Username and password (Not recommended): Choose one of the following options.
Select Immuta Generated to have Immuta populate the system account name and password.
Select User Provided to enter your own name and password for the Immuta system account.
Snowflake External OAuth:
Fill out the Token Endpoint, which is where the generated token is sent. It is also known as aud (audience) and iss (issuer).
Fill out the Client ID, which is the subject of the generated token. It is also known as
:
Complete the Username field. This user must be .
If using an encrypted private key, enter the Private Key Password.
Copy the provided script and run it in Snowflake as a user with the privileges listed in the requirements section.
Click Test Connection.
If the connection is successful, click Next. If there are any errors, check the connection details and credentials to ensure they are correct and try again.
Ensure all the details are correct in the summary and click Complete Setup.
Databricks Unity Catalog
Snowflake
Trino
An integration enabled on the Immuta app settings page
Data sources registered
Immuta global GOVERNANCE and APPLICATION_ADMIN permissions
Select Data and then Upgrade Manager in the navigation menu. This tab will only be available if you have integrations ready for upgrade.
Click Start Upgrade.
Display Name: The display name represents the unique name of your connection and will be used as prefix in the name for all data objects associated with this connection. It will also appear as the display name in the UI and will be used in all API calls made to update or delete the connection.
Click Next.
Ensure Immuta has the correct credentials to connect to the data platform. Select the tab below for more information:
Click Validate Credentials to ensure the access token can connect Immuta and Databricks Unity Catalog.
Create a Snowflake role with a minimum of the following permissions:
USAGE on all databases and schemas with registered data sources.
REFERENCES on all tables and views registered in Immuta.
SELECT on all tables and views registered in Immuta.
to the Immuta system user in your Snowflake environment.
Enter the new Snowflake role in the textbox.
Click Validate Credentials to ensure the role has been granted to the right user.
When possible, Immuta will populate your credentials from your data source registration. If you used multiple credentials to register data sources you will need to enter a single set of credentials for your system account.
If Immuta populates the credentials:
Click Validate Connection to ensure the Trino cluster is running, and Immuta can connect to it.
If you need to enter credentials:
Click Next.
Click Upgrade Connection.
Click the link to the docs to understand the impacts of the upgrade.
Click the checkbox to confirm understanding of the upgrade effects, and click Yes, Upgrade Connection.
The upgrade manager will then begin connecting your data sources with the tables in the backing technology. This may take some time to complete.
While most upgrades will complete without any additional intervention, it may be necessary to resolve data sources that are not easily matched to the backing tables. See the Troubleshooting guide if you are prompted to Resolve in the upgrade manager.
Your connection is in an upgrade state until you finalize. In the upgrade state, policy will still be applied to your data sources, but object sync is not on. To allow Immuta to discover new objects and created data sources for them, finalize your upgrade.
Select Data and then Upgrade Manager in the navigation menu. This tab will only be available if you have integrations ready for upgrade.
Click Finalize for the finished connection.
Starburst (Trino) version 438 or newer
Write policies for Starburst (Trino) enabled. Contact your Immuta representative to get this feature enabled on your account.
In its default setting, the Starburst (Trino) integration's write access value controls the authorization of SQL operations that perform data modification (such as INSERT, UPDATE, DELETE, MERGE, and TRUNCATE). However, administrators can allow table modification operations (such as ALTER and DROP tables) to be authorized as write operations. Two locations allow administrators to specify how read and write access policies are applied to data in Starburst (Trino). Select one or both of the options below to customize these settings. If the access-control.properties file is used, it may override the policies configured in the Immuta web service.
Immuta web service: Configure write policies in the Immuta web service to allow all Starburst (Trino) clusters targeting that Immuta tenant to receive the same write policy configuration for data sources. This configuration will only affect tables or views registered as Immuta data sources.
Starburst (Trino) cluster: Configure write policies using the access-control.properties file in Starburst or Trino to broadly customize access for Immuta users on a specific cluster. This configuration file takes precedence over write policies passed from the Immuta web service. Use this option if all Immuta users should have the same level of access to tables regardless of the write policy setting in the Immuta web service.
Contact your Immuta representative to configure read and write access in the Immuta web service if all Starburst (Trino) data source operations should be affected identically across Starburst (Trino) clusters connected to your Immuta tenant. A configuration example is provided below.
The following example maps WRITE to READ, WRITE and OWN permissions and READ to just READ. Both READ and WRITE permissions should always include READ:
Given the above configuration, when a user gets write access to a Starburst (Trino) data source, they will have both data and table modification permissions on that data source. See the Starburst (Trino) privileges section of the Subscription policy access types guide for details about these operations.
Configure the integration to allow read and write policies to apply to any data source (registered or unregistered in Immuta) on a Starburst cluster.
Create the Immuta access control configuration file in the Starburst configuration directory (/etc/starburst/immuta-access-control.properties for Docker installations or <starburst_install_directory>/etc/immuta-access-control.properties for standalone installations).
Modify one or both properties below to customize the behavior of read or write access policies for all users:
immuta.allowed.immuta.datasource.operations: This property governs objects (catalogs, schemas, tables, etc.) that are registered as data sources in Immuta. These permissions apply to all querying users except for administrators defined in immuta.user.admin (who get all permissions).
READ: Grants SELECT on tables or views; grants SHOW on tables, views, or columns
WRITE: Grants INSERT, UPDATE, DELETE
immuta.allowed.non.immuta.datasource.operations: This property governs objects (catalogs, schemas, tables, etc.) that are not registered as data sources in Immuta. Use all or a combination of the following access values:
READ: Grants SELECT on tables or views; grants SHOW on tables, views, or columns
For example, the following configuration allows READ, WRITE, and OWN operations to be authorized on data sources registered in Immuta and all operations are permitted on data that is not registered in Immuta:
Enable the Immuta access control plugin in the Starburst cluster's configuration file (/etc/starburst/config.properties for Docker installations or <starburst_install_directory>/etc/config.properties for standalone installations). For example,
Create the Immuta access control configuration file in the Trino configuration directory (/etc/trino/config.properties for Docker installations or <trino_install_directory>/etc/config.properties for standalone installations).
Modify one or both properties below to customize the behavior of read or write access policies for all users:
immuta.allowed.immuta.datasource.operations: This property governs objects (catalogs, schemas, tables, etc.) that are registered as data sources in Immuta. These permissions apply to all querying users except for administrators defined in immuta.user.admin (who get all permissions).
READ: Grants SELECT on tables or views; grants SHOW on tables, views, or columns
WRITE: Grants INSERT, UPDATE, DELETE
immuta.allowed.non.immuta.datasource.operations: This property governs objects (catalogs, schemas, tables, etc.) that are not registered as data sources in Immuta. Use all or a combination of the following access values:
READ: Grants SELECT on tables or views; grants SHOW on tables, views, or columns
For example, the following configuration allows READ, WRITE, and OWN operations to be authorized on data sources registered in Immuta and all operations are permitted on data that is not registered in Immuta:
Enable the Immuta access control plugin in Trino's configuration file (/etc/trino/config.properties for Docker installations or <trino_install_directory>/etc/config.properties for standalone installations). For example,
Immuta utilizes connections to register and manage data from your Trino cluster. Instead of registering individual catalogs, connections enable you to register an entire data platform at once. This approach simplifies data registration and allows Immuta to automatically monitor your Trino platform for changes. Data sources are then added or removed to reflect the current state of your data platform.
When the connection is registered, Immuta ingests and stores connection metadata in the Immuta metadata database.
Immuta presents a hierarchical view of your data that reflects the hierarchy of objects in Trino after registration is complete:
Cluster
Catalog
Schema
Tables
Beyond making the registration of your data more intuitive, connections provide more control. Instead of performing operations on individual schemas or tables, you can perform operations (such as object sync) at the connection level.
See the Connections reference guide for details about connections and how to manage them. To configure your Trino connection, see the Register a Trino connection guide.
The privileges that the Trino connection requires align to the least privilege security principle. The table below describes the privilege required by the IMMUTA_SYSTEM_ACCOUNT user.
SELECT on all tables
Immuta system account
This privilege provides access to all the Trino tables that you want registered in Immuta.
The following user actions spur various processes in the Trino connection so that Immuta data remains synchronous with data in Trino. The list below provides an overview of each process:
Data source created or updated: Immuta registers data source metadata and stores that metadata in the Immuta metadata database.
Data source deleted: Immuta deletes the data source metadata from the metadata database.
User account is mapped to Immuta: When a user account is mapped to Immuta, their metadata is stored in the metadata database.
Table
✅
✅
View
✅
✅
The Trino integration supports the following authentication methods to register a connection. The credentials provided must be for an account with the permissions listed in the Register a Trino connection page.
Username and password: You can authenticate with your Starburst (Trino) username and password.
OAuth 2.0: You can authenticate with OAuth 2.0. Immuta's OAuth authentication method uses the Client Credentials Flow; when you register a data source, Immuta reaches out to your OAuth server to generate a JSON web token (JWT) and then passes that token to the Starburst (Trino) cluster. Therefore, when using OAuth authentication to create data sources in Immuta, configure your Starburst (Trino) cluster to use JWT authentication, not OpenID Connect or OAuth.
Data owner fallback
When users query a Starburst (Trino) data source, Immuta sends the data owner username with the view SQL so that policies apply in the right context. However, there are two scenarios in which Immuta cannot retrieve and send the data owner username:
The Starburst (Trino) cluster has an error when Immuta queries for the owner
The data source has already been registered without an owner
If either of these scenarios occur, queries will fail. To avoid this error, you must set a global admin username. Contact your Immuta representative to configure the globalAdminUsername property.
The built-in Immuta IAM can be used as a complete solution for authentication and user entitlement. However, you can connect your existing identity management provider to Immuta to use that system for authentication and user entitlement instead. Each of the supported IAM protocols includes a set of configuration options that enable Immuta to communicate with the IAM system and map the users, permissions, groups, and attributes into Immuta.
For policies to impact the right users, the user account in Immuta must be mapped to the user account in Trino. You can ensure these accounts are mapped correctly in the following ways:
Automatically: If usernames in Trino align with usernames in the external IAM and those accounts align with an IAM attribute, you can enter that IAM attribute on the app settings page to automatically map user IDs in Immuta to Trino.
Manually: You can manually map user IDs for individual users.
For guidance on connecting your IAM to Immuta, see the how-to guide for your protocol.
APPLICATION_ADMIN Immuta permission
CAN MANAGE Databricks privilege on the cluster
A Databricks workspace with the Premium tier, which includes cluster policies (required to configure the Spark integration)
A cluster that uses one of these supported Databricks Runtimes:
11.3 LTS
Enable (recommended) or .
by setting runtime_engine to STANDARD using the . Immuta does not support clusters with Photon enabled. Photon is enabled by default on compute running Databricks Runtime 9.1 LTS or newer and must be manually disabled before setting up the integration with Immuta.
Click the App Settings icon in Immuta.
Navigate to HDFS > System API Key and click Generate Key.
Click Save and then Confirm. If you do not save and confirm, the system API key will not be saved.
Behavior change in Immuta v2025.1 and newer
If a table is registered in Immuta and does not have a subscription policy applied to it, that data will be visible to users in Databricks, even if the Protected until made available by policy setting is enabled.
If you have enabled this setting, author an "Allow individually selected users" that applies to all data sources.
Select the Storage Access Type from the dropdown menu.
Opt to add any Additional Hadoop Configuration Files.
Click Add Native Integration, and then click Save and Confirm. This will restart the application and save your Databricks Spark integration. (It is normal for this restart to take some time.)
The Databricks Spark integration will not do anything until your cluster policies are configured, so even though your integration is saved, continue to the next section to configure your cluster policies so the Spark plugin can manage authorization on the Databricks cluster.
Click Configure Cluster Policies.
Select one or more cluster policies in the matrix. Clusters running Immuta with Databricks Runtime 14.3 can only use Python and SQL. You can make changes to the policy by clicking Additional Policy Changes and editing the environment variables in the text field or by downloading it. See the for information about each variable and its default value. Some common settings are linked below:
Give users the Can Attach To permission on the cluster.
This page outlines configuration details for Immuta-enabled Databricks clusters. Databricks administrators should place the desired configuration in the Spark environment variables.
If you add additional Hadoop configuration during the integration setup, this variable sets the path to that file.
The additional Hadoop configuration is where sensitive configuration goes for remote filesystems (if you are using a secret key pair to access S3, for example).
Default value: true
Set this to false if ephemeral overrides should not be enabled for Spark. When true, this will automatically override ephemeral data source httpPaths with the httpPath of the Databricks cluster running the user's Spark application.
This configuration item can be used if automatic detection of the Databricks httpPath should be disabled in favor of a static path to use for ephemeral overrides.
Default value: true
When querying Immuta data sources in Spark, the metadata from the Metastore is compared to the metadata for the target source in Immuta to validate that the source being queried exists and is queryable on the current cluster. This check typically validates that the target (database, table) pair exists in the Metastore and that the table’s underlying location matches what is in Immuta. This configuration can be used to disable location checking if that location is dynamic or changes over time. Note: This may lead to undefined behavior if the same table names exist in multiple workspaces but do not correspond to the same underlying data.
A URI that points to a valid calling class file, which is an Immuta artifact you download during the process.
This is a comma-separated list of Databricks users who can access any table or view in the cluster metastore without restriction.
Default value: 3600
The number of seconds to cache privileged user status for the Immuta ACL. A privileged Databricks user is an admin or is allowlisted in IMMUTA_SPARK_ACL_ALLOWLIST.
Default value: false
Enables auditing all queries run on a Databricks cluster, regardless of whether users touch Immuta-protected data or not.
Default value: false
Allows non-privileged users to SELECT from tables that are not protected by Immuta. See the for details about this feature.
Default value: false
Allows non-privileged users to run DDL commands and data-modifying commands against tables or spaces that are not protected by Immuta. See the for details about this feature.
This is a comma-separated list of Databricks users who are allowed to impersonate Immuta users:
Default value: false
Exposes the DBFS FUSE mount located at /dbfs. Granular permissions are not possible, so all users will have read/write access to all objects therein. Note: Raw, unfiltered source data should never be stored in DBFS.
Block one or more Immuta from being used on an Immuta cluster. This should be a Java regular expression that matches the set of UDFs to block by name (excluding the immuta database). For example to block all project UDFs, you may configure this to be ^.*_projects?$. For a list of functions, see the .
Default value: file:///databricks/jars/immuta-spark-hive.jar
The location of immuta-spark-hive.jar on the filesystem for Databricks. This should not need to change unless a custom initialization script that places immuta-spark-hive in a non-standard location is necessary.
Default value: true
Creates a world-readable or writable scratch directory on local disk to facilitate the use of dbutils and 3rd party libraries that may write to local disk. Its location is non-configurable and is stored in the environment variable IMMUTA_LOCAL_SCRATCH_DIR. Note: Sensitive data should not be stored at this location.
Default value: INFO
The SLF4J log level to apply to Immuta's Spark plugins.
Default value: false
If true, writes logging output to stdout/the console as well as the log4j-active.txt file (default in Databricks).
This configuration is a comma-separated list of additional databases that will appear as scratch databases when running a SHOW DATABASE query. This configuration increases performance by circumventing the Metastore to get the metadata for all the databases to determine what to display for a SHOW DATABASE query; it won't affect access to the scratch databases. Instead, use to control read and write access to the underlying database paths.
Additionally, this configuration will only display the scratch databases that are configured and will not validate that the configured databases exist in the Metastore. Therefore, it is up to the Databricks administrator to properly set this value and keep it current.
Comma-separated list of remote paths that Databricks users are allowed to directly read/write. These paths amount to unprotected "scratch spaces." You can create a scratch database by configuring its specified location (or configure dbfs:/user/hive/warehouse/<db_name>.db for the default location).
To create a scratch path to a location or a database stored at that location, configure
To create a scratch path to a database created using the default location,
Default value: false
Enables non-privileged users to create or drop scratch databases.
Default value: false
When true, this configuration prevents users from changing their impersonation user once it has been set for a given Spark session. This configuration should be set when the BI tool or other service allows users to submit arbitrary SQL or issue SET commands.
Default value: true
Denotes whether the Spark job will be run that "tags" a Databricks cluster as being associated with Immuta.
A comma-separated list of URIs.
Default value: 3600
The number of seconds Immuta caches whether a table has been exposed as a data source in Immuta. This setting only applies when IMMUTA_SPARK_DATABRICKS_ALLOW_NON_IMMUTA_WRITES or IMMUTA_SPARK_DATABRICKS_ALLOW_NON_IMMUTA_READS is enabled.
Default value: false
Requires that users act through a single, equalized project. A cluster should be equalized if users need to run Scala jobs on it, and it should be limited to Scala jobs only via spark.databricks.repl.allowedLanguages.
Default value: true
Enables use of the underlying database and table name in queries against a table-backed Immuta data source. Administrators or allowlisted users can set IMMUTA_SPARK_RESOLVE_RAW_TABLES_ENABLED to false to bypass resolving raw databases or tables as Immuta data sources. This is useful if an admin wants to read raw data but is also an Immuta user. By default, data policies will be applied to a table even for an administrative user if that admin is also an Immuta user.
Default value: true
Same as the variable, but this is a session property that allows users to toggle this functionality. If users run set immuta.spark.session.resolve.raw.tables.enabled=false, they will see raw data only (not Immuta data policy-enforced data). Note: This property is not set in immuta_conf.xml.
Default value: true
This shows the immuta database in the configured Databricks cluster. When set to false Immuta will no longer show this database when a SHOW DATABASES query is performed. However, queries can still be performed against tables in the immuta database using the Immuta-qualified table name (e.g., immuta.my_schema_my_table) regardless of whether or not this feature is enabled.
Default value: true
Immuta checks the versions of its artifacts to verify that they are compatible with each other. When set to true, if versions are incompatible, that information will be logged to the Databricks driver logs and the cluster will not be usable. If a configuration file or the jar artifacts have been patched with a new version (and the artifacts are known to be compatible), this check can be set to false so that the versions don't get logged as incompatible and make the cluster unusable.
Default value: bim
Denotes which IAM in Immuta should be used when mapping the current Spark user's username to a userid in Immuta. This defaults to Immuta's internal IAM (bim) but should be updated to reflect an actual production IAM.
In the Databricks Spark integration, Immuta installs an Immuta-maintained Spark plugin on your Databricks cluster. When a user queries data that has been registered in Immuta as a data source, the plugin injects policy logic into the plan Spark builds so that the results returned to the user only include data that specific user should see.
The sequence diagram below breaks down this process of events when an Immuta user queries data in Databricks.
When data owners register Databricks securables in Immuta, the securable metadata is registered and Immuta creates a corresponding data source for those securables. The data source metadata is stored in the Immuta Metadata Database so that it can be referenced in policy definitions.
The image below illustrates what happens when a data owner registers the Accounts, Claims, and Customers securables in Immuta.
Users who are subscribed to the data source in Immuta can then query the corresponding securable directly in their Databricks notebook or workspace.
See the page for details about the authentication methods supported for registering data.
When schema monitoring is enabled, Immuta monitors your servers to detect when new tables or columns are created or deleted, and automatically registers (or disables) those tables in Immuta. These newly updated data sources will then have any global policies and tags that are set in Immuta applied to them. The Immuta data dictionary will be updated with any column changes, and the Immuta environment will be in sync with your data environment.
For Databricks Spark, the automatic is disabled because of the . Immuta requires you to download a schema detection job template (a Python script) and import that into your Databricks workspace.
See the guide for instructions on enabling schema monitoring.
In Immuta, a Databricks data source is considered ephemeral, meaning that the compute resources associated with that data source will not always be available.
Ephemeral data sources allow the use of ephemeral overrides, user-specific connection parameter overrides that are applied to Immuta metadata operations.
When a user runs a Spark job in Databricks, the Immuta plugin submits ephemeral overrides for that user to Immuta. Consequently, subsequent metadata operations for that user will use the current cluster as compute.
See the for more details about ephemeral overrides and how to configure or disable them.
The Spark plugin has the capability to send ephemeral override requests to Immuta. These requests are distinct from ephemeral overrides themselves. Ephemeral overrides cannot be turned off, but the Spark plugin can be configured to not send ephemeral override requests.
Tags can be used in Immuta in a variety of ways:
Use tags for global subscription or data policies that will apply to all data sources in the organization. In doing this, company-wide data security restrictions can be controlled by the administrators and governors, while the users and data owners need only to worry about tagging the data correctly.
Generate Immuta reports from tags for insider threat surveillance or data access monitoring.
Filter search results with tags in the Immuta UI.
The Databricks Spark integration cannot ingest tags from Databricks, but you can connect any of these to work with your integration.
You can also manage tags in Immuta by to your data sources and columns. Alternatively, you can use to automatically tag your sensitive data.
Immuta allows you to author subscription and data policies to automate access controls on your Databricks data.
Subscription policies: After registering data sources in Immuta, you can control who has access to specific securables in Databricks through Immuta subscription policies or by . Data users will only see the immuta database with no tables until they are granted access to those tables as Immuta data sources. See the page for a list of policy types supported.
Data policies: You can create data policies to apply fine-grained access controls (such as restricting rows or masking columns) to manage what users can see in each table after they are subscribed to a data source. See the page for details about specific types of data policies supported.
The image below illustrates how Immuta enforces a subscription policy that only allows users in the Analysts group to access the yellow-table.
See the for details about the benefits of using Immuta subscription and data policies.
Once a Databricks user who is subscribed to the data source in Immuta directly in their workspace, Spark Analysis initiates and the following events take place:
Spark calls down to the Metastore to get table metadata.
Immuta intercepts the call to retrieve table metadata from the Metastore.
Immuta modifies the Logical Plan to enforce policies that apply to that user.
The image below illustrates what happens when an Immuta user who is subscribed to the Customers data source queries the securable in Databricks.
Regardless of the policies on the data source, the users will be able to read raw data on the cluster if they meet one of the criteria listed below:
Databricks administrator is tied to an Immuta account
A Databricks user is listed as an ignored user (Users can be specified in the to become ignored users.)
Generally, Immuta prevents users from seeing data unless they are explicitly given access, which blocks access to raw sources in the underlying databases.
Databricks non-admin users will only see sources to which they are subscribed in Immuta, and this can present problems if organizations have a data lake full of non-sensitive data and Immuta removes access to all of it. To address this challenge, Immuta allows administrators to change this default setting when configuring the integration so that Immuta users can access securables that are not registered as a data source. Although this is similar to how privileged users in Databricks operate, non-privileged users cannot bypass Immuta controls.
See the for details about this setting.
Immuta projects combine users and data sources under a common purpose. Sometimes this purpose is for a single user to organize their data sources or to control an entire schema of data sources through a single projects screen; however, most often this is an Immuta purpose for which the data has been approved to be used and will restrict access to data and streamline team collaboration. Consequently, data owners can restrict access to data for a specified purpose through projects.
When a user is working within the context of a project, they will only see the data in that project. This helps to prevent data leaks when users collaborate. Users can switch project contexts to access various data sources while acting under the appropriate purpose.
When users change project contexts (either through the Immuta UI or with ), queries reflect users as acting under the purposes of that project, which may allow additional access to data if there are purpose restrictions on the data source(s). This process also allows organizations to track not just whether a specific data source is being used, but why.
See the for details about how to prevent users from switching project contexts in a session.
Users can have additional write access in their integration using project workspaces. Users can integrate a single or multiple workspaces with a single Immuta tenant.
See the page for more details.
Connections allow you to register your data objects in a technology through a single connection, instead of registering data sources and an integration separately.
This feature is available to all 2026.1+ tenants. Contact your Immuta representative to enable this feature.
Trino cluster or Starburst Enterprise
The user registering the connection must have the permissions below.
APPLICATION_ADMIN Immuta permission
The Trino user must have the ability to
Create a new file in the Trino etc directory
In Trino, create a new system account user with the privileges listed below. Immuta uses this system account continuously to crawl the connection, maintain state between Immuta and Trino, and run identification.
SELECT on all securables you want registered in Immuta as data sources
In Immuta, click Data and select Connections in the navigation menu.
Click the + Add Connection button.
Select the Trino tile.
Private preview: This feature is available to select accounts. Contact your Immuta representative to enable this feature.
Snowflake column lineage specifies how data flows from source tables or columns to the target tables in write operations. When Snowflake lineage tag propagation is enabled in Immuta, Immuta automatically applies tags added to a Snowflake table to its descendant data source columns in Immuta so you can build policies using those tags to restrict access to sensitive data.
Snowflake Access History tracks user read and write operations. Snowflake column lineage extends this Access History to specify how data flows from source columns to the target columns in write operations, allowing data stewards to understand how sensitive data moves from ancestor tables to target tables so that they can
accessGrantMapping:
WRITE: ['READ', 'WRITE', 'OWN']
READ: ['READ']Materialized view
✅
✅
subOpt to fill out the Resource field with a URI of the resource where the requested token will be used.
Enter the x509 Certificate Thumbprint. This identifies the corresponding key to the token and is often abbreviated as x5t or is called kid (key identifier).
Upload the PEM Certificate, which is the client certificate that is used to sign the authorization request.
The Physical Plan is applied and filters out and transforms raw data coming back to the user.
The user sees policy-enforced data.
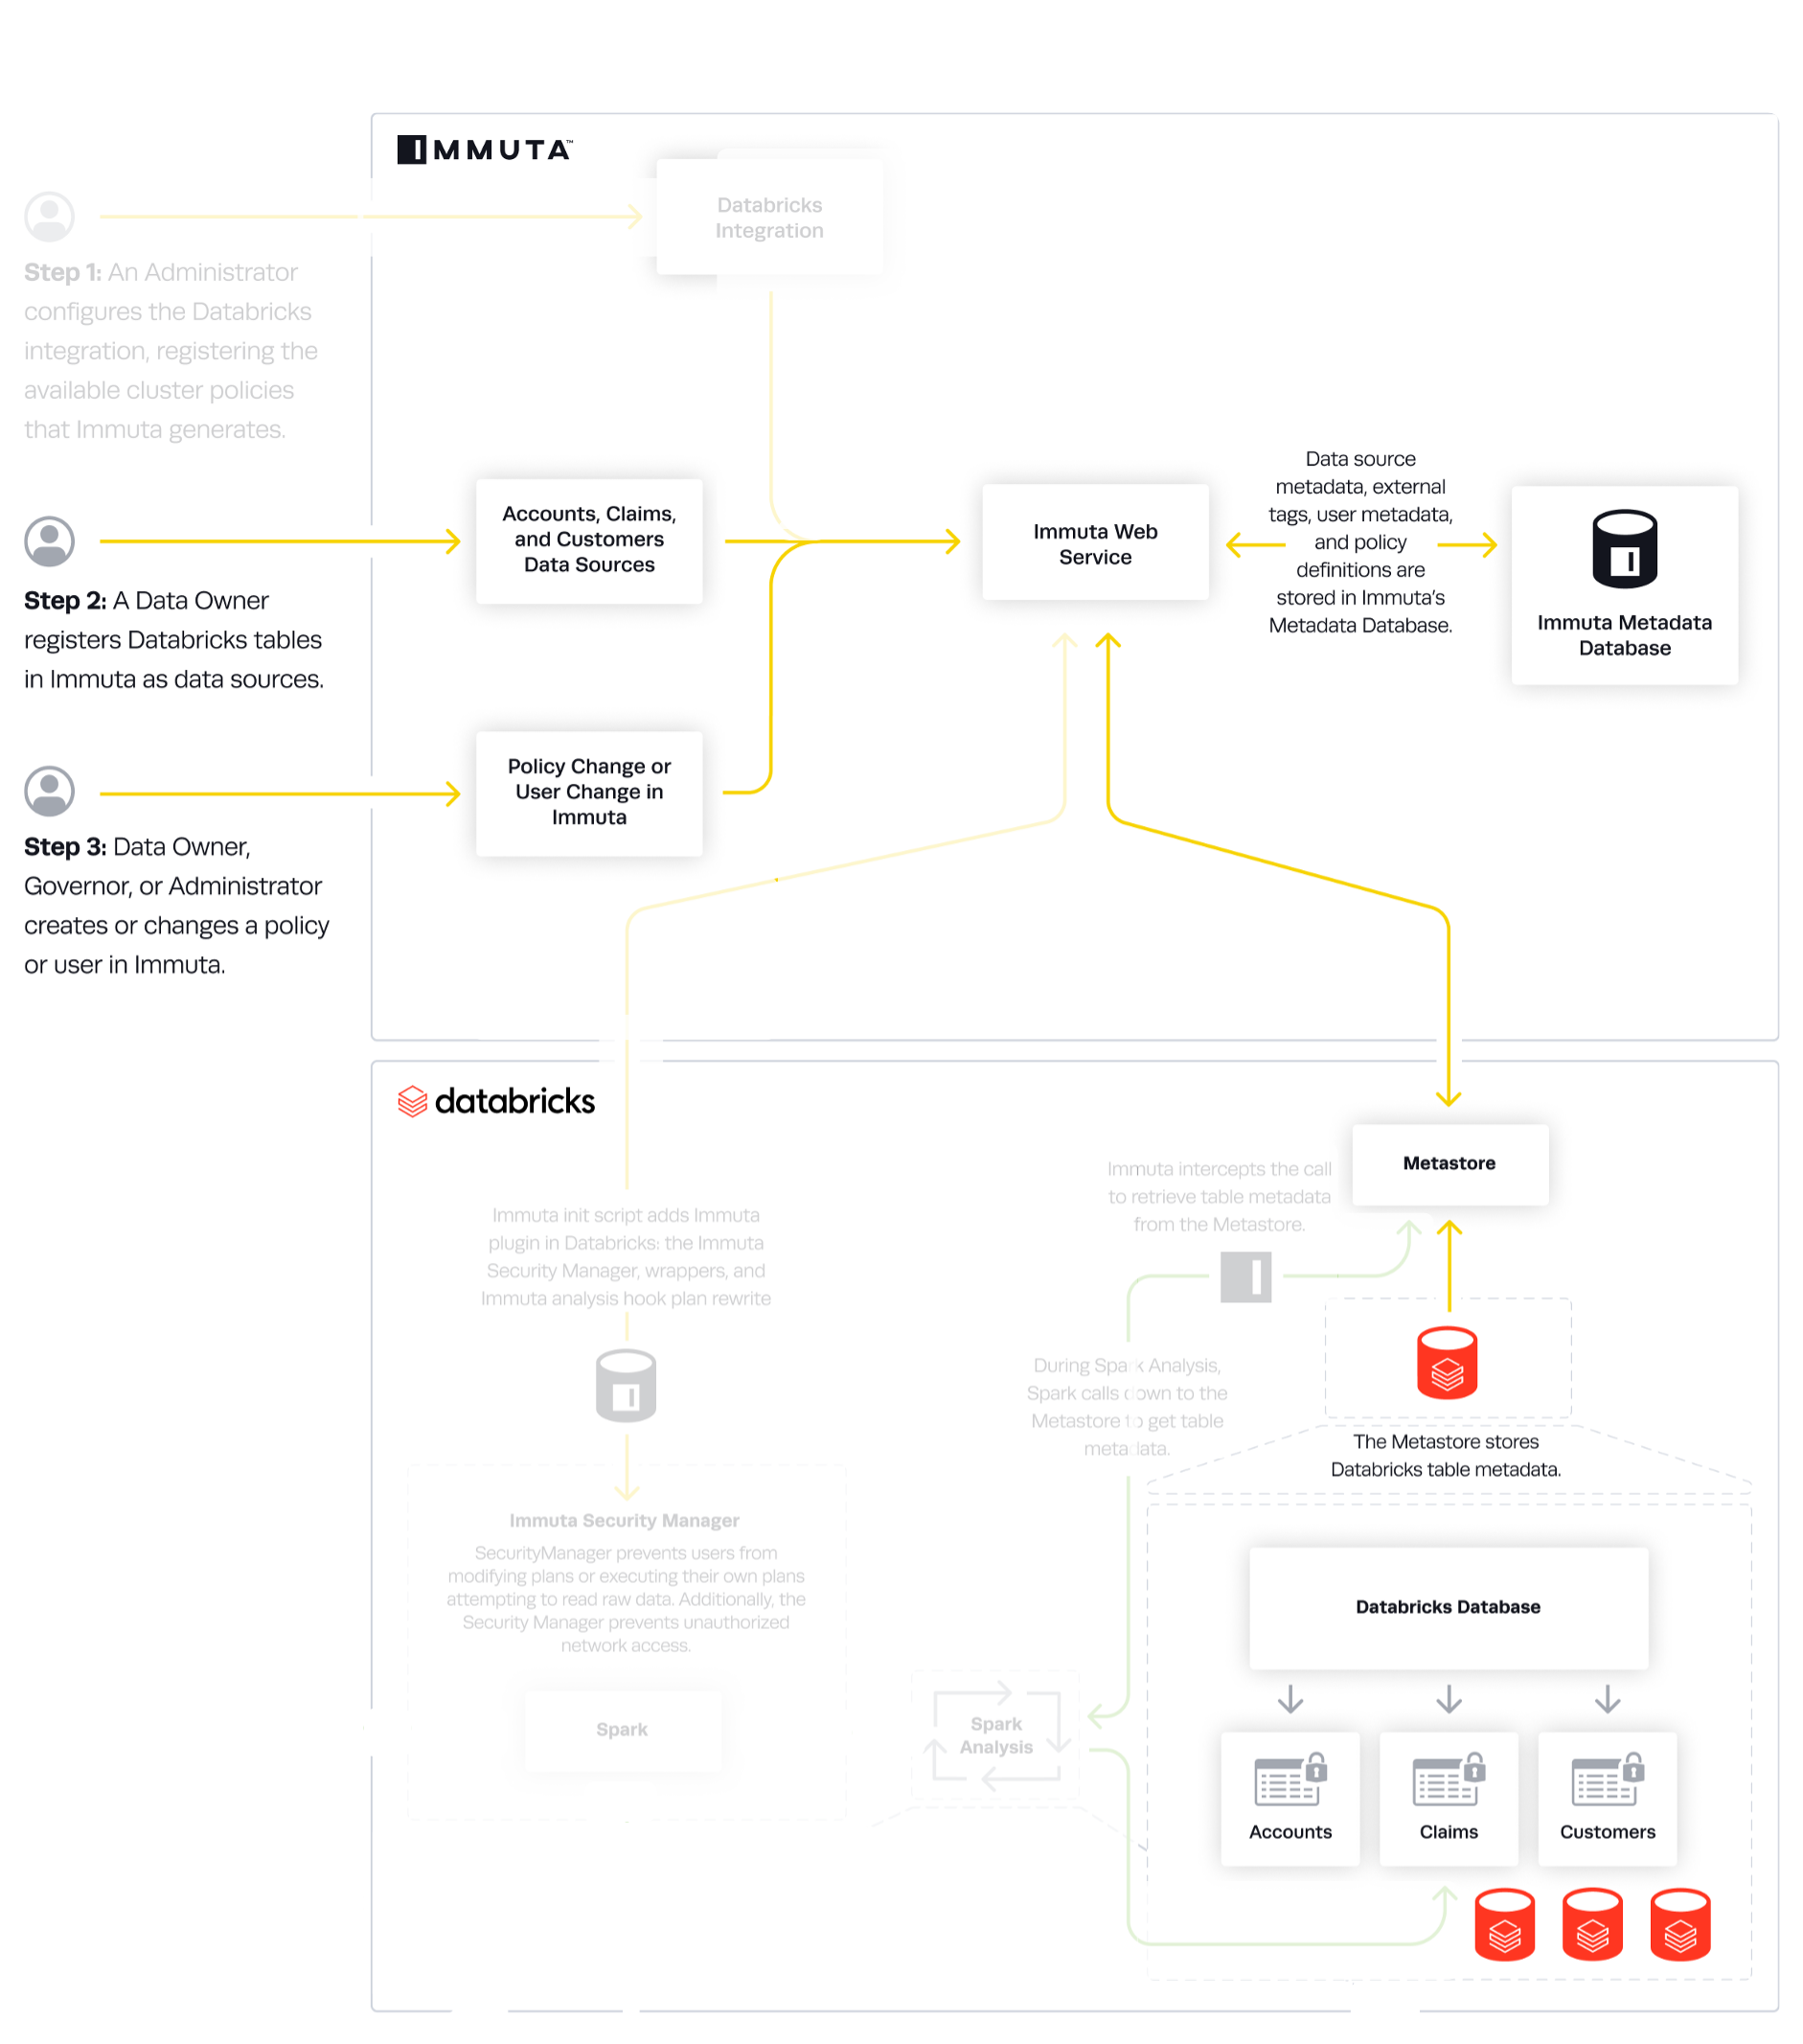

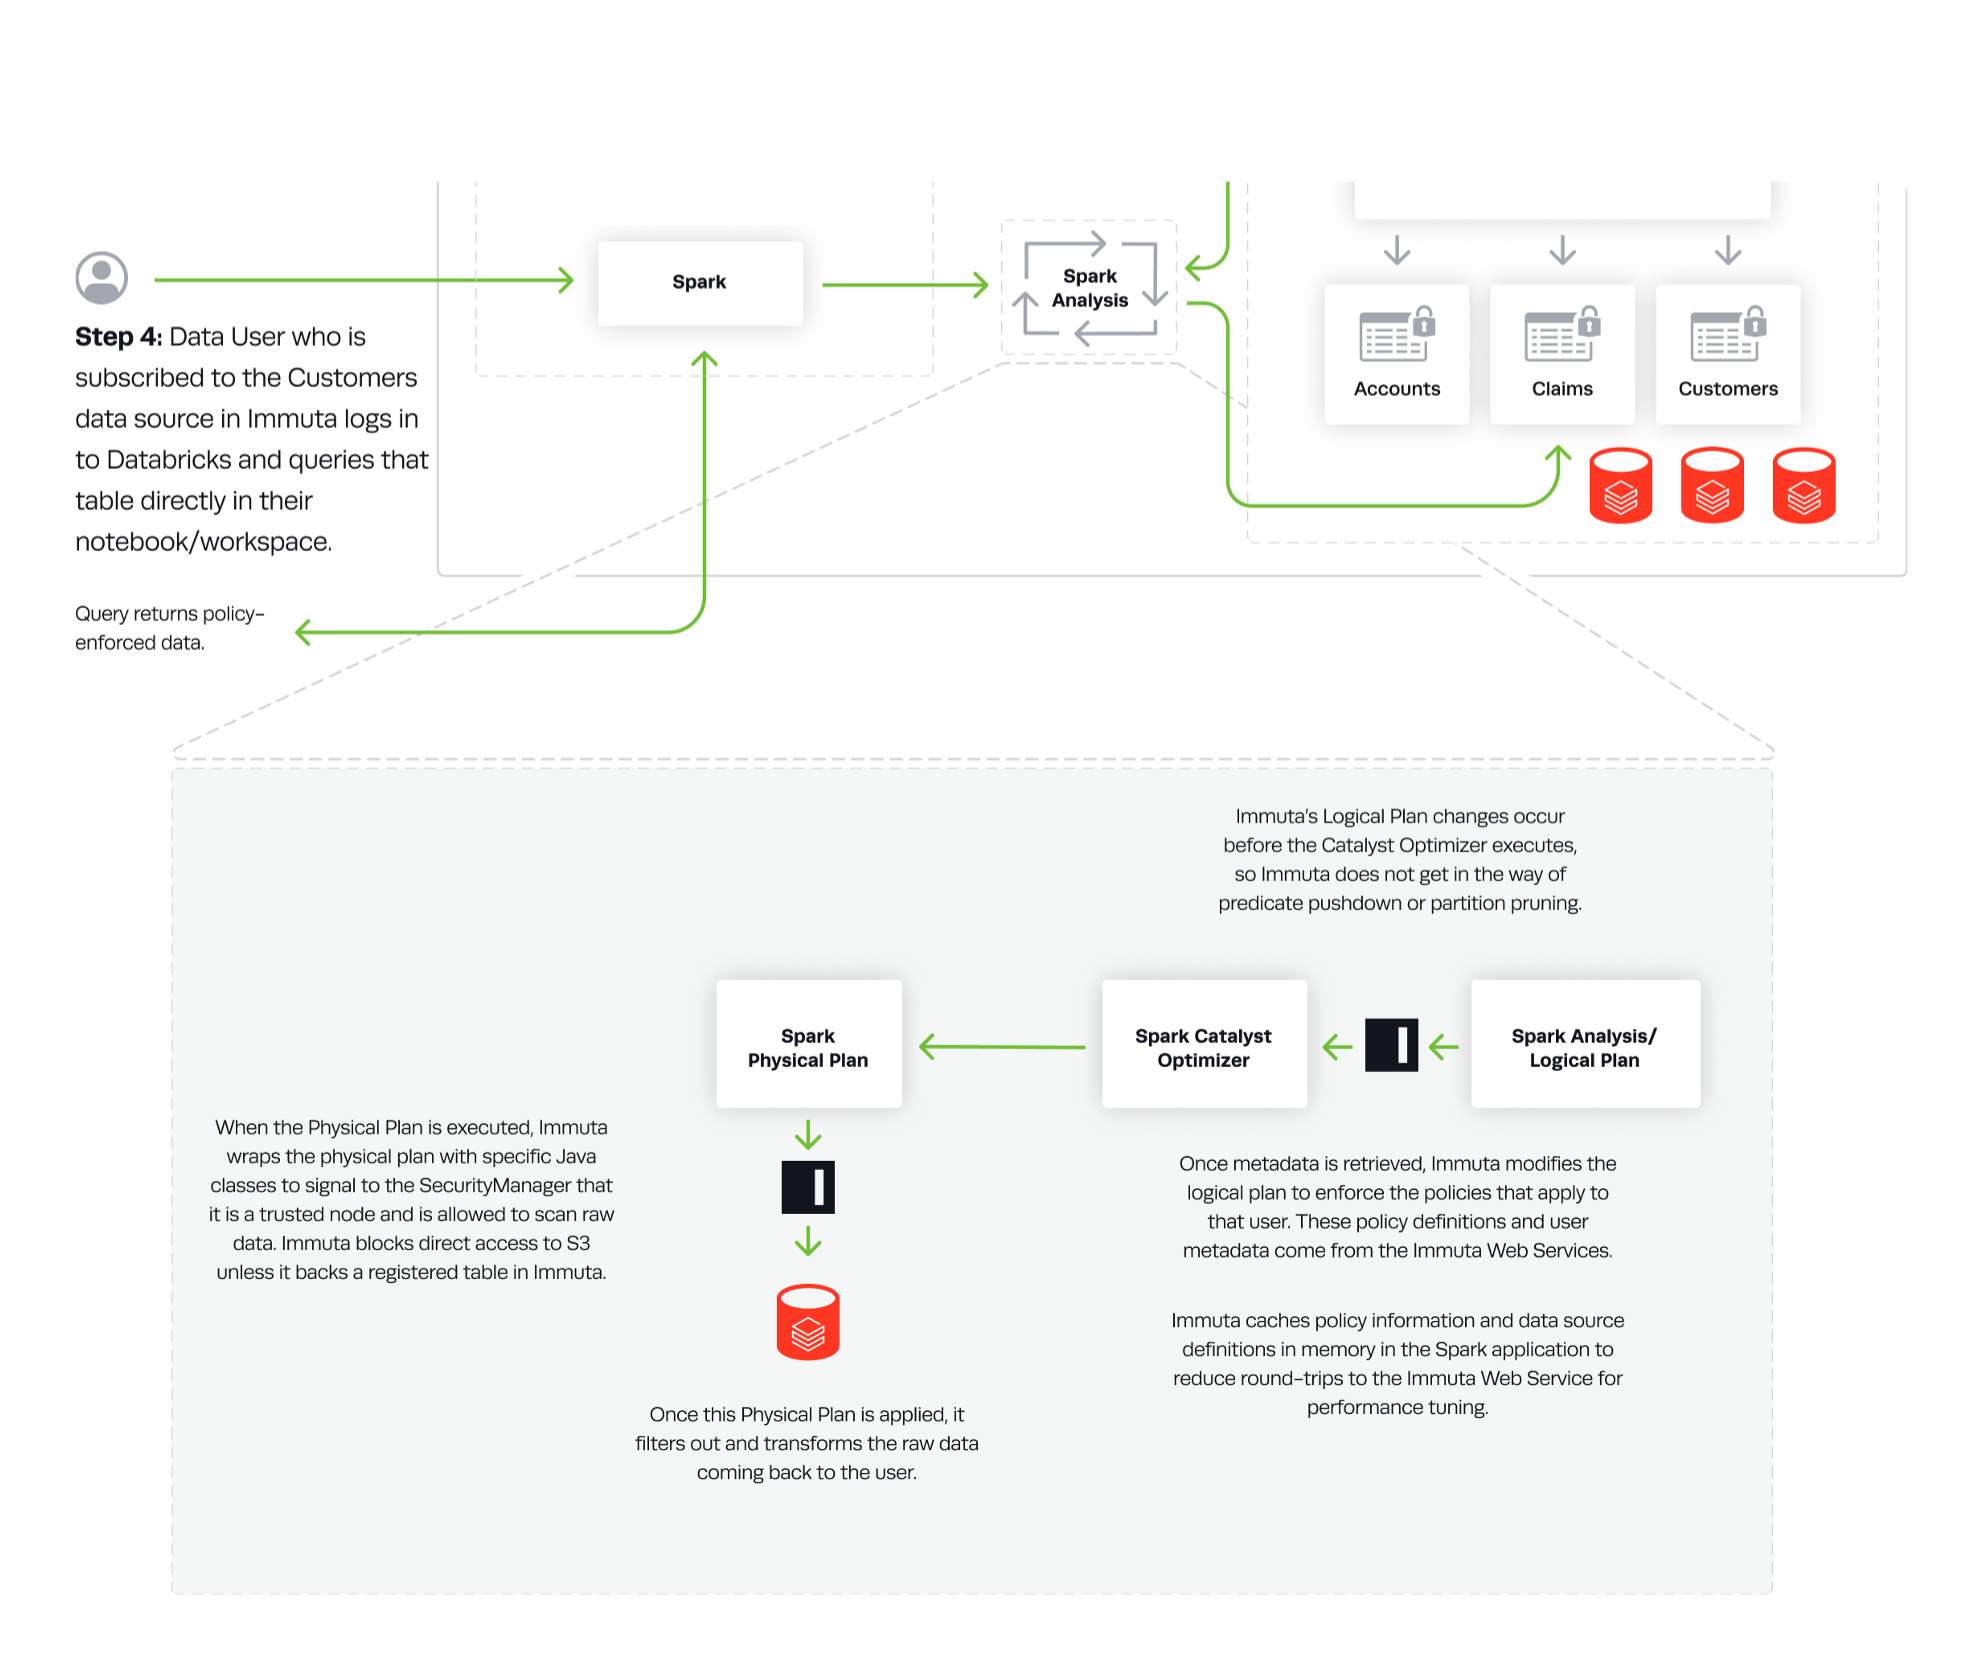
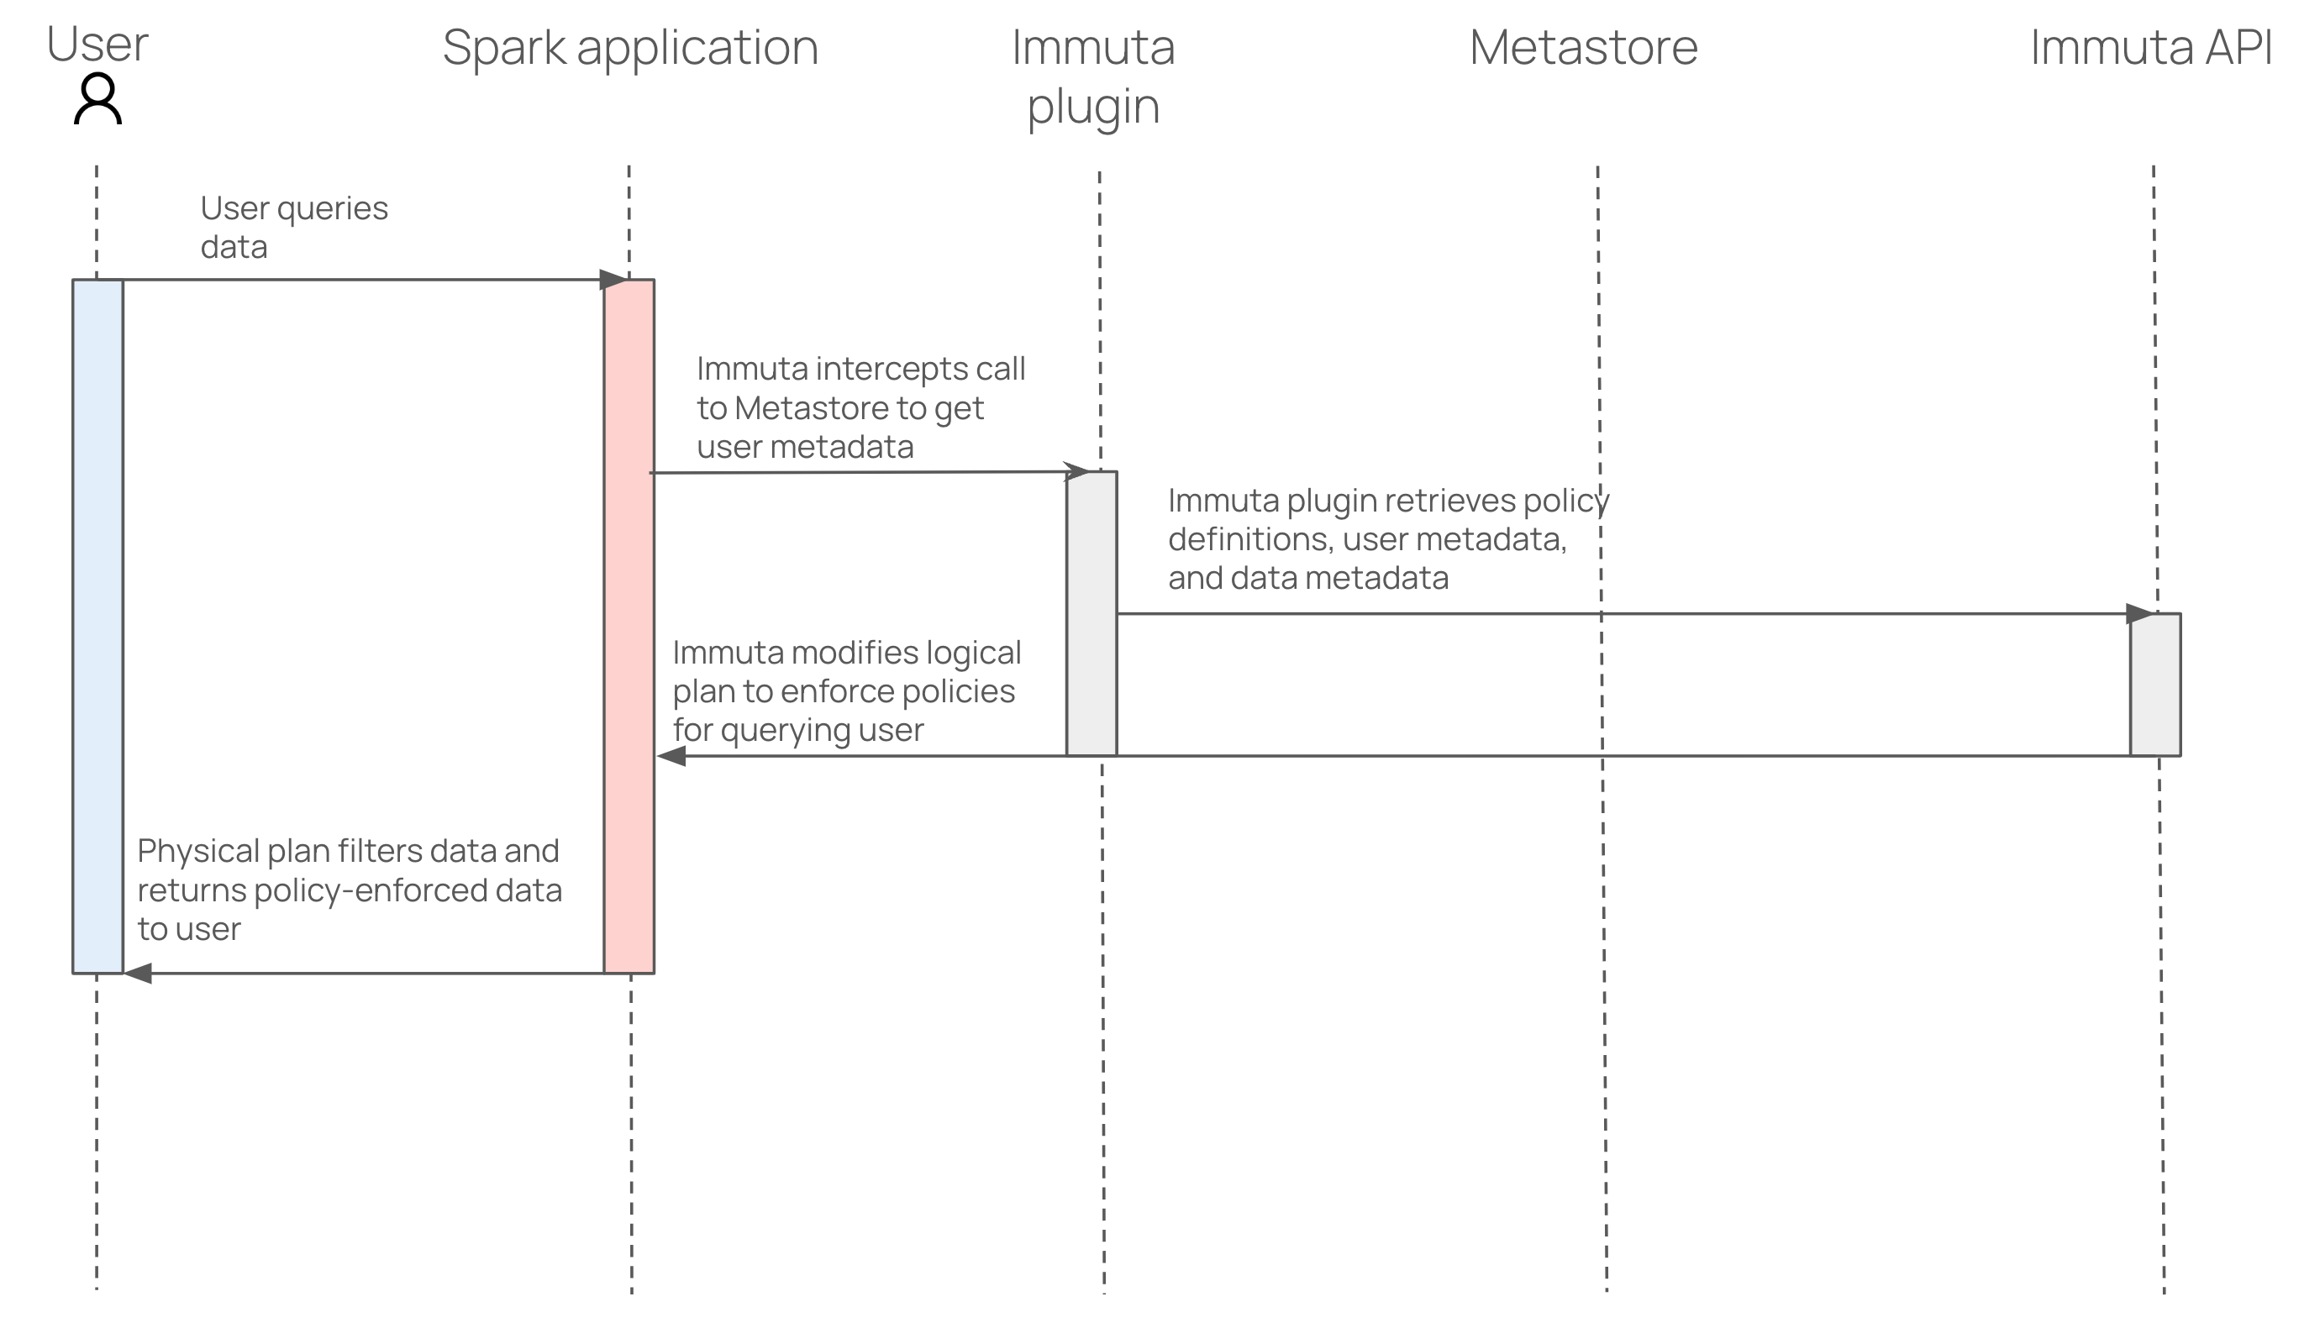
MERGETRUNCATEREFRESHOWN: Grants ALTER and DROP on tables; grants SET on comments and properties
WRITE: Grants INSERT, UPDATE, DELETE, MERGE, or TRUNCATE on tables; grants REFRESH on materialized views.
OWN: Grants ALTER and DROP on tables; grants SET on comments and properties
CREATE: Grants CREATE on catalogs, schema, tables, and views. This is the only property that can allow CREATE permissions, since CREATE is enforced on new objects that do not exist in Starburst or Immuta yet (such as a new table being created with CREATE TABLE).
immuta.allowed.immuta.datasource.operations=READ,WRITE,OWN
immuta.allowed.non.immuta.datasource.operations=READ,WRITE,CREATE,OWNaccess-control.config-files=/etc/starburst/immuta-access-control.propertiesimmuta.allowed.immuta.datasource.operations=READ,WRITE,OWN
immuta.allowed.non.immuta.datasource.operations=READ,WRITE,CREATE,OWNaccess-control.config-files=/etc/trino/immuta-access-control.properties"spark_env_vars.IMMUTA_SPARK_DATABRICKS_ALLOWED_IMPERSONATION_USERS": {
"type": "fixed",
"value": "[email protected],[email protected]"
}IMMUTA_SPARK_DATABRICKS_SCRATCH_PATHS=s3://path/to/the/dirIMMUTA_SPARK_DATABRICKS_SCRATCH_PATHS=s3://path/to/the/dir,dbfs:/user/hive/warehouse/any_db_name.db</value>SELECT on all tables you want registered in Immuta
Use the dropdown to select your authentication method:
Username and Password: Enter the username and password for the system account user.
OAuth 2.0 with Client Secret:
Fill out the Token Endpoint with the full URL of the identity provider. This is where the generated token is sent.
Fill out the Client ID. This is a combination of letters, numbers, or symbols, used as a public identifier. This is the subject of the generated token.
Enter the Scope (string). The scope limits the operations allowed in Trino by the access token. See the for details about scopes.
Enter the Client Secret. Immuta uses this secret to authenticate with the authorization server when it requests a token.
OAuth 2.0 with Client Certificate:
Fill out the Token Endpoint with the full URL of the identity provider. This is where the generated token is sent.
Fill out the Client ID. This is a combination of letters, numbers, or symbols, used as a public identifier. This is the subject of the generated token.
Update your immuta-access-control.properties file and enter the Trino username into the immuta.user.admin field.
Click Validate Connection to ensure the Trino cluster is running, and Immuta can connect to it.
Supported languages
Python
R (not supported for Databricks Runtime 14.3)
Scala (not supported for Databricks Runtime 14.3)
SQL
A Databricks cluster that is one of these supported compute types:
Custom access mode
A Databricks workspace and cluster with the ability to directly make HTTP calls to the Immuta web service. The Immuta web service also must be able to connect to and perform queries on the Databricks cluster, and to call Databricks workspace APIs.
CAN MANAGE privileges on Databricks clusters where the Spark plugin is installed. This is to prevent editing environment variables or Spark configuration, editing cluster policies, or removing the Spark plugin from the cluster, all of which would cause the Spark plugin to stop working.If Databricks Unity Catalog is enabled in a Databricks workspace, you must use an Immuta cluster policy when you set up the Databricks Spark integration to create an Immuta-enabled cluster. See the configure cluster policies section below for guidance.
If Databricks Unity Catalog is not enabled in your Databricks workspace, you must disable Unity Catalog in your Immuta tenant before proceeding with your configuration of Databricks Spark:
Navigate to the App Settings page and click Integration Settings.
Uncheck the Enable Unity Catalog checkbox.
Click Save.
Scroll to the Integration Settings section.
Click + Add Native Integration and select Databricks Spark Integration from the dropdown menu.
Complete the Hostname field.
Enter a Unique ID for the integration. The unique ID is used to name cluster policies clearly, which is important when managing several Databricks Spark integrations. As cluster policies are workspace-scoped, but multiple integrations might be made in one workspace, this ID lets you distinguish between different sets of cluster policies.
Select the identity manager that should be used when mapping the current Spark user to their corresponding identity in Immuta from the Immuta IAM dropdown menu. This should be set to reflect the identity manager you use in Immuta (such as Entra ID or Okta).
Choose an Access Model. The Protected until made available by policy option disallows reading and writing tables not protected by Immuta, whereas the Available until protected by policy option allows it.
Select your Databricks Runtime.
Use one of the two installation types described below to apply the policies to your cluster:
Automatically push cluster policies: This option allows you to automatically push the cluster policies to the configured Databricks workspace. This will overwrite any cluster policy templates previously applied to this workspace.
Select the Automatically Push Cluster Policies radio button.
Enter your Admin Token. This token must be for a user who has the . This will give Immuta temporary permission to push the cluster policies to the configured Databricks workspace and overwrite any cluster policy templates previously applied to the workspace.
Click Apply Policies.
Manually push cluster policies: Enabling this option allows you to manually push the cluster policies and the init script to the configured Databricks workspace.
Select the Manually Push Cluster Policies radio button.
Click Download Init Script and set the Immuta plugin init script as a cluster-scoped init script in Databricks by following the .
Click Close, and then click Save and Confirm.
Apply the cluster policy generated by Immuta to the cluster with the Spark plugin installed by following the Databricks documentation.
Create a new Trino user and grant that new user permissions
Display Name: This is the name of your new connection. This name will be used in the API (connectionKey), in data source names from the host, and on the connections page. Avoid the use of periods (.) or restricted words in your connection name.
Hostname: URL of your Trino cluster.
Port: Port configured for Trino.
SSL Mode: Use the dropdown to select the SSL mode to connect to the host.
Enabled: Use this mode if you have http-server.https.enabled=true set in your Trino cluster's config.properties file.
Disabled: Use this mode for plain, unencrypted connections (e.g., your URL starts with
Certificate Validation: Use the dropdown to select whether to require certificate validation to connect to the host.
Enabled: Use this to ensure Immuta verifies that the server's certificate was issued by a trusted Certificate Authority (CA).
Disabled: Use this setting if you are using a self-signed certificate to skip certificate validation for the connection.
Select the authentication method from the dropdown and enter the credentials of the Trino user you created above.
Username and Password: Enter the username and password for the system account user.
OAuth 2.0 with Client Secret:
Fill out the Token Endpoint with the full URL of the identity provider. This is where the generated token is sent.
Fill out the Client ID. This is a combination of letters, numbers, or symbols, used as a public identifier. This is the subject of the generated token.
Enter the Scope (string). The scope limits the operations allowed in Trino by the access token. See the for details about scopes.
Enter the Client Secret. Immuta uses this secret to authenticate with the authorization server when it requests a token.
OAuth 2.0 with Client Certificate:
Fill out the Token Endpoint with the full URL of the identity provider. This is where the generated token is sent.
Fill out the Client ID. This is a combination of letters, numbers, or symbols, used as a public identifier. This is the subject of the generated token.
Click Save connection.
If you are using Starburst, move on to the next step.
If you are using open-source Trino, you must download the Immuta Trino plugin and add it to your Trino cluster.
The Immuta Trino plugin version matches the version of the corresponding Trino releases. Navigate to the for a list of supported Trino versions. Immuta follows , but you can contact your Immuta representative for a specific Trino OSS release.
Download the assets for the release that corresponds to your Trino version.
Enable Immuta on your cluster:
Docker installations
Follow to install the plugin archive on all nodes in your cluster.
On the Next Steps page, copy the provided immuta-access-control.properties file. It is pre-populated with the required fields:
access-control.name: Leave this as immuta.
immuta.endpoint: This is your tenant URL. Use the value provided in the file.
immuta.apikey: This is how Immuta applies policy to your users' queries. Use the value provided in the file.
immuta.user.admin: This is your Trino system account user. To ensure tables can be properly ingested into Immuta, no Immuta policies will ever apply to this user. Use the value pre-populated in the file to match the username you initially used to create the connection.
Customize any other properties in the file. See the Trino integration how-to page for detailed descriptions of all the properties.
Once your file is customized, add it to your Trino cluster's etc folder.
Enable the Immuta access control plugin in your Trino cluster's config.properties file:
Ensure you have completed all the connection steps, and click Finish.
trace data back to its source to validate the integrity of dashboards and reports,
identify who performed write operations to meet compliance requirements,
evaluate data quality and pinpoint points of failure, and
tag sensitive data on source tables without having tag columns on their descendant tables.
However, tagging sensitive data doesn’t innately protect that data in Snowflake; users need Immuta to disseminate these lineage tags automatically to descendant tables registered in Immuta so data stewards can build policies using the semantic and business context captured by those tags to restrict access to sensitive data. When Snowflake lineage tag propagation is enabled, Immuta propagates tags applied to a data source to its descendant data source columns in Immuta, which keeps your data inventory in Immuta up-to-date and allows you to protect your data with policies without having to manually tag every new Snowflake data source you register in Immuta.
An application administrator enables the feature on the Immuta app settings page.
Snowflake lineage metadata (column names and tags) for the Snowflake tables is stored in the metadata database.
A data owner creates a new data source (or adds a new column to a Snowflake table) that initiates a job that applies all tags for each column from its ancestor columns.
A data owner or governor adds a tag to a column in Immuta that has descendants, which initiates a job that propagates the tag to all descendants.
An audit record is created that includes which tags were applied and from which columns those tags originated.
The Snowflake Account Usage ACCESS_HISTORY view contains column lineage information.
To appropriately propagate tags to descendant data sources, Immuta fetches Access History metadata to determine what column tags have been updated, stores this metadata in the Immuta metadata database, and then applies those tags to relevant descendant columns of tables registered in Immuta.
Consider the following example using the Customer, Customer 2, and Customer 3 tables that were all registered in Immuta as data sources.
Customer: source table
Customer 2: descendant of Customer
Customer 3: descendant of Customer 2
If the Discovered.Electronic Mail Address tag is added to the Customer data source in Immuta, that tag will propagate through lineage to the Customer 2 and Customer 3 data sources.
After an application administrator has enabled Snowflake lineage tag propagation, data owners can register data in Immuta and have tags in Snowflake propagated from ancestor tables to descendant data sources. Whenever new tags are added to those tables in Immuta, those upstream tags will propagate to descendant data sources.
By default, all tags are propagated, but these tags can be filtered on the app settings page or using the Immuta API.
Lineage tag propagation works with any tag added to the data dictionary. Tags can be manually added, synced from an external catalog, or discovered by identification.
Consider the following example using the tables that were all registered in Immuta as data sources:
Customer
None, source table
Discovered.Electronic Mail Address
Manually applied
Customer 2
Customer
Immuta added the Discovered.Electronic Mail Address tag to the Customer data source, and that tag propagated through lineage to the Customer 2 and Customer 3 data sources.
When a tag is deleted, downstream lineage tags are removed, unless another parent data source still has that tag. The tag remains visible, but it will not be re-added if a future propagation event specifies the same tag again. Immuta prevents you from removing Snowflake object tags from data sources. You can only remove Immuta-managed tags. To remove Snowflake object tags from tables, you must remove them in Snowflake.
Removing the Discovered.Electronic Mail Address tag from the Customer 2 table soft deletes it from the Customer 2 data source. However the Discovered.Electronic Mail Address tag still applies to the Customer 3 data source because Customer still has the tag applied.
Customer
None, source table
Discovered.Electronic Mail Address
Manually applied
Customer 2
Customer
The only way a tag will be removed from descendant data sources is if no other ancestor of the descendant still prescribes the tag.
If the Snowflake lineage tag propagation feature is disabled, tags will remain on Immuta data sources.
Identification will still run on data sources and can be manually triggered. Tags applied through identification will propagate as tags added through lineage to descendant Immuta data sources.
Immuta audit records include Snowflake lineage tag events when a tag is added or removed.
The example audit record below illustrates the SNOWFLAKE_TAGS.pii tag successfully propagating from the Customer table to Customer 2:
Without tableFilter set, Immuta will ingest lineage for every table on the Snowflake instance.
Tag propagation based on lineage is not retroactive. For example, if you add a table, add tags to that table, and then run the lineage ingestion job, tags will not get propagated. However, if you add a table, run the lineage ingestion job, and then add tags to the table, the tags will get propagated.
The lineage job needs to pull in lineage data before any tag is applied in Immuta. When Immuta gets new lineage information from Snowflake, Immuta does not update existing tags in Immuta.
There can be up to a 3-hour delay in Snowflake for a lineage event to make it into the ACCESS_HISTORY view.
Immuta does not ingest lineage information for views.
Snowflake only captures lineage events for CTAS, CLONE, MERGE, and INSERT write operations. Snowflake does not capture lineage events for DROP, RENAME, ADD, or SWAP. Instead of using these latter operations, you need to recreate a table with the same name if you need to make changes.
Immuta cannot enforce coherence of your Snowflake lineage. If a column, table, or schema in the middle of the lineage graph gets dropped, Immuta will not do anything unless a table with that same name gets recreated. This means a table that gets dropped but not recreated could live in Immuta’s system indefinitely.
The enable_case_sensitive_identifier parameter must be set to false (default setting) for your Redshift cluster.
CREATE_DATA_SOURCE Immuta permission
The Redshift user registering data sources must have the following privileges on all securables:
USAGE on all schemas with registered data sources
SELECT on all tables within those schemas
Navigate to the Data Sources list page and click Register Data Source.
Select the Redshift tile in the Data Platform section.
Complete these fields in the Connection Information box:
Server: hostname or IP address
Port: port configured for Redshift, typically port 5439
SSL: when enabled, ensures communication between Immuta and the remote database is encrypted
Database: the remote database
Username: the username to use to connect to the remote database and retrieve records for this data source
Password: the password to use with the above username to connect to the remote database
You can then choose to enter Additional Connection String Options or Upload Certificates to connect to the database.
Click the Test Connection button.
Use SSL
Although not required, it is recommended that all connections use SSL. Additional connection string arguments may also be provided.
Note: Only Immuta uses the connection you provide and injects all policy controls when users query the system. In other words, users always connect through Immuta with policies enforced and have no direct association with this connection.
Further considerations
Immuta pushes down joins to be processed on the remote database when possible. To ensure this happens, make sure the connection information matches between data sources, including host, port, ssl, username, and password. You will see performance degradation on joins against the same database if this information doesn't match.
If a client certificate is required to connect to the source database, you can add it in the Upload Certificates section.
Decide how to virtually populate the data source by selecting one of the options:
Create sources for all tables in this database: This option will create data sources and keep them in sync for every table in the dataset. New tables will be automatically detected and new Immuta views will be created.
Schema / Table: This option will allow you to specify tables or datasets that you want Immuta to register.
Opt to Edit in the table selection box that appears.
By default, all schemas and tables are selected. Select and deselect by clicking the checkbox to the left of the name in the Import Schemas/Tables menu. You can create multiple data sources at one time by selecting an entire schema or multiple tables.
After making your selection(s), click Apply.
Enter the SQL Schema Name Format to be the SQL name that the data source exists under in Immuta. It must include a schema macro but you may personalize it using lowercase letters, numbers, and underscores to personalize the format. It may have up to 255 characters.
Enter the Schema Project Name Format to be the name of the schema project in the Immuta UI. If you enter a name that already exists, the name will automatically be incremented. For example, if the schema project Customer table already exists and you enter that name in this field, the name for this second schema project will automatically become Customer table 2 when you create it.
When selecting Create sources for all tables in this database and monitor for changes you may personalize this field as you wish, but it must include a schema macro.
When selecting Schema/Table this field is prepopulated with the recommended project name and you can edit freely.
Select the Data Source Name Format, which will be the format of the name of the data source in the Immuta UI.
<Tablename>: The data source name will be the name of the remote table, and the case of the data source name will match the case of the macro.
<
Enter the SQL Table Name Format, which will be the format of the name of the table in Immuta. It must include a table name macro, but you may personalize the format using lowercase letters, numbers, and underscores. It may have up to 255 characters.
Schema monitoring best practices
Schema monitoring is a powerful tool that ensures tables are all governed by Immuta.
Consider using schema monitoring later in your onboarding process, not during your initial setup and configuration when tables are not in a stable state.
Consider using to either run the schema monitoring job when your ETL process adds new tables or to add new tables.
Activate the to protect potentially sensitive data. This policy will null the new columns until a data owner reviews new columns that have been added, protecting your data to avoid data leaks on new columns getting added without being reviewed first.
When selecting the Schema/Table option, you can opt to enable Schema Monitoring by selecting the checkbox in this section.
Note: This step will only appear if all tables within a server have been selected for creation.
Although not required, completing these steps will help maximize the utility of your data source. Otherwise, click Create to save the data source.
This setting monitors when remote tables' columns have been changed, updates the corresponding data sources in Immuta, and notifies Data Owners of these changes.
To enable, select the checkbox in this section.
See the Schema projects overview page to learn more about column detection.
An Event Time column denotes the time associated with records returned from this data source. For example, if your data source contains news articles, the time that the article was published would be an appropriate Event Time column.
Click the Edit button in the Event Time section.
Select the column(s).
Click Apply.
Selecting an Event Time column will enable
more statistics to be calculated for this data source including the most recent record time, which is used for determining the freshness of the data source.
the creation of time-based restrictions in the policy builder.
Click Edit in the Latency section.
Complete the Set Time field, and then select MINUTES, HOURS, or DAYS from the subsequent dropdown menu.
Click Apply.
This setting impacts how often Immuta checks for new values in a column that is driving row-level redaction policies. For example, if you are redacting rows based on a country column in the data, and you add a new country, it will not be seen by the Immuta policy until this period expires.
Data owners can disable identification for their data sources in this section.
Click Edit in this section.
Select Enabled or Disabled in the window that appears, and then click Apply.
Adding tags to your data source allows users to search for the data source using the tags and Governors to apply Global policies to the data source. Note if Schema Detection is enabled, any tags added now will also be added to the tables that are detected.
To add tags,
Click the Edit button in the Data Source Tags section.
Begin typing in the Search by Tag Name box to select your tag, and then click Add.
Tags can also be added after you create your data source from the data source details page on the overview tab or the data dictionary tab.
Click Create to save the data source(s).
CREATE_DATA_SOURCE Immuta permission
Google BigQuery roles:
roles/bigquery.metadataViewer on the source table (if managed at that level) or dataset
roles/bigquery.dataViewer (or higher) on the source table (if managed at that level) or dataset
roles/bigquery.jobUser on the project
Google BigQuery data sources in Immuta must be created using a Google Cloud service account rather than a Google Cloud user account. If you do not currently have a service account for the Google Cloud project separate from the Google Cloud service account you created when configuring the Google BigQuery integration, you must create a Google Cloud service account with privileges to view and run queries against the tables you are protecting.
You have two options to create the required Google Cloud service account:
Using the Google Cloud documentation, create a service account with the following roles:
BigQuery User
BigQuery Data Viewer
Using the , generate a service account key for the account you just created.
Copy the script below and update the SERVICE_ACCOUNT, PROJECT_ID, and IMMUTA_GCP_KEY_FILE values.
SERVICE_ACCOUNT is the name for the new service account.
PROJECT_ID is the project ID for the Google Cloud Project that is integrated with Immuta.
IMMUTA_GCP_KEY_FILE is the path to a new output file for the private key.
Use the script below in the gcloud command line. This script is a template; change values as necessary:
Required Google BigQuery roles
Ensure that the user creating the data source has these Google BigQuery roles:
roles/bigquery.metadataViewer on the source table (if managed at that level) or dataset
roles/bigquery.dataViewer (or higher) on the source table (if managed at that level) or dataset
roles/bigquery.jobUser on the project
Click the + button in the top-left corner of the screen and select New Data Source.
Select the Google BigQuery tile in the Data Platform section.
Complete these fields in the Connection Information box:
Account Email Address: Enter the email address of a user with access to the dataset and tables. This is the account .
Project: Enter the name of the project that has been integrated with Immuta.
Dataset: Enter the name of the dataset with the tables you want Immuta to ingest.
Upload a BigQuery Key File in the modal. Note that the account in the key file must match the account email address entered in the previous step.
Click the Test Connection button. If the connection is successful, a check mark and successful connection notification will appear and you will be able to proceed. If an error occurs when attempting to connect, the error will be displayed in the UI. In order to proceed to the next step of data source creation, you must be able to connect to this data source using the connection information that you just entered.
Decide how to virtually populate the data source by selecting one of the options:
Create sources for all tables in this database: This option will create data sources and keep them in sync for every table in the dataset. New tables will be automatically detected and new Immuta views will be created.
Schema / Table: This option will allow you to specify tables or datasets that you want Immuta to register.
Provide basic information about your data source to make it discoverable to users.
Enter the SQL Schema Name Format to be the SQL name that the data source exists under in Immuta. For BigQuery the schema will be the BigQuery dataset. The format must include a schema macro but you may personalize it using lowercase letters, numbers, and underscores to personalize the format. It can have up to 255 characters.
Enter the Schema Project Name Format to be the name of the schema project in the Immuta UI. This is an Immuta project that will hold all of the metadata for the tables in a single dataset.
When selecting the Schema/Table option, you can opt to enable by selecting the checkbox in this section. This step will only appear if all tables within a server have been selected for creation.
Optional Advanced Settings:
Column Detection: To enable, select the checkbox in this section. This setting monitors when remote tables' columns have been changed, updates the corresponding data sources in Immuta, and notifies data owners of these changes. See to learn more about column detection.
Data Source Tags: Adding tags to your data source allows users to search for the data source using the tags and governors to apply global policies to the data source. Note if schema detection is enabled, any tags added now will also be added to the tables that are detected.
Click Create to save the data source(s).
With data sources registered in Immuta, your organization can now start
building global subscription and data policies to govern data.
creating projects to collaborate.
Select Accounts in this organizational directory only as the account type.
Navigate to the Data Sources list page and click Register Data Source.
Select the Azure Synapse Analytics tile in the Data Platform section.
Complete these fields in the Connection Information box:
Server: hostname or IP address
Port: port configured for Azure Synapse Analytics
SSL: when enabled, ensures communication between Immuta and the remote database is encrypted
Database: the remote database
Select the authentication method:
Username and Password:
Username: The username to use to connect to the remote database and retrieve records for this data source
You can then choose to enter Additional Connection String Options or Upload Certificates to connect to the database.
Click the Test Connection button.
Use SSL
Although not required, it is recommended that all connections use SSL. Additional connection string arguments may also be provided.
Note: Only Immuta uses the connection you provide and injects all policy controls when users query the system. In other words, users always connect through Immuta with policies enforced and have no direct association with this connection.
Considerations
Immuta pushes down joins to be processed on the remote database when possible. To ensure this happens, make sure the connection information matches between data sources, including host, port, ssl, and credentials. You will see performance degradation on joins against the same database if this information doesn't match.
If a client certificate is required to connect to the source database, you can add it in the Upload Certificates section.
Decide how to virtually populate the data source by selecting one of the options:
Create sources for all tables in this database: This option will create data sources and keep them in sync for every table in the dataset. New tables will be automatically detected and new Immuta views will be created.
Schema / Table: This option will allow you to specify tables or datasets that you want Immuta to register.
Opt to Edit in the table selection box that appears.
By default, all schemas and tables are selected. Select and deselect by clicking the checkbox to the left of the name in the Import Schemas/Tables menu. You can create multiple data sources at one time by selecting an entire schema or multiple tables.
After making your selection(s), click Apply.
Enter the SQL Schema Name Format to be the SQL name that the data source exists under in Immuta. It must include a schema macro but you may personalize it using lowercase letters, numbers, and underscores to personalize the format. It may have up to 255 characters.
Enter the Schema Project Name Format to be the name of the schema project in the Immuta UI. If you enter a name that already exists, the name will automatically be incremented. For example, if the schema project Customer table already exists and you enter that name in this field, the name for this second schema project will automatically become Customer table 2 when you create it.
When selecting Create sources for all tables in this database and monitor for changes you may personalize this field as you wish, but it must include a schema macro.
When selecting Schema/Table this field is prepopulated with the recommended project name and you can edit freely.
Select the Data Source Name Format, which will be the format of the name of the data source in the Immuta UI.
<Tablename>: The data source name will be the name of the remote table, and the case of the data source name will match the case of the macro.
<
Enter the SQL Table Name Format, which will be the format of the name of the table in Immuta. It must include a table name macro, but you may personalize the format using lowercase letters, numbers, and underscores. It may have up to 255 characters.
Schema monitoring best practices
Schema monitoring is a powerful tool that ensures tables are all governed by Immuta.
Consider using schema monitoring later in your onboarding process, not during your initial setup and configuration when tables are not in a stable state.
Consider using to either run the schema monitoring job when your ETL process adds new tables or to add new tables.
Activate the to protect potentially sensitive data. This policy will null the new columns until a data owner reviews new columns that have been added, protecting your data to avoid data leaks on new columns getting added without being reviewed first.
When selecting the Schema/Table option, you can opt to enable Schema Monitoring by selecting the checkbox in this section.
Note: This step will only appear if all tables within a server have been selected for creation.
Although not required, completing these steps will help maximize the utility of your data source. Otherwise, click Create to save the data source.
This setting monitors when remote tables' columns have been changed, updates the corresponding data sources in Immuta, and notifies Data Owners of these changes.
To enable, select the checkbox in this section.
See the Schema projects overview page to learn more about column detection.
An Event Time column denotes the time associated with records returned from this data source. For example, if your data source contains news articles, the time that the article was published would be an appropriate Event Time column.
Click the Edit button in the Event Time section.
Select the column(s).
Click Apply.
Selecting an Event Time column will enable
more statistics to be calculated for this data source including the most recent record time, which is used for determining the freshness of the data source.
the creation of time-based restrictions in the policy builder.
Click Edit in the Latency section.
Complete the Set Time field, and then select MINUTES, HOURS, or DAYS from the subsequent dropdown menu.
Click Apply.
This setting impacts how often Immuta checks for new values in a column that is driving row-level redaction policies. For example, if you are redacting rows based on a country column in the data, and you add a new country, it will not be seen by the Immuta policy until this period expires.
Adding tags to your data source allows users to search for the data source using the tags and Governors to apply Global policies to the data source. Note if Schema Detection is enabled, any tags added now will also be added to the tables that are detected.
To add tags,
Click the Edit button in the Data Source Tags section.
Begin typing in the Search by Tag Name box to select your tag, and then click Add.
Tags can also be added after you create your data source from the data source details page on the overview tab or the data dictionary tab.
Click Create to save the data source(s).
Connections allow you to register your data objects in a technology through a single connection, instead of registering data sources and an integration separately.
This feature is available to all 2025.1+ tenants. Contact your Immuta representative to enable this feature.
Immuta user with the APPLICATION_ADMIN Immuta permission
Databricks service principal with the following privileges. For instructions on setting up this user, see the :
See the for more details about Unity Catalog privileges and securable objects.
Unity Catalog and attached to a Databricks workspace.
Unity Catalog enabled on your Databricks cluster or SQL warehouse. All SQL warehouses have Unity Catalog enabled if your workspace is attached to a Unity Catalog metastore. Immuta recommends linking a SQL warehouse to your Immuta tenant rather than a cluster for both performance and availability reasons.
No Databricks Unity Catalog integration configured in Immuta. If your Databricks Unity Catalog integration is already configured on the app settings page, follow the .
Create a separate Immuta catalog for each Immuta tenant
If multiple Immuta tenants are connected to your Databricks environment, create a separate Immuta catalog for each of those tenants. Having multiple Immuta tenants use the same Immuta catalog causes failures in policy enforcement.
Click Data and select the Connections tab in the navigation menu.
Click the + Add Connection button.
Select the Databricks data platform tile.
Databricks Unity Catalog behavior
If you register a connection and a data object has no subscription policy set on it, Immuta will REVOKE access to the data in Databricks for all Immuta users, even if they had been directly granted access to the table in Unity Catalog.
If you disable a Unity Catalog data source in Immuta, all existing grants and policies on that object will be removed in Databricks for all Immuta users. All existing grants and policies will be removed, regardless of whether they were set in Immuta or in Unity Catalog directly.
If you need instruction for setting up your Databricks service principal before registering your connection, see the steps below.
In Databricks, with the privileges listed below. Immuta uses this service principal continuously to orchestrate Unity Catalog policies and maintain state between Immuta and Databricks.
USE CATALOG and MANAGE on all catalogs containing securables you want registered as Immuta data sources.
USE SCHEMA on all schemas containing securables you want registered as Immuta data sources.
MANAGE and MODIFY are required so that the service principal can apply row filters and column masks on the securable; to do so, the service principal must also have SELECT on the securable as well as USE CATALOG on its parent catalog and USE SCHEMA on its parent schema. Since privileges are inherited, you can grant the service principal the MODIFY and SELECT privilege on all catalogs or schemas containing Immuta data sources, which automatically grants the service principal the
See the for more details about Unity Catalog privileges and securable objects.
Audit is enabled by default on all Databricks Unity Catalog connections. If you need to turn audit off, and set audit to false in the payload.
. For Databricks Unity Catalog audit to work, Immuta must have, at minimum, the following access.
USE CATALOG on the system catalog
USE SCHEMA on the system.access and system.query schemas
This feature is available to all 2025.1+ tenants. Contact your Immuta representative to enable this feature.
Connections allow you to register your data objects in a technology through a single connection, making data registration more scalable for your organization. Instead of registering schema and databases individually, you can register them all at once and allow Immuta to monitor your data platform for changes so that data sources are added and removed automatically to reflect the state of data on your data platform.
Once you register your connection, Immuta presents a hierarchical view of your data that reflects the hierarchy of objects in your data platform:
Host (e.g., account, metastore, etc.)
Database
Schema
Tables: These represent the individual objects in your data platform, and when enabled, become data sources
Beyond making the registration of your data more intuitive, connections provides more control. Instead of performing operations on individual schemas or tables, you can perform operations (such as object sync) at the connection level.
See the following guides for a list of requirements per data platform:
See the integration's reference guide for the supported object types for each technology:
Immuta will ensure the objects in your database stay synchronous with the registered objects in Immuta. To do this, Immuta uses the account credentials provided during registration to check the remote technology for object changes. See the for each connection's support, but in general, the following is true:
If tables are added, new data sources are created in Immuta.
If remote tables are deleted, the corresponding data sources in Immuta will become disabled; however, the data object representing the table will still appear in the connections view until manually deleted.
If a column changes in a table, those changes will be reflected in the Immuta data source data dictionary.
Your connection can be synced in two ways:
Periodic object sync: This happens once every 24 hours (at 1:00 AM UTC). Currently, updating this schedule is not configurable.
: You can manually run object sync on your whole connection or on any object in your connection.
Object sync is designed to pull in the user’s data objects from the connected backing technology, so it specifically excludes internal Immuta-managed objects. These objects reside within the Immuta database or catalog, which is , and are used solely for Immuta's internal processes. Because these objects are only for Immuta processes and cannot be queried by users, the objects will be ignored by object sync and will not be ingested into Immuta.
All data sources within the registered connection and found by object sync after will get an automated tag that represents the connection. These tags can be used like any other in Immuta to , , , etc. However, they cannot be edited or deleted.
The tag will be formatted as follows and applied to data sources from table data objects:
Immuta Connections . The Technology . Your Connection Name . Your Schema . Your Database
When new columns are detected and added to Immuta, they will be automatically tagged with the New tag. This allows governors to use the to mask columns with the New tag, since they could contain sensitive data.
The New Column Added global policy is staged (inactive) by default. See the to activate this seeded global policy if you want any columns with the New tag to be automatically masked.
Without connections, would also tag new data sources with the New tag. However this behavior is exclusive to schema monitoring and will not happen with object sync. Object sync only tags new columns of known data sources with the New tag.
When there is an active policy that targets the New tag, Immuta sends validation requests to data owners for the following changes made in the remote data platform:
Column added: Immuta applies the New tag on the column that has been added and sends a request to the data owner to validate if the new column contains sensitive data. Once the data owner confirms they have validated the content of the column, Immuta removes the New tag from it and as a result any policy that targets the New column tag no longer applies.
Column deleted: Immuta deletes the column from the data source's data dictionary in Immuta. Then, Immuta sends a request to the data owner to validate the deleted column.
For instructions on how to view and manage your tasks and requests in the Immuta UI, see the . To view and manage your tasks and requests via the Immuta API, see the section of the API documentation.
When registering a connection, Immuta sets the connection to the recommended default settings to protect your data. The recommended settings are described below:
Object sync: This setting allows Immuta to monitor the connection for changes. This setting is enabled by default and cannot be disabled.
Default run schedule: This sets the time interval for Immuta to check for new objects. By default, this schedule is set to 24 hours.
Impersonation: This setting enables and defines the role for user impersonation, available with . This setting is disabled by default.
If you want all data objects from connections to have data tags ingested from the data provider into Immuta, ensure the credentials provided on the Immuta app settings page for the external catalog feature can access all the data objects. Any data objects the credentials do not have access to will not be tagged in Immuta. In practice, it is recommended to just use the same credentials for the connection and tag ingestion.
Within the connection, the Data Owner permission can be granted on any data object, and will allow that user to manage that object and any within it. For example, granting a user Data Owner on a schema will grant them Data Owner on tables within that schema as well. Data owners can complete the following actions:
View the connections UI
Access any connection where they are granted Data Owner anywhere in the hierarchy
Trigger object sync for their data objects
Deregistering a connection automatically deletes all of its child objects in Immuta. However, Immuta will not remove the objects in your backing technology.
When trying to enable a data object, it must have fewer than 100,000 child objects. The only exception is the second-to-lowest object (e.g., a Snowflake schema), which can be enabled with any number of child objects to ensure bulk actions can be completed.
Having multiple objects with the same name within the same schema is currently unsupported and will lead to object uniqueness violations in Immuta. If this happens, all objects within the schema will not be properly ingested into Immuta. In this scenario, you can work around it as follows:
Ensure every object within the same schema has a unique name, or
If you attempted the upgrade and receive the message that your upgrade is Partially Complete, find the un-upgraded data sources by navigating to the Upgrade Manager and clicking the number in the Available column for the relevant connection.
Use the options below to resolve those un-upgraded data sources in order to finish your upgrade. See the linked how-to's for more details on the actions to take.
Note that these un-upgraded data sources still exist and are still protected by policy.
Delete the remaining data sources: The easiest solution is to delete the data sources that did not upgrade. Note that disabled data sources that no longer exist in your data platform will never be upgraded. Only do this if you no longer need these data sources in Immuta.
Adjust the privileges of the system user used to connect Immuta and your data platform: Ensure that the Immuta system user can also access all remaining un-upgraded data sources in your data platform.
Expand privileges in , , or (recommended): Extend the Immuta system user's privileges in your data platform by granting it access to all remaining un-upgraded data sources.
: You can also provide Immuta with a different set of credentials that already have the required privileges on the un-upgraded data sources.
Ensure that the role you specified in the upgrade has the and has been granted to the Immuta system user.
Ensure the Databricks service principal you created and connected with Immuta has the .
Ensure the user's credentials you provided have the .
to disable and delete data sources that did not upgrade.
View the data sources that were not upgraded
Find the un-upgraded data sources by navigating to the Upgrade Manager and clicking the number in the Available column.
Disable the data sources
From this data source list page, disable all the data sources to delete.
Check your role privileges
To find the role you specified, do the following in the Immuta UI:
Navigate to Connections.
Select the connection you are trying to upgrade.
Check your service principal privileges
To find the service principal you specified, do the following in the Immuta UI:
Navigate to Connections.
Select the connection you are trying to upgrade.
Check your system account privileges
To find the system account you specified, do the following in the Immuta UI:
Navigate to Connections.
Select the connection you are trying to upgrade.
If you have another set of credentials on hand with wider privileges, you can edit the connection to use these credentials instead to resolve the un-upgraded data sources.
Edit the connection
Navigate to Connections.
Select the connection you are trying to upgrade.
access-control.config-files=/etc/trino/immuta-access-control.properties{
"id": "c8e020cb-232c-4ba9-a0d8-f3a84ba6808d",
"dateTime": "1670355170336",
"month": 1475,
"profileId": 1,
"userId": "immuta_system_account",
"dataSourceId": 2,
"dataSourceName": "Customer 2",
"count": 1,
"recordType": "nativeLineageDataSourceTagUpdate",
"success": true,
"component": "dataSource",
"extra": {
"sourceColumn": {
"nativeColumnName": "\"MY_DATABASE\".\"PUBLIC\".\"CUSTOMER\".\"C_FIRST_NAME\"",
"dataSourceId": 1,
"columnName": "c_first_name"
},
"dataSourceId": 2,
"columnName": "c_first_name",
"tagPropagationDirection": "downstream",
"tags": [
{
"name": "SNOWFLAKE_TAGS.pii",
"source": "immuta-us-east-1"
}
]
},
"newAuditServiceFields": {
"actorIp": null,
"sessionId": null
},
"createdAt": "2022-12-06T19:32:50.372Z",
"updatedAt": "2022-12-06T19:32:50.372Z"
}Discovered.Electronic Mail Address
Propagated through lineage
Customer 3
Customer 2
Discovered.Electronic Mail Address
Propagated through lineage
None, manually removed
Manually removed
Customer 3
Customer 2
Discovered.Electronic Mail Address
Propagated through lineage
Enter the Scope (string). The scope limits the operations allowed in Trino by the access token. See the OAuth 2.0 documentation for details about scopes.
Opt to fill out the Resource field with a URI of the resource where the requested token will be used.
Enter the x509 Certificate Thumbprint. This identifies the corresponding key to the token and is often abbreviated as `x5t` or is called `sub` (Subject).
Upload the Client Certificate, which is used to sign the authorization request.
Click Download Policies, and then manually add this cluster policy to your Databricks workspace.
Ensure that the init_scripts.0.workspace.destination in the policy matches the file path to the init script you configured above.
The Immuta cluster policy references Databricks Secrets for several of the sensitive fields. These secrets must be manually created if the cluster policy is not automatically pushed. Use Databricks API or CLI to push the proper secrets.
http://Enter the Scope (string). The scope limits the operations allowed in Trino by the access token. See the OAuth 2.0 documentation for details about scopes.
Opt to fill out the Resource field with a URI of the resource where the requested token will be used.
Enter the x509 Certificate Thumbprint. This identifies the corresponding key to the token and is often abbreviated as x5t or is called sub (Subject).
Upload the Client Certificate, which is used to sign the authorization request.
/etc/trino/immuta-access-control.properties.Standalone installations
Follow Trino's documentation to install the plugin archive on all nodes in your cluster.
Create the Immuta access control configuration file in the Trino configuration directory: <trino_install_directory>/etc/immuta-access-control.properties.
TablenameCustom: Enter a custom template for the Data Source Name. You may personalize this field as you wish, but it must include a tablename macro. The case of the macro will apply to the data source name (i.e., <Tablename> will result in "Data Source Name," <tablename> will result in "data source name," and <TABLENAME> will result in "DATA SOURCE NAME").
When selecting Create sources for all tables in this database and monitor for changes, you may personalize this field as you wish, but it must include a schema macro to represent the dataset name.
When selecting Schema/Table, this field is pre-populated with the recommended project name and you can edit freely.
Select the Data Source Name Format, which will be the format of the name of the data source in the Immuta UI.
<Tablename>: The Immuta data source will have the same name as the original table.
<Schema><Tablename>: The Immuta data source will have both the dataset and original table name.
Custom: This is a template you create to make the data source name. You may personalize this field as you wish, but it must include a tablename macro. The case of the macro will apply to the data source name (i.e., <Tablename> will result in "Data Source Name," <tablename> will result in "data source name," and <TABLENAME> will result in "DATA SOURCE NAME").
Enter the SQL Table Name Format, which will be the format of the name of the table in Immuta. It must include a table name macro, but you may personalize the format using lowercase letters, numbers, and underscores. It may have up to 255 characters.
Click the Edit button in the Data Source Tags section.
Begin typing in the Search by Tag Name box to select your tag, and then click Add.
# Fill these out
# Please use .json extension for key
export SERVICE_ACCOUNT=datasource-account
export PROJECT_ID=project123
export IMMUTA_GCP_KEY_FILE=~/GCP_${SERVICE_ACCOUNT}_key.json
# Create service account for creating data sources
gcloud iam service-accounts create ${SERVICE_ACCOUNT} --project ${PROJECT_ID}
# Generate keyfile
gcloud iam service-accounts keys create ${IMMUTA_GCP_KEY_FILE} --iam-account=${SERVICE_ACCOUNT}@${PROJECT_ID}.iam.gserviceaccount.com
# Allow account to execute queries
#gcloud projects add-iam-policy-binding ${PROJECT_ID} \
#--member="serviceAccount:${SERVICE_ACCOUNT}@${PROJECT_ID}.iam.gserviceaccount.com" --role=projects/${PROJECT_ID}/roles/bigquery.user
gcloud projects add-iam-policy-binding ${PROJECT_ID} \
--member="serviceAccount:${SERVICE_ACCOUNT}@${PROJECT_ID}.iam.gserviceaccount.com" --role=roles/bigquery.user
# Allow account to view data
gcloud projects add-iam-policy-binding ${PROJECT_ID} \
--member="serviceAccount:${SERVICE_ACCOUNT}@${PROJECT_ID}.iam.gserviceaccount.com" --role=roles/bigquery.dataViewer
echo if something went wrong and you want to delete the service account, run:
echo gcloud iam service-accounts delete ${SERVICE_ACCOUNT}@${PROJECT_ID}.iam.gserviceaccount.com --project ${PROJECT_ID}Entra ID OAuth Client Secret: The values below can be found on the overview page of the application you created in Microsoft Entra ID. Before you enter this information, ensure you have completed the prerequisites for OAuth authentication listed above.
Tenant ID
Client ID
Client Secret: Enter the Value of the secret, not the secret ID.
TablenameCustom: Enter a custom template for the Data Source Name. You may personalize this field as you wish, but it must include a tablename macro. The case of the macro will apply to the data source name (i.e., <Tablename> will result in "Data Source Name," <tablename> will result in "data source name," and <TABLENAME> will result in "DATA SOURCE NAME").
USE CATALOG and MANAGE on all catalogs containing securables you want registered as Immuta data sources.
USE SCHEMA on all schemas containing securables you want registered as Immuta data sources.
MODIFY and SELECT on all securables you want registered as Immuta data sources.
Additional privileges are required for query audit:
USE CATALOG on the system catalog
USE SCHEMA on the system.access and system.query schemas
SELECT on the following system tables:
system.access.table_lineage
system.access.column_lineage
Databricks user to run the script to register the connection with the following privileges:
Metastore admin and account admin
CREATE CATALOG privilege on the Unity Catalog metastore to create an Immuta-owned catalog and tables
Host: The hostname of your Databricks workspace.
Port: Your Databricks port.
HTTP Path: The HTTP path of your Databricks cluster or SQL warehouse.
Immuta Catalog: The name of the catalog Immuta will create to store internal entitlements and other user data specific to Immuta. This catalog will only be readable for the Immuta service principal and should not be granted to other users. The catalog name may only contain letters, numbers, and underscores and cannot start with a number.
Display Name: The display name represents the unique name of your connection and will be used as prefix in the name for all data objects associated with this connection. It will also appear as the display name in the UI and will be used in all API calls made to update or delete the connection. Avoid the use of periods (.) or
Click Next.
Select your authentication method from the dropdown:
Access Token: Enter the Access Token in the Immuta System Account Credentials section. This is the access token for the Immuta service principal, which can be an on-behalf token created in Databricks. This service principal must have the metastore privileges listed above for the metastore associated with the Databricks workspace. If this token is configured to expire, update this field regularly for the connection to continue to function. This authentication information will be included in the script populated later on the page.
OAuth M2M:
AWS Databricks:
Follow for the Immuta service principal and assign this service principal the for the metastore associated with the Databricks workspace.
Fill out the Token Endpoint with the full URL of the identity provider. This is where the generated token is sent. The default value is https://<your workspace name>.cloud.databricks.com/oidc/v1/token.
Copy the provided script and run it in Databricks as a user with the privileges listed in the requirements section.
Click Validate Connection.
If the connection is successful, click Next. If there are any errors, check the connection details and credentials to ensure they are correct and try again.
Ensure all the details are correct in the summary and click Complete Setup.
See the Databricks Unity Catalog reference guide for more details about permissions Immuta revokes and how to configure this behavior for your connection.
MODIFYSELECTMODIFYMODIFYMODIFYSELECTMANAGESELECT on the following system tables:
system.access.table_lineage
system.access.column_lineage
system.access.audit
system.query.history
Access to system tables is governed by Unity Catalog. No user has access to these system schemas by default. To grant access, a user that is both a metastore admin and an account admin must grant USE_SCHEMA and SELECT privileges on the system schemas to the service principal. See .
Project workspaces: This setting enables Snowflake project workspaces. If you use Snowflake secure data sharing with Immuta, enable this setting, as project workspaces are required. If you use Snowflake table grants, disable this setting; project workspaces cannot be used when Snowflake table grants are enabled. Project workspaces are not supported with any other connections. This setting is disabled by default.
Remove the visibility of one of the objects from the Immuta system account by adjusting the permissions in the backing technology. This will ensure only one of the objects is seen by the system account and ingested in Immuta.
Using periods (.) in the display name of the connection or data object names should be avoided because periods are used as hierarchy delimiters in Immuta. If you must use periods in names, explicitly escape them to avoid issues.
Learn
Read these guides to learn more about data platform connections, data sources, and policies.
Implement
Follow these guides to register a connection.
Check the top checkbox in the data source list table. Deselect the checkbox for any data sources you do not want to delete.
Click More Actions.
Click Disable and then Confirm.
Delete the data sources
From this data source list page, delete the data sources.
Check the top checkbox in the data source list table. Deselect the checkbox for any data sources you do not want to delete.
Click More Actions.
Click Disable and then Confirm.
Finalize the upgrade
Once the un-upgraded data sources are deleted, you should be able to complete the upgrade.
Navigate to the Upgrade Manager.
Click Finalize.
Navigate to the Connections tab.
See the Role.
Now, ensure that role has the required privileges for each data source that was not successfully upgraded. Add the privileges where needed.
Grant your role to the system account
To find the system account you specified, do the following in the Immuta UI:
Navigate to Connections.
Select the connection you are trying to upgrade.
Navigate to the Connections tab.
See the Setup: Username.
Now, in Snowflake, grant the role to the system account:
Run object sync
Navigate to Connections.
Click on the more actions menu for the connection you are trying to upgrade.
Select Run Object Sync.
Click the checkbox to Also scan all disabled data objects.
Click Run Object Sync.
Now, navigate back to the Upgrade Manager tab, and if all your data sources are successfully upgraded, finalize the upgrade.
Finalize the upgrade
Once the un-upgraded data sources are resolved, you can complete the upgrade.
Navigate to the Upgrade Manager.
Click Finalize.
Navigate to the Connections tab.
Now, ensure that service principal has the required privileges for each data source that was not successfully upgraded. Add the privileges where needed.
Run object sync
Navigate to Connections.
Click on the more actions menu for the connection you are trying to upgrade.
Select Run Object Sync.
Click the checkbox to Also scan all disabled data objects.
Click Run Object Sync.
Now, navigate back to the Upgrade Manager tab, and if all your data sources are successfully upgraded, finalize the upgrade.
Finalize the upgrade
Once the un-upgraded data sources are resolved, you can complete the upgrade.
Navigate to the Upgrade Manager.
Click Finalize.
Navigate to the Connections tab.
Now, ensure that system account has the required privileges for each data source that was not successfully upgraded. Add the privileges where needed.
Run object sync
Navigate to Connections.
Click on the more actions menu for the connection you are trying to upgrade.
Select Run Object Sync.
Click the checkbox to Also scan all disabled data objects.
Click Run Object Sync.
Now, navigate back to the Upgrade Manager tab, and if all your data sources are successfully upgraded, finalize the upgrade.
Finalize the upgrade
Once the un-upgraded data sources are resolved, you can complete the upgrade.
Navigate to the Upgrade Manager.
Click Finalize.
Navigate to the Connections tab.
Click Edit and then Next
Enter the new credentials in the textbox and continue to the end to save.
Run object sync
Navigate to Connections.
Click on the more actions menu for the connection you are trying to upgrade.
Select Run Object Sync.
Click the checkbox to Also scan all disabled data objects.
Click Run Object Sync.
Now, navigate back to the Upgrade Manager tab, and if all your data sources are successfully upgraded, finalize the upgrade.
Finalize the upgrade
Once the un-upgraded data sources are resolved, you can complete the upgrade.
Navigate to the Upgrade Manager.
Click Finalize.
Private preview: This integration is available to select accounts. Contact your Immuta representative for details.
Immuta's Amazon S3 integration allows users to apply to data in S3 to restrict what prefixes, buckets, or objects users can access. To enforce access controls on this data, Immuta creates S3 grants that are administered by S3 Access Grants, an AWS feature that defines access permissions to data in S3.
No location is registered in your S3 Access Grants instance before configuring the integration in Immuta
; contact your Immuta representative to get this feature enabled
Enable AWS IAM Identity Center (IDC) (recommended)
APPLICATION_ADMIN Immuta permission to configure the integration
CREATE_S3_DATASOURCE Immuta permission to register S3 prefixes
The AWS account credentials or optional AWS IAM role you provide Immuta to configure the integration must
. AWS supports one Access Grants instance per region per AWS account.
. You will add this role to your integration configuration in Immuta so that Immuta can register this role with your Access Grants location. The policy should include at least the following permissions, but might need additional permissions depending on other local setup factors. An example trust policy is provided below.
sts:AssumeRole
with the following permissions, and attach the policy to the IAM role you created to grant the permissions to the role. The policy should include the following permissions. An example policy is provided below.
s3:GetObject
s3:GetObjectVersion
s3:GetObjectAcl
Replace <bucket_arn> in the example below with the ARN of the bucket scope that contains data you want to grant access to.
If you use server-side encryption with AWS Key Management Service (AWS KMS) keys to encrypt your data, the following permissions are required for the IAM role in the policy. If you do not use this feature, do not include these permissions in your IAM policy:
kms:Decrypt
kms:GenerateDataKey
that Immuta can use to create Access Grants locations and issue grants. This role must have the S3 permissions listed in the . An example policy is provided below.
Replace <role_arn> and <access_grants_instance_arn> in the example below with the ARNs of the role you created and your Access Grants instance, respectively. The Access Grants instance resource ARN should be scoped to apply to any future locations that will be created under this Access Grants instance. For example, "Resource": "arn:aws:s3:us-east-2:6********499:access-grants/default*" ensures that the role would have permissions for both of these locations:
arn:aws:s3:us-east-2:6********499:access-grants/default/newlocation1
If you use AWS IAM Identity Center, associate . Then add the permissions listed in the sample policy below to your IAM policy, and attach the policy to the IAM role you created to grant the permissions to the role.
Copy the JSON below and replace the following bracketed placeholder values with your own. For details about the actions and resource values, see the .
<iam_identity_center_instance_arn>: The that is configured with the application.
In Immuta, click App Settings in the navigation menu and click the Integrations tab.
Click + Add Integration.
Select Amazon S3 from the dropdown menu and click Continue Configuration.
Follow the to register prefixes in Immuta.
To create an S3 data source using the API, see the .
You can edit the following settings for an existing Amazon S3 integration on the app settings page:
friendly name
authentication type and values (access key, secret, and role)
To edit settings for an existing integration via the API, see the .
Requirements: USER_ADMIN Immuta permission and either the GOVERNANCE or CREATE_S3_DATASOURCE Immuta permission
in Immuta to enforce access controls.
Map AWS IAM principals to each Immuta user to ensure Immuta properly enforces policies:
Click Identities and select Users in the navigation menu.
Requirement: User must be subscribed to the data source in Immuta
. If you're accessing S3 data through one of the supported (such as Amazon EMR on EC2), that application will make this request on your behalf, so you can skip this step.
.
Immuta's Amazon S3 integration allows users to apply to data in S3 to restrict what prefixes, buckets, or objects users can access. To enforce access controls on this data, Immuta creates S3 grants that are administered by S3 Access Grants, an AWS feature that defines access permissions to data in S3.
With this integration, users can avoid
hand-writing AWS IAM policies
managing AWS IAM role limits
manually tracking what user or role has access to what files in AWS S3 and verifying those are consistent with intent
To enforce controls on S3 data, Immuta interacts with several S3 Access Grants components:
Access Grants instance: An Access Grants instance is a logical container for individual grants that specify who can access what level of data in S3 in your AWS account and region. AWS supports one Access Grants instance per region per AWS account.
Location: A location specifies what data the Access Grants instance can grant access to. For example, registering a location with a scope of s3:// allows Access Grants to manage access to all S3 buckets in that AWS account and region, whereas setting the bucket s3://research-data as the scope limits Access Grants to managing access to that single bucket for that location. When you configure the S3 integration in Immuta, you specify a location's scope and IAM assumed role, and Immuta registers the location in your Access Grants instance and associates it with the provided IAM role for you. Each S3 integration you configure in Immuta is associated with one location, and Immuta manages all grants in that location. Therefore, grants cannot be manually created by users in an Access Grants instance location that Immuta has registered and manages. During data source registration, this location scope is prepended to the data source prefixes to build the final path used to grant or revoke access to that data in S3. For example, a location scope of
The diagram below illustrates how these S3 Access Grants components interact.
For more details about these Access Grants concepts, see the .
After an administrator creates an Access Grants instance and an assumed IAM role in their AWS account, an application administrator configures the Amazon S3 integration in Immuta. During configuration, the administrator provides the following connection information so that Immuta can create and register a location in that Access Grants instance:
AWS account ID and region
ARN for the existing Access Grants instance
ARN for the assumed IAM role
When Immuta registers this location, it associates the assumed IAM role with the location. This allows the IAM role to create temporary credentials with access scoped to a particular S3 prefix, bucket, or object in the location. The IAM role you create for this location must have all the object- and bucket-level permissions listed in the on all buckets and objects in the location; if it is missing permissions, the IAM role will not be able to grant those missing permissions to users or applications requesting temporary credentials.
In the example below, an application administrator registers the following location prefix and IAM role for their Access Grants instance in AWS account 123456:
Location path: s3://. This path allows a single Amazon S3 integration to manage all objects in S3 in that AWS account and region. Data owners can scope down access further when registering specific S3 prefixes and applying policies.
Location IAM role: The arn:aws:iam::123456:role/access-grants-role IAM role will be used to vend temporary credentials to users and applications.
Immuta registers this location and associated IAM role in the user's Access Grants instance:
After the S3 integration is configured, a data owner can register S3 prefixes and buckets that are in the configured Access Grants location path to enforce access controls on resources. Immuta stores the connection information for the prefix so that the metadata can be used to create and enforce subscription policies on S3 data.
A data owner or governor can apply a subscription policy to a registered prefix, bucket, or object to control who can access objects beginning with that prefix or in that bucket after it is registered in Immuta. Once a subscription policy is created and Immuta users are subscribed to the prefix, bucket, or object, Immuta calls the Access Grants API to create a grant for each subscribed user, specifying the following parameters in the payload so that Access Grants can create and store a grant for each user:
Access Grants location
READ access
User or role principle
In the example below, a data owner registers the s3://research-data/* bucket, and Immuta stores the connection information in the Immuta metadata database. Once the user, Taylor, is subscribed to s3://research-data/*, Immuta calls the Access Grants API to create a grant for that user to allow them to read and write S3 data in that bucket:
The status of the integration is visible on the integrations tab of the Immuta application settings page. If errors occur in the integration, a banner will appear in the Immuta UI with guidance for remediating the error.
The definitions for each status and the state of configured data platform integrations is available in the . However, the UI consolidates these error statuses and provides detail in the error messages.
To access S3 data registered in Immuta, users must be subscribed to the prefix, bucket, or object in Immuta, and their principals must be . Once users are subscribed, they request temporary credentials from S3 Access Grants. Access Grants looks up the grant ID associated with the requester. If no matching grant exists, they receive an access denied error. If one exists, Access Grants assumes the IAM role associated with the location and requests temporary credentials that are scoped to the prefix, bucket, or object and permissions specified by the individual grant. Access Grants vends the credentials to the requester, who uses those temporary credentials to access the data in S3.
In the example below, Taylor requests temporary credentials from S3 Access Grants. Access Grants looks up the grant ID (1) for that user, assumes the arn:aws:iam::123456:role/access-grants-role IAM role for the location, and vends temporary credentials to Taylor, who then uses the credentials to access the research-data bucket in S3:
Note that when accessing data through S3 Access Grants, the user or application interacts directly with the Access Grants API to request temporary credentials; Immuta does not act in this process at all. See the diagram below for an illustration of the process for accessing data through S3 Access Grants.
AWS services that support S3 Access Grants will request temporary credentials for users automatically. If users are not using a service that supports S3 Access Grants, they must have the to to request temporary credentials to access data through the access grant.
For a list of AWS services that support S3 Access Grants, see the .
Immuta's S3 integration allows data owners and governors to apply object-level access controls on data in S3 through subscription policies. When a user is subscribed to a registered prefix, bucket, or object, Immuta calls the Access Grants API to create an individual grant that narrows the scope of access within the location to that registered prefix, bucket, or object. See the diagram below for a visualization of this process.
When a user's entitlements change or a subscription policy is added to, updated, or deleted from a prefix, Immuta performs one of the following processes for each user subscribed to the registered prefix:
User added to the prefix: Immuta specifies a permission (READ or READWRITE) for each user and uses the Access Grants API to create an individual grant for each user.
User updated: Immuta deletes the current grant ID and creates a new one using the Access Grants API.
Immuta offers two to manage read and write access to data in S3:
Read access policies manage who can get objects from S3.
Write access policies manage who can modify data in S3.
Data policies, which provide more granular controls by redacting or masking values in a table, are not supported for S3.
Data owners can register an S3 prefix at any level in the S3 path by . During this process, Immuta stores the connection information for use in .
Each prefix added in the data registration workflow is created as a single Immuta data source, and a subscription policy added to a data source applies to any objects in that bucket or beginning with that prefix:
Therefore, data owners should register prefixes or buckets at the lowest level of access control they need for that data. Using the example above, if the data owner needed to allow different users to access s3://yellow-bucket/research-data/* than those who should access s3://yellow-bucket/analyst-data/*, the data owner must register the research-data/* and analyst-data/* prefixes separately and then apply a subscription policy to those prefixes:
When an S3 data source is deleted, Immuta deletes all the grants associated with that prefix, bucket, or object in that location.
Access can be managed in AWS using IAM users, roles, or Identity Center (IDC). Immuta for user provisioning in the S3 integration.
However, if you manage access in AWS through IAM roles instead of users, user provisioning in Immuta must be done using IAM role principals. This means that if users share IAM roles, you could end up in a situation where you over-provision access to everyone in the IAM role.
See the guidelines below for the best practices to avoid this behavior if you currently use IAM roles to manage access.
Enable (recommended): IDC is the best approach for user provisioning because it treats users as users, not users as roles. Consequently, access controls are enforced for the querying user, nothing more. This approach eliminates over-provisioning and permits granular access control. Furthermore, IDC uses trusted identity propagation, meaning AWS propagates a user's identity wherever that user may operate within the AWS ecosystem. As a result, a user's identity always remains known and consistent as they navigate across AWS services, which is a key requirement for organizations to properly govern that user. Enabling IDC does not impact any existing access controls; it is additive. Immuta will manage the GRANTs for you using IDC if it is enabled and configured in Immuta. See the for instructions on mapping users from AWS IDC to user accounts in Immuta.
Create an IAM role per user: If you do not have IDC enabled, create an IAM role per user that is unique to that user and assign that IAM role to each corresponding user in Immuta. Ensure that the IAM role cannot be shared with other users. This approach can be a challenge because there is an .
Names are case-sensitive
The IAM role name and IAM user name are case-sensitive. See the for details.
Immuta supports mapping an Immuta user to AWS in one of the following ways:
: Only a single Immuta user can be mapped to an IAM role. This restriction prohibits enforcing policies on AWS users who could assume that role. Therefore, if using role principals, create a new user in Immuta that represents the role so that the role then has the permissions applied specifically to it.
See the for instructions on mapping principals to user accounts in Immuta.
The Amazon S3 integration will not interfere with existing legacy S3 integrations, and multiple S3 integrations can exist in a single Immuta tenant.
AWS services that support S3 Access Grants will request temporary credentials for users automatically. If users are not using a service that supports S3 Access Grants, they must have the to to request temporary credentials to access data through the access grant.
For a list of AWS services that support S3 Access Grants, see the .
During private preview, Immuta supports up to 500 prefixes (data sources) and up to 20 Immuta users that are mapped to S3 identities principals. This is a preview limitation that will be removed in a future phase of the integration.
S3 Access Grants allows 100,000 grants per region per account. Thus, if you have 5 Immuta users with access to 20,000 registered prefixes, you would reach this limit. for details.
The following Immuta features are not currently supported by the integration in private preview:
Deprecation notice
Support for registering Snowflake data sources using this legacy workflow has been deprecated. Instead, register your data using connections.
CREATE_DATA_SOURCE Immuta permission
The Snowflake user registering data sources must have the following privileges on all securables:
USAGE on all databases and schemas with registered data sources.
Snowflake imported databases
Immuta does not support Snowflake tables from imported databases. Instead, create a view of the table and register that view as a data source.
Use SSL
Although not required, all connections should use SSL. Additional connection string arguments may also be provided.
Note: Only Immuta uses the connection you provide and injects all policy controls when users query the system. In other words, users always connect through Immuta with policies enforced and have no direct association with this connection.
Navigate to the Data Sources list page and click Register Data Source.
Select the Snowflake tile in the Data Platform section.
Complete these fields in the Connection Information box:
Considerations
Immuta pushes down joins to be processed on the remote database when possible. To ensure this happens, make sure the connection information matches between data sources, including host, port, ssl, username, and password. You will see performance degradation on joins against the same database if this information doesn't match.
File naming convention
If you are uploading more than one file, ensure the certificate used for the OAuth authentication has the key name "oauth client certificate."
Decide how to virtually populate the data source by selecting one of the options:
Create sources for all tables in this database: This option will create data sources and keep them in sync for every table in the dataset. New tables will be automatically detected and new Immuta views will be created.
Schema / Table: This option will allow you to specify tables or datasets that you want Immuta to register.
Opt to Edit in the table selection box that appears.
Enter the SQL Schema Name Format to be the SQL name that the data source exists under in Immuta. It must include a schema macro but you may personalize it using lowercase letters, numbers, and underscores to personalize the format. It may have up to 255 characters.
Enter the Schema Project Name Format to be the name of the schema project in the Immuta UI. If you enter a name that already exists, the name will automatically be incremented. For example, if the schema project Customer table already exists and you enter that name in this field, the name for this second schema project will automatically become Customer table 2 when you create it.
Schema monitoring best practices
Schema monitoring is a powerful tool that ensures tables are all governed by Immuta.
Consider using schema monitoring later in your onboarding process, not during your initial setup and configuration when tables are not in a stable state.
When selecting the Schema/Table option, opt to enable by selecting the checkbox in this section.
Note: This step will only appear if all tables within a server have been selected for creation.
Although not required, completing these steps will help maximize the utility of your data source. Otherwise, click Create to save the data source.
This setting monitors when remote tables' columns have been changed, updates the corresponding data sources in Immuta, and notifies Data Owners of these changes.
To enable, select the checkbox in this section.
See the page to learn more about column detection.
An Event Time column denotes the time associated with records returned from this data source. For example, if your data source contains news articles, the time that the article was published would be an appropriate Event Time column.
Click the Edit button in the Event Time section.
Select the column(s).
Click Apply.
Selecting an Event Time column will enable
more statistics to be calculated for this data source including the most recent record time, which is used for determining the freshness of the data source.
the creation of time-based restrictions in the policy builder.
Click Edit in the Latency section.
Complete the Set Time field, and then select MINUTES, HOURS, or DAYS from the subsequent dropdown menu.
Click Apply.
This setting impacts how often Immuta checks for new values in a column that is driving row-level redaction policies. For example, if you are redacting rows based on a country column in the data, and you add a new country, it will not be seen by the Immuta policy until this period expires.
Data owners can disable identification for their data sources in this section.
Click Edit in this section.
Select Enabled or Disabled in the window that appears, and then click Apply.
Adding tags to your data source allows users to search for the data source using the tags and Governors to apply Global policies to the data source. Note if Schema Detection is enabled, any tags added now will also be added to the tables that are detected.
To add tags,
Click the Edit button in the Data Source Tags section.
Begin typing in the Search by Tag Name box to select your tag, and then click Add.
Tags can also be added after you create your data source from the data source details page on the overview tab or the data dictionary tab.
Click Create to register your data source.
The following endpoints have been deprecated with connections. Use the recommended endpoint instead.
If you have any automated actions using the following APIs, ensure you do the required change after the upgrade to ensure they continue working as expected.
Immuta does not require users to learn a new API or language to access protected data. Instead, Immuta integrates with existing tools and data platforms while remaining invisible to downstream consumers.
The table below outlines features supported by each of Immuta's data platform integrations.
Trino connections available
Use to configure your integration and register data sources in a single onboarding flow. Contact your Immuta representative to enable Trino connections on your tenant.
Create a single data source
POST /{technology}/handler
POST /api/v2/data
Step 1: Ensure your system user has been granted access to the relevant object in the data platform.
Step 2: Wait until the next object sync or manually trigger a metadata crawl using POST /data/crawl/{objectPath*}.
Step 3: If the parent schema has activateNewChildren: false,
PUT /data/settings/{objectPath*} with settings: isActive: true.
Bulk create data sources
POST /{technology}/handler
POST /api/v2/data
Step 1: Ensure your system user has been granted access to the relevant object in the data platform.
Step 2: Wait until the next object sync or manually trigger a metadata crawl using POST /data/crawl/{objectPath*}.
Step 3: If the parent schema has activateNewChildren: false,
PUT /data/settings/{objectPath*} with settings: isActive: true.
Edit a data source connection
POST /api/v2/data
No substitute. Data sources no longer have their own separate connection details but are tied to the parent connection.
Bulk edit data source's connections
PUT /{technology}/bulk
POST /api/v2/data
PUT /{technology}/handler/{handlerId}
No substitute. Data sources no longer have their own separate connection details but are tied to the parent connection.
Run schema detection (object sync)
PUT /dataSource/detectRemoteChanges
Delete a data source
DELETE /dataSource/{dataSourceId}
Bulk delete data sources
PUT /dataSource/bulk/{delete}
DELETE /api/v2/data/{connectionKey}
DELETE /{technology}/handler/{handlerId}
DELETE /dataSource/{dataSourceId}
Enable a single data source
PUT /dataSource/{dataSourceId}
PUT /data/settings/{objectPath*} with settings: isActive: true
Bulk enable data sources
PUT /dataSource/bulk/{restore}
PUT /data/settings/{objectPath*} with settings: isActive: true
Disable a single data source
PUT /dataSource/{dataSourceId}
PUT /data/settings/{objectPath*} with settings: isActive: false
Bulk disable data sources
PUT /dataSource/bulk/{disable}
PUT /data/settings/{objectPath*} with settings: isActive: false
Edit a data source name
PUT /dataSource/{dataSourceId}
No substitute. Data source names are automatically generated based on information from your data platform.
Edit a display name
POST /api/v2/data/{connectionKey}
No substitute. Data sources no longer have their own separate connection details but are tied to the parent connection.
Override a host name
PUT /dataSource/{dataSourceId}/overrideHost
No substitute. Data sources no longer have their own separate connection details but are tied to the parent connection.
Create an integration/connection
POST /integrations
Update an integration/connection
PUT /integrations/{integrationId}
Delete an integration/connection
DELETE /integrations/{integrationId}
Delete and update a data dictionary
DELETE /dictionary/{dataSourceId}
POST /dictionary/{dataSourceId}
PUT /dictionary/{dataSourceId}
No substitute. Data source dictionaries are automatically generated based on information from your data platform.
Update a data source owner
PUT /dataSource/{dataSourceId}/access/{id}
DELETE /dataSource/{dataSourceId}/unsubscribe
PUT /data/settings/{objectPath*} with settings: dataOwners
Response to a data source owner request
POST /subscription/deny
POST /subscription/deny/bulk
PUT /data/settings/{objectPath*} with settings: dataOwners

GRANT ROLE <name> TO USER <user_name>;system.access.audit
system.query.history
Fill out the Client ID. This is a combination of letters, numbers, or symbols, used as a public identifier and is the client ID displayed in Databricks when creating the client secret for the service principal.
Enter the Scope (string). The scope limits the operations and roles allowed in Databricks by the access token. See the OAuth 2.0 documentation for details about scopes.
Enter the Client Secret you created above. Immuta uses this secret to authenticate with the authorization server when it requests a token.
Azure Databricks:
Follow Databricks documentation to create a service principal within Azure and then populate to your Databricks account and workspace.
Assign this service principal the privileges listed above for the metastore associated with the Databricks workspace.
Within Databricks, . This completes your Databricks-based service principal setup.
Within Immuta, fill out the Token Endpoint with the full URL of the identity provider. This is where the generated token is sent. The default value is https://<your workspace name>.azuredatabricks.net/oidc/v1/token.
Fill out the Client ID. This is a combination of letters, numbers, or symbols, used as a public identifier and is the (note that Azure Databricks uses the Azure SP Client ID; it will be identical).
Enter the Scope (string). The scope limits the operations and roles allowed in Databricks by the access token. See the for details about scopes.
Enter the Client Secret you created above. Immuta uses this secret to authenticate with the authorization server when it requests a token.
have the permissions to perform the following actions to create locations and issue grants:
accessgrantslocation resource:
s3:CreateAccessGrant
s3:DeleteAccessGrantsLocation
s3:GetAccessGrantsLocation
s3:UpdateAccessGrantsLocation
accessgrantsinstance resource:
s3:CreateAccessGrantsInstance
s3:CreateAccessGrantsLocation
accessgrant resource:
s3:DeleteAccessGrant
s3:GetAccessGrant
bucket resource: s3:ListBucket
role resource:
iam:GetRole
iam:PassRole
all resources: s3:ListAccessGrantsInstances
sts:SetSourceIdentity
s3:GetObjectVersionAcl
s3:ListMultipartUploadParts
s3:PutObject
s3:PutObjectAcl
s3:PutObjectVersionAcl
s3:DeleteObject
s3:DeleteObjectVersion
s3:AbortMultipartUpload
s3:ListBucket
s3:ListAllMyBuckets
arn:aws:s3:us-east-2:6********499:access-grants/default/newlocation2
ApplicationArn) configured with IAM Identity Center.<aws_account>: Your AWS account ID.
<identity_store_id>: The globally unique identifier for the identity store (IdentityStoreId) that is connected to the Identity Center instance. This value is generated when a new identity store is created.
Complete the connection details fields, where
Friendly Name is a name for the integration that is unique across all Amazon S3 integrations configured in Immuta.
AWS Account ID is the ID of your AWS account.
AWS Region is the AWS region to use.
S3 Access Grants Location IAM Role ARN is the role the S3 Access Grants service assumes to vend credentials to the grantee. When a grantee accesses S3 data, the Access Grants service attaches session policies and assumes this role in order to vend credentials scoped to a prefix or bucket to the grantee. This role needs full access to all paths under the S3 location prefix.
S3 Access Grants S3 Location Scope is the base S3 location that Immuta will use for this connection when registering S3 prefixes. This path must be unique across all S3 integrations configured in Immuta. During data source registration, this prefix is prepended to the data source prefixes to build the final path used to grant or revoke access to that data in S3. For example, a location prefix of s3://research-data would be prepended to the data source prefix /demographics to generate a final path of s3://research-data/demographics.
Select your authentication method:
Automatically discover AWS credentials: Searches and obtains credentials using the AWS SDK's default credential provider chain. This method requires a configured IAM role for a service account (IRSA). Contact your Immuta representative to customize your deployment and set up an IAM role for a service account that can give Immuta the credentials to set up the integration. Then, complete the steps below.
Access using access key and secret access key: Provide your AWS Access Key ID and AWS Secret Access Key.
Click Verify Credentials.
Click Next to review and confirm your connection information, and then click Complete Setup.
Navigate to the user's page and click the more actions icon next to their username.
Select Change S3 User or AWS IAM Role from the dropdown menu.
Use the dropdown menu to select the User Type. Then complete the S3 field. User and role names are case-sensitive. See the AWS documentation for details.
AWS IAM role principals: Only a single Immuta user can be mapped to an IAM role. This restriction prohibits enforcing policies on AWS users who could assume that role. Therefore, if using role principals, create a new user in Immuta that represents the role so that the role then has the permissions applied specifically to it.
AWS Identity Center user IDs: You must use the numeric User ID value found in AWS IAM Identity Center, not the user's email address. Ensure that you have added the content to your IAM policy JSON as outlined in the above to allow Immuta to use AWS Identity Center.
Unset (fallback to Immuta username): When selecting this option, the S3 username is assumed to be the same as the Immuta username.
Click Save.
See the Mapping IAM principals in Immuta section for details about supported principals.
s3://research-data/demographicss3://research-data/demographicsIndividual grants: Individual permission grants in S3 Access Grants specify the identity that can access the data, the access level, and the location of the S3 data. Immuta creates a grant for each user subscribed to a prefix, bucket, or object by interacting with the Access Grants API. Each grant has its own ID and gives the user or role principle access to the data.
IAM assumed role: This is an IAM role you create in S3 that has full access to all prefixes, buckets, and objects in the Access Grants location registered by Immuta. This IAM role is used to vend temporary credentials to users or applications. When a grantee requests temporary credentials, the S3 Access Grants service assumes this role to vend credentials scoped to the prefix, bucket, or object specified in the grant to the grantee. The grantee then uses these credentials to access S3 data. When configuring the integration in Immuta, you specify this role, and then Immuta associates this role with the registered location in the Access Grants instance.
Temporary credentials: These just-in-time access credentials provide access to a prefix, bucket, or object with a permission level of READ or READWRITE in S3. When a user or application requests temporary credentials to access S3 data, the S3 Access Grants instance evaluates the request against the grants Immuta has created for that user. If a matching grant exists, S3 Access Grants assumes the IAM role associated with the location of the matching grant and scopes the permissions of the IAM session to the S3 prefix, bucket, or object specified by the grant and vends these temporary credentials to the requester. These credentials have a default timeout of 1 hour, but this duration can be changed by the requester.
Request on behalf of IAM roles (not recommended): Create users in Immuta that map to each of your existing IAM roles. Then, when users request access to data, they request on behalf of the IAM role user rather than themselves. This approach is not recommended because everyone in that role will gain access to data when granted access through a policy, and adding future users to that role will also grant access. Furthermore, it requires policy authors and approvers to understand what role should have access to what data.
Audit
Data policies
Impersonation
Schema monitoring
Tag ingestion
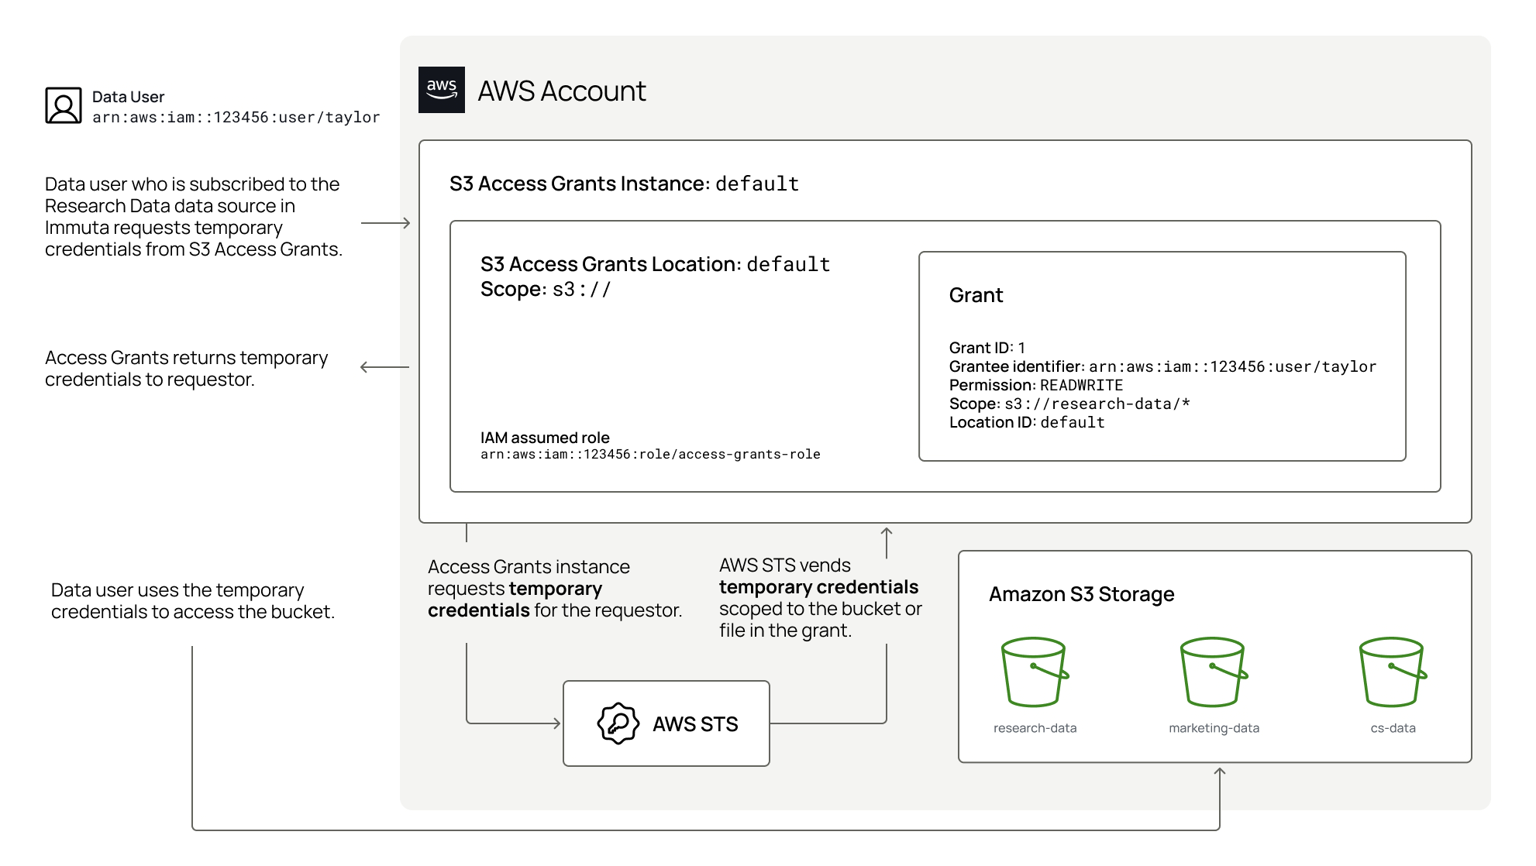
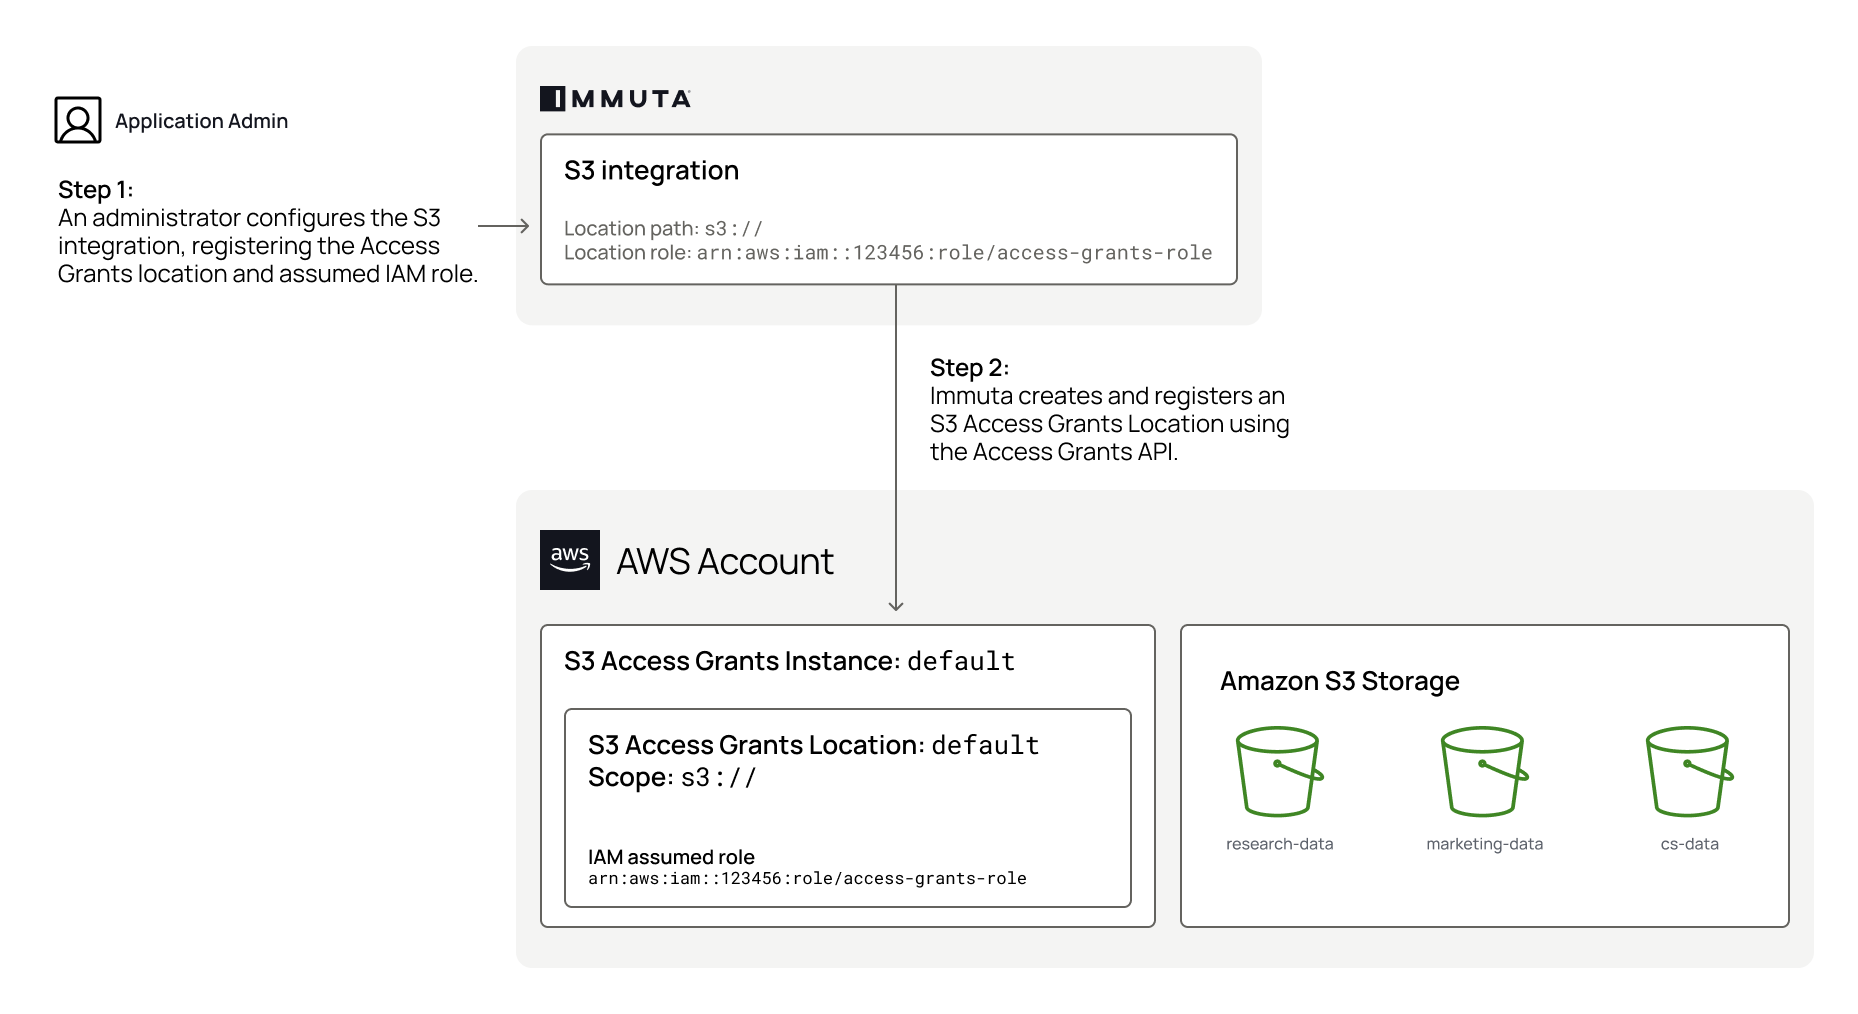
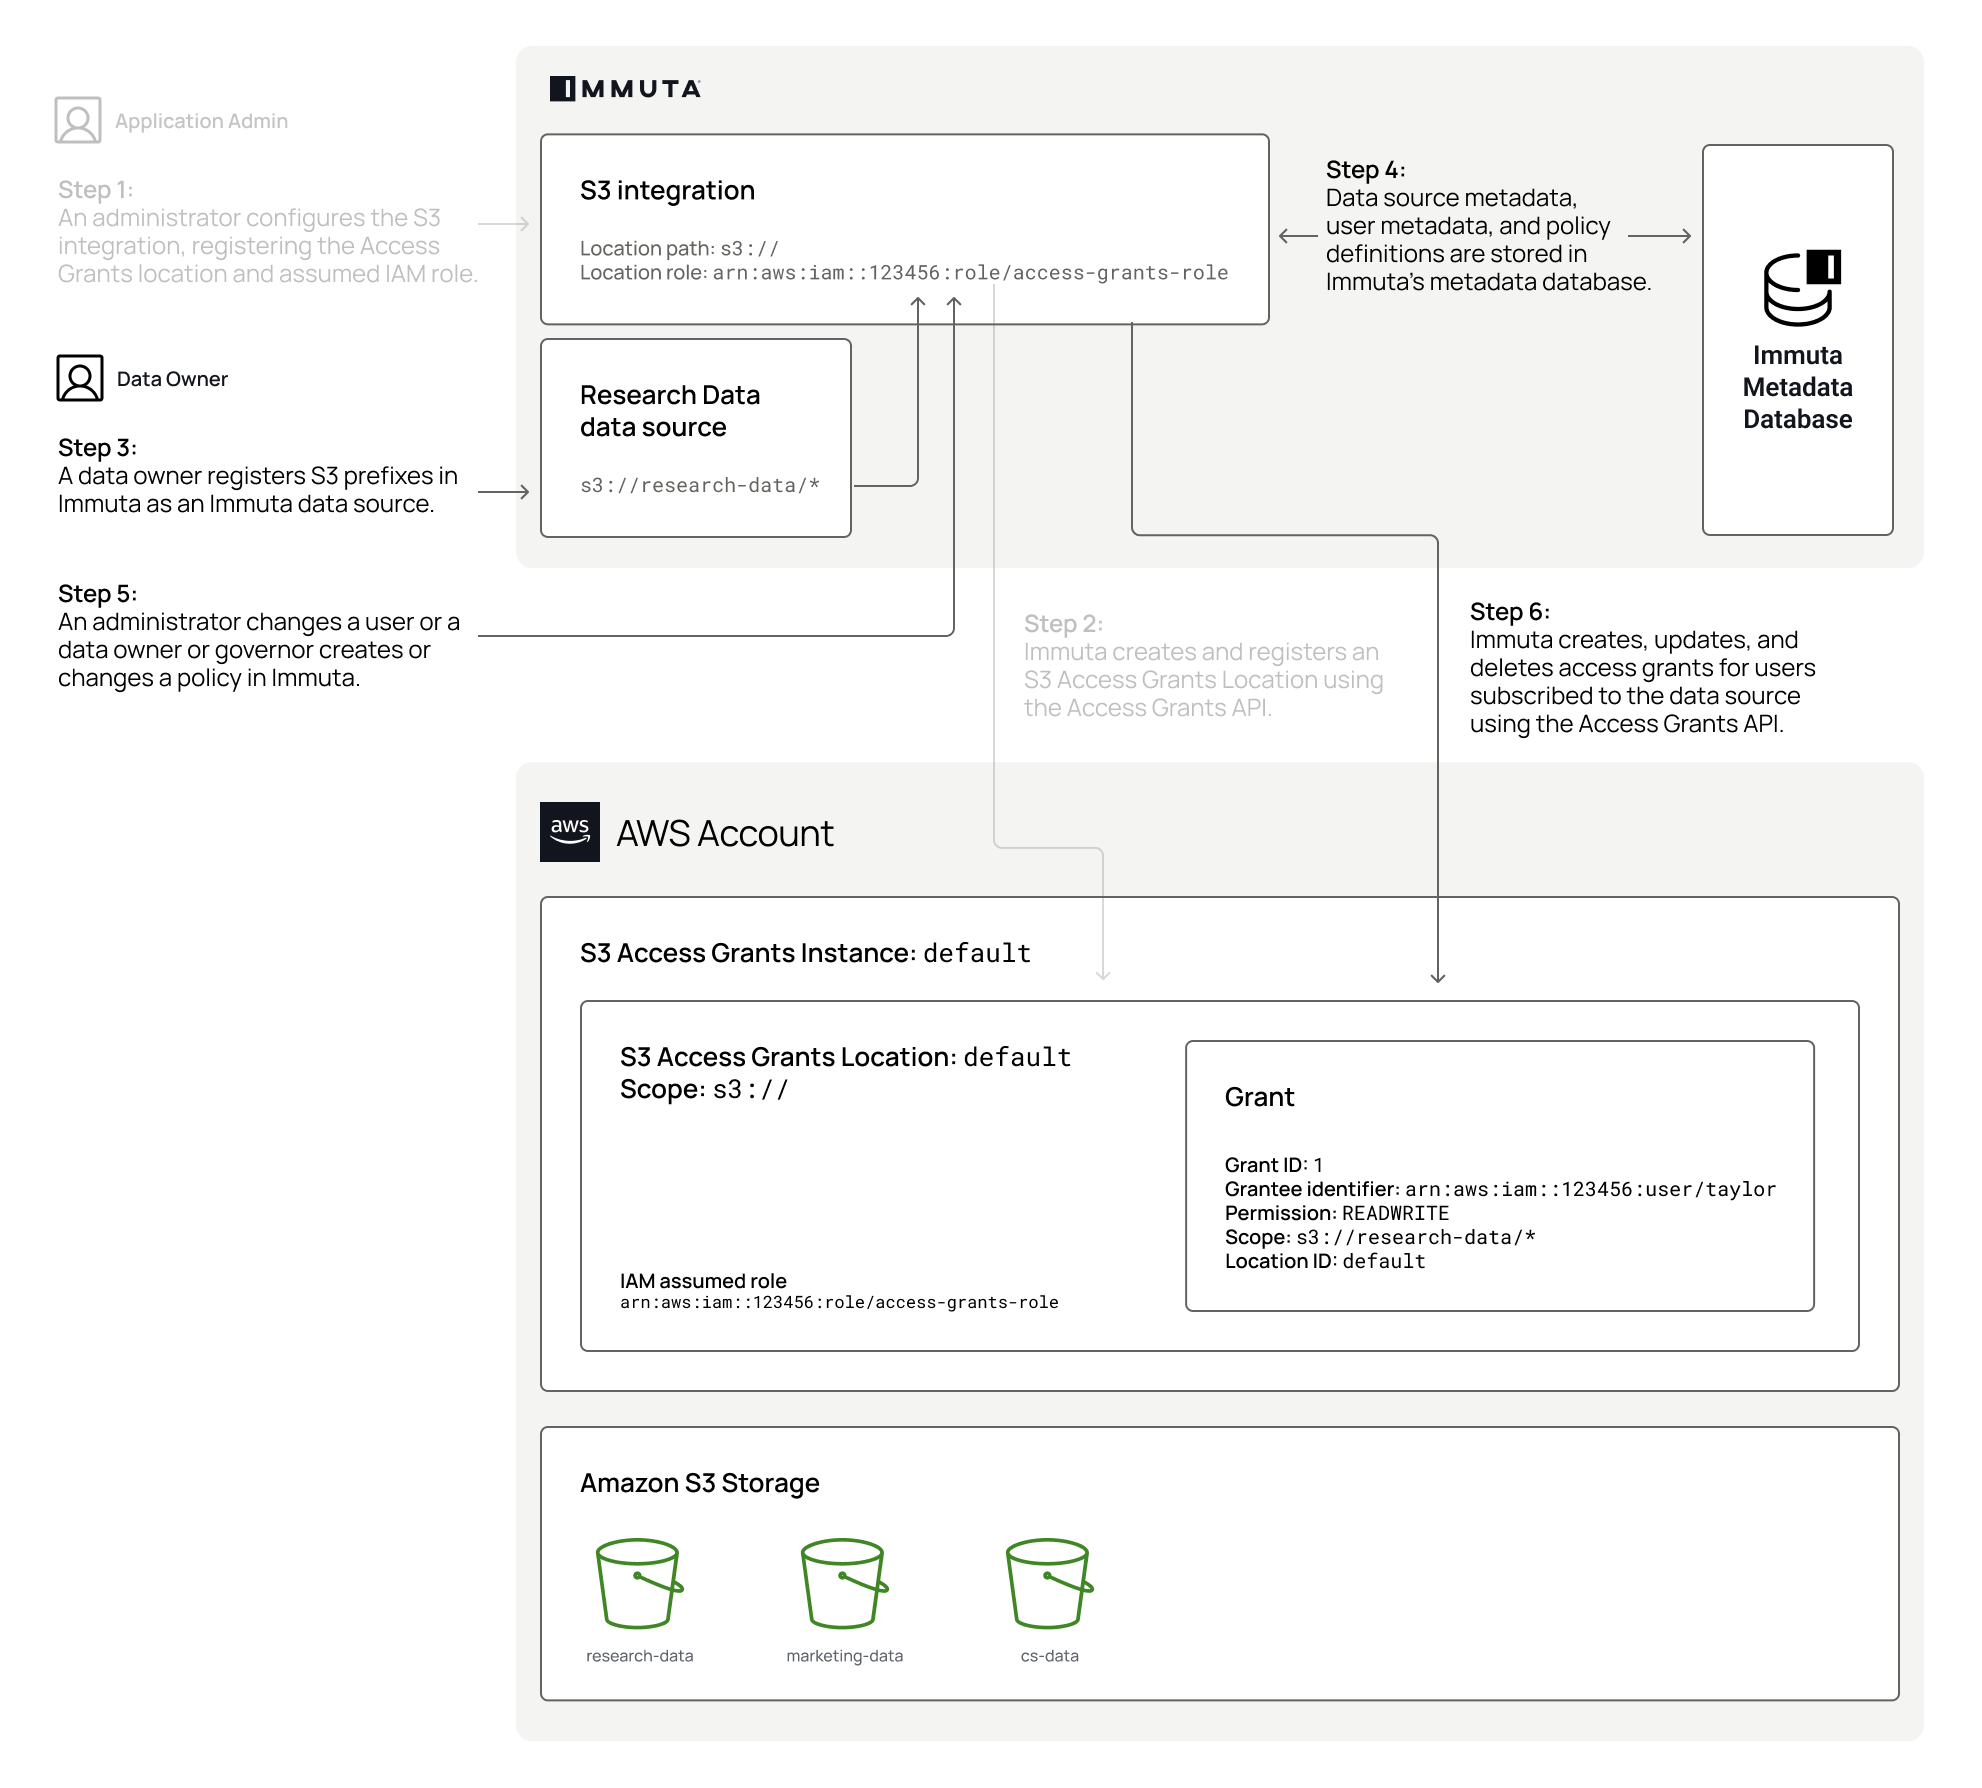
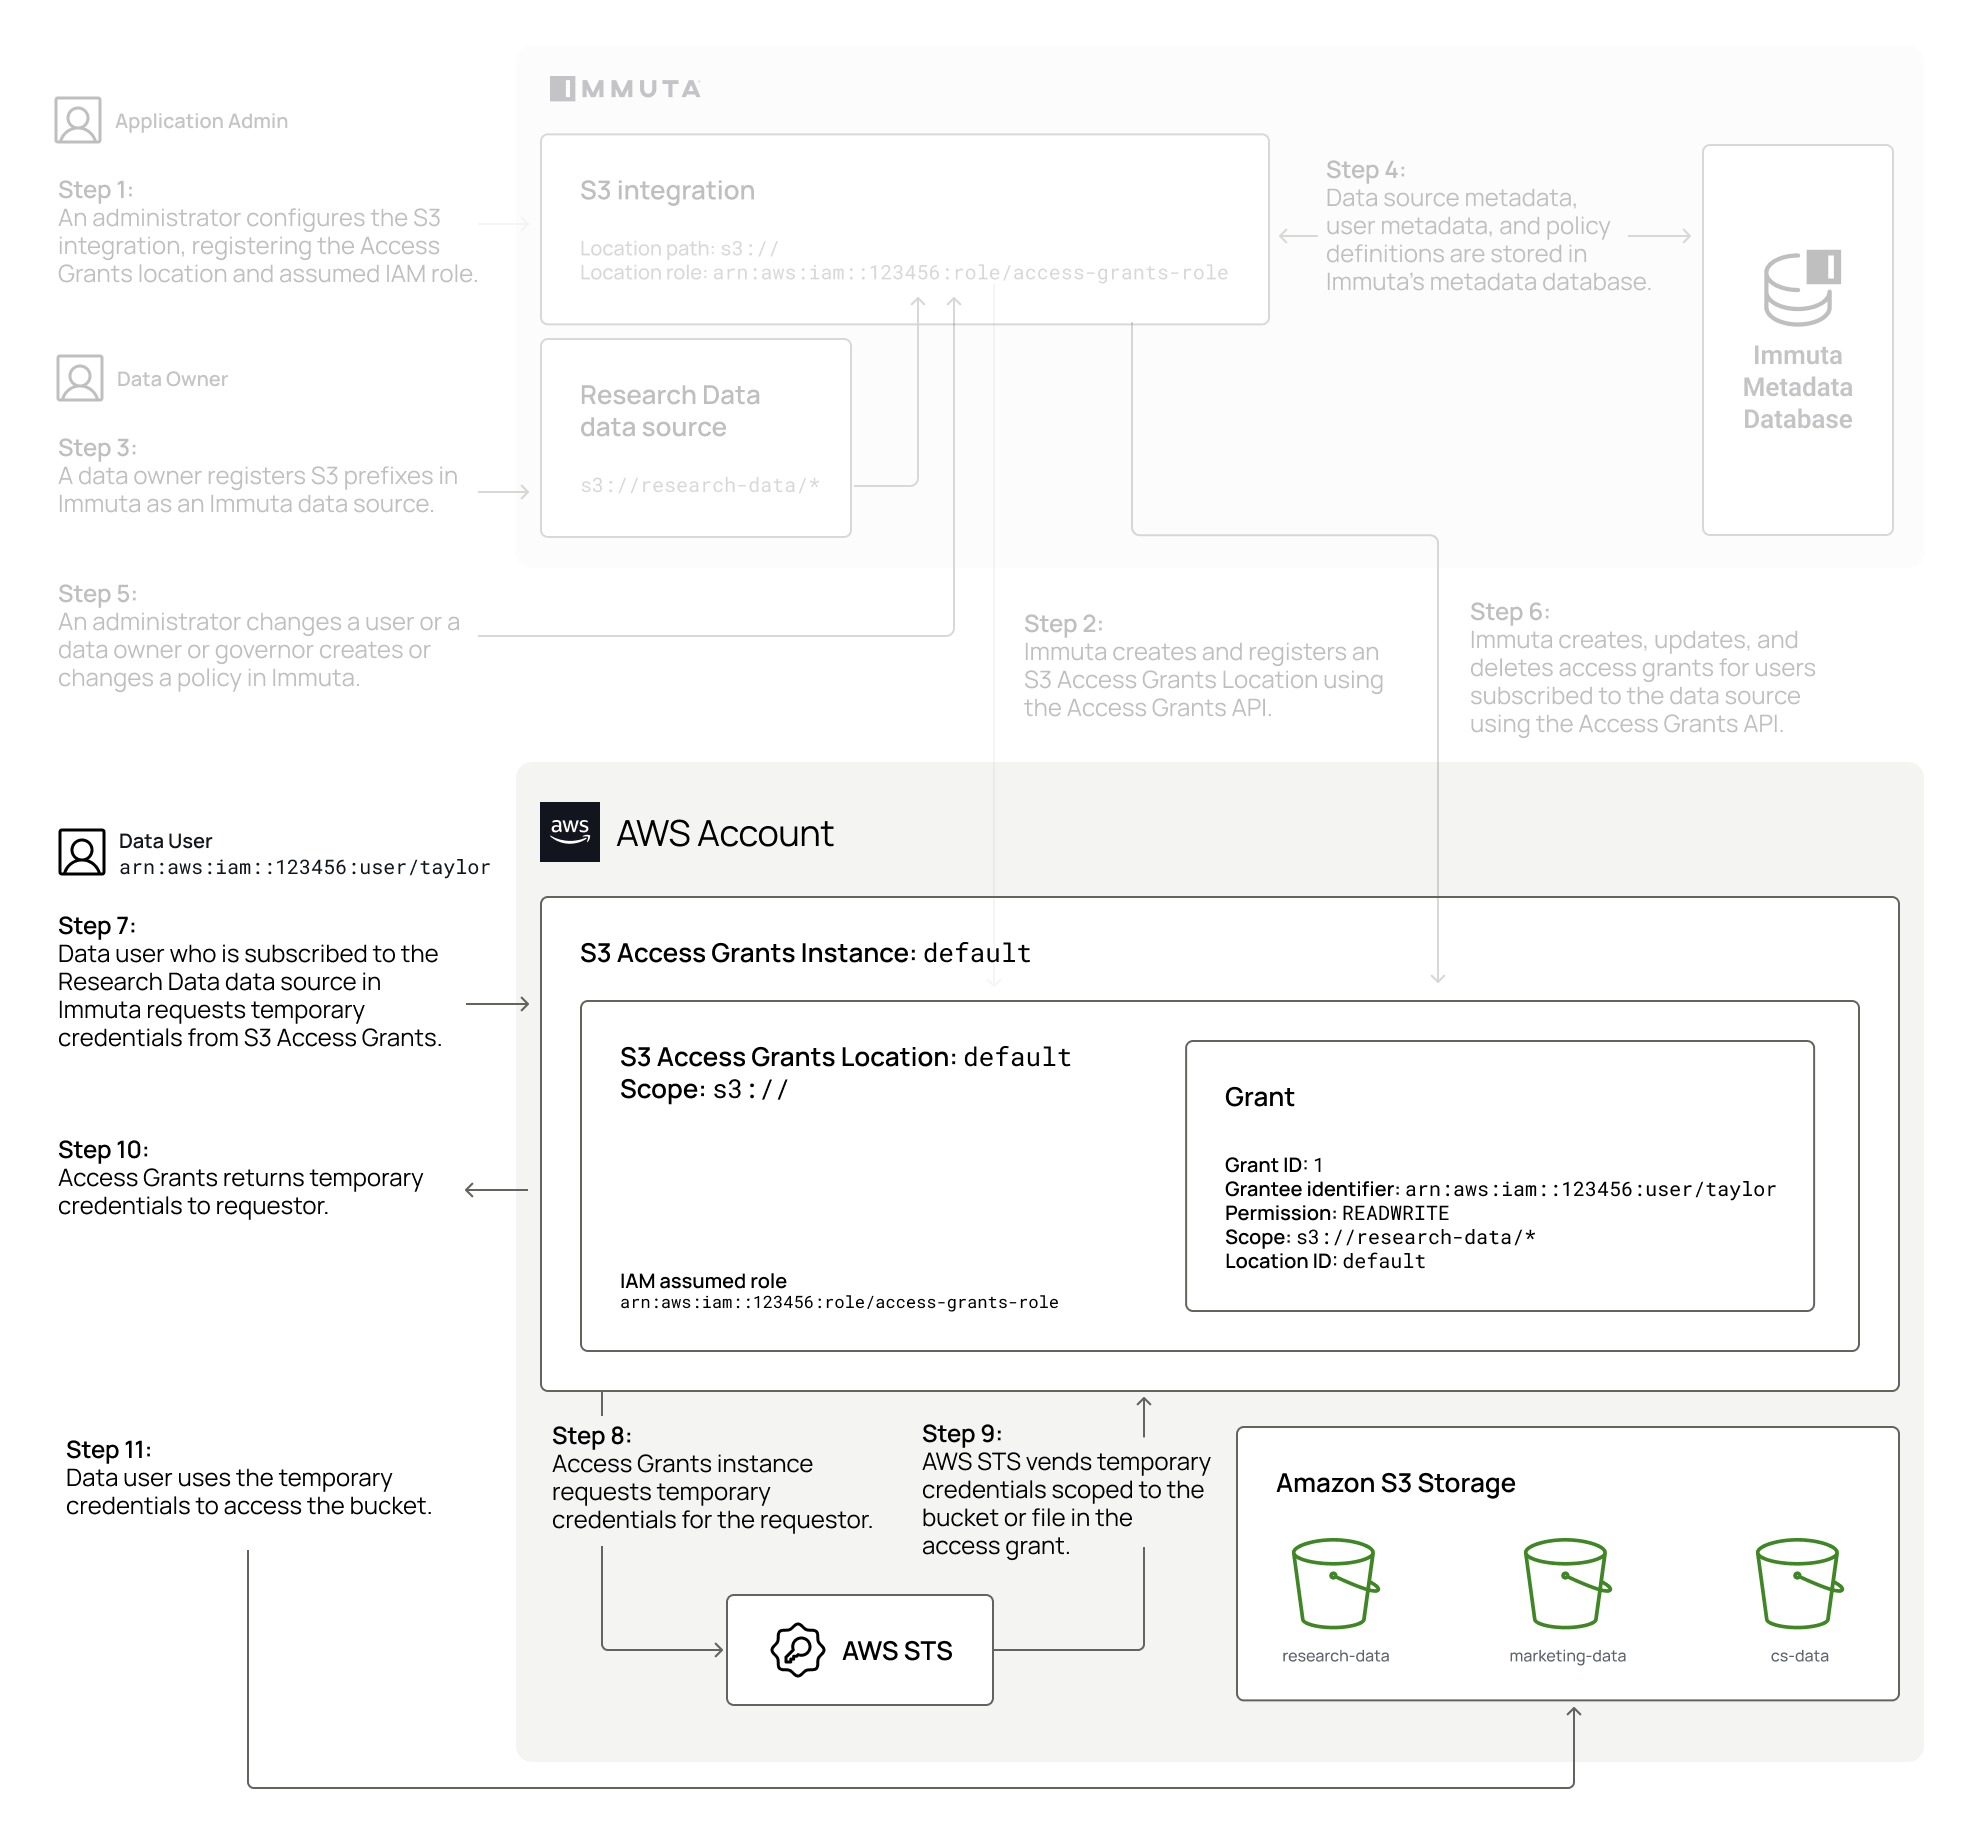
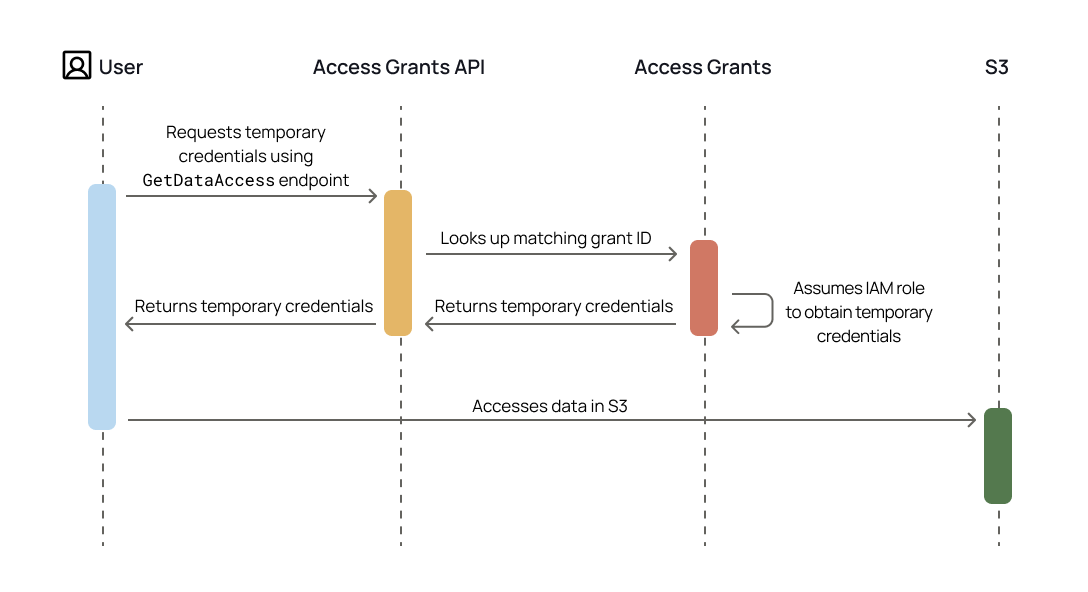
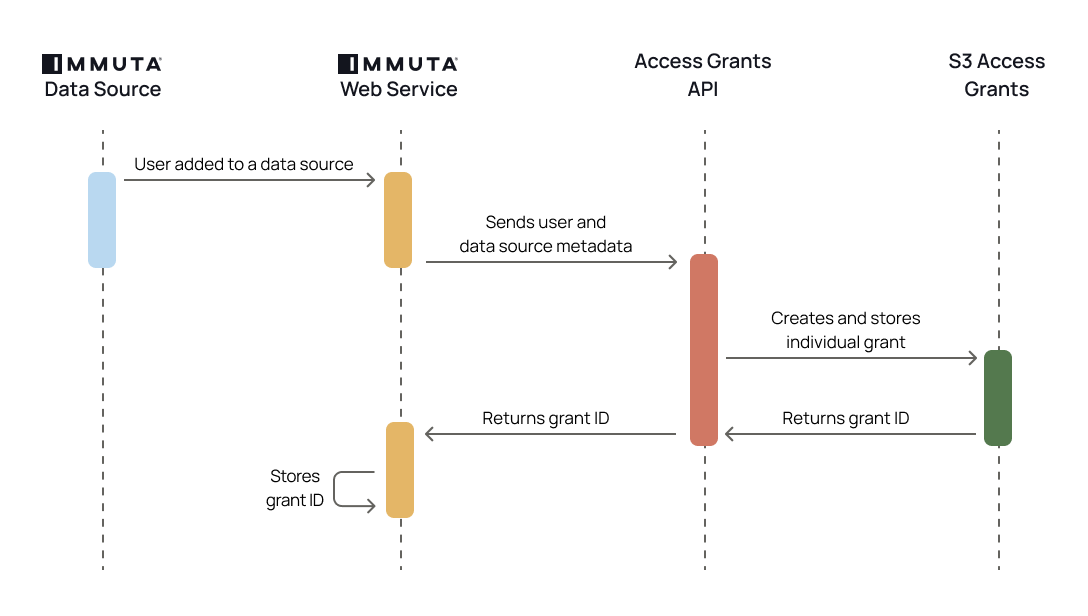
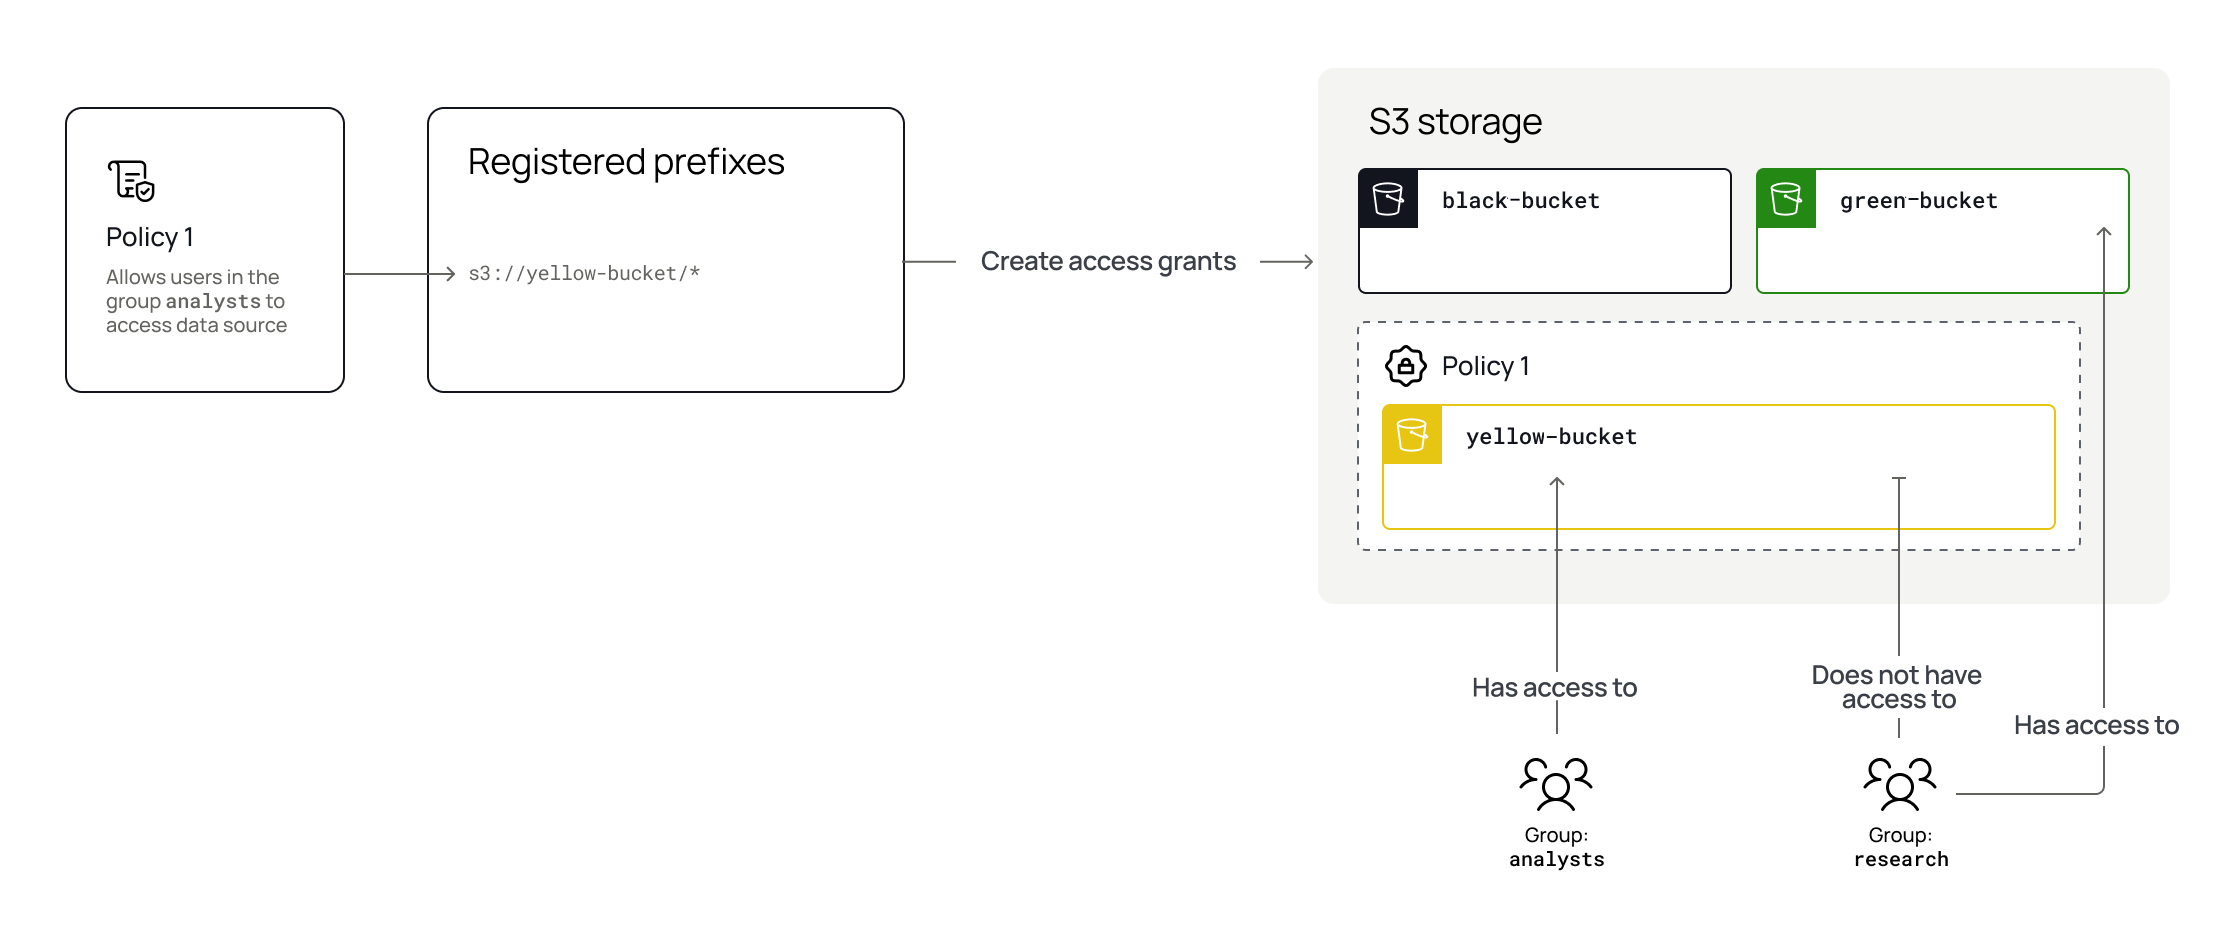
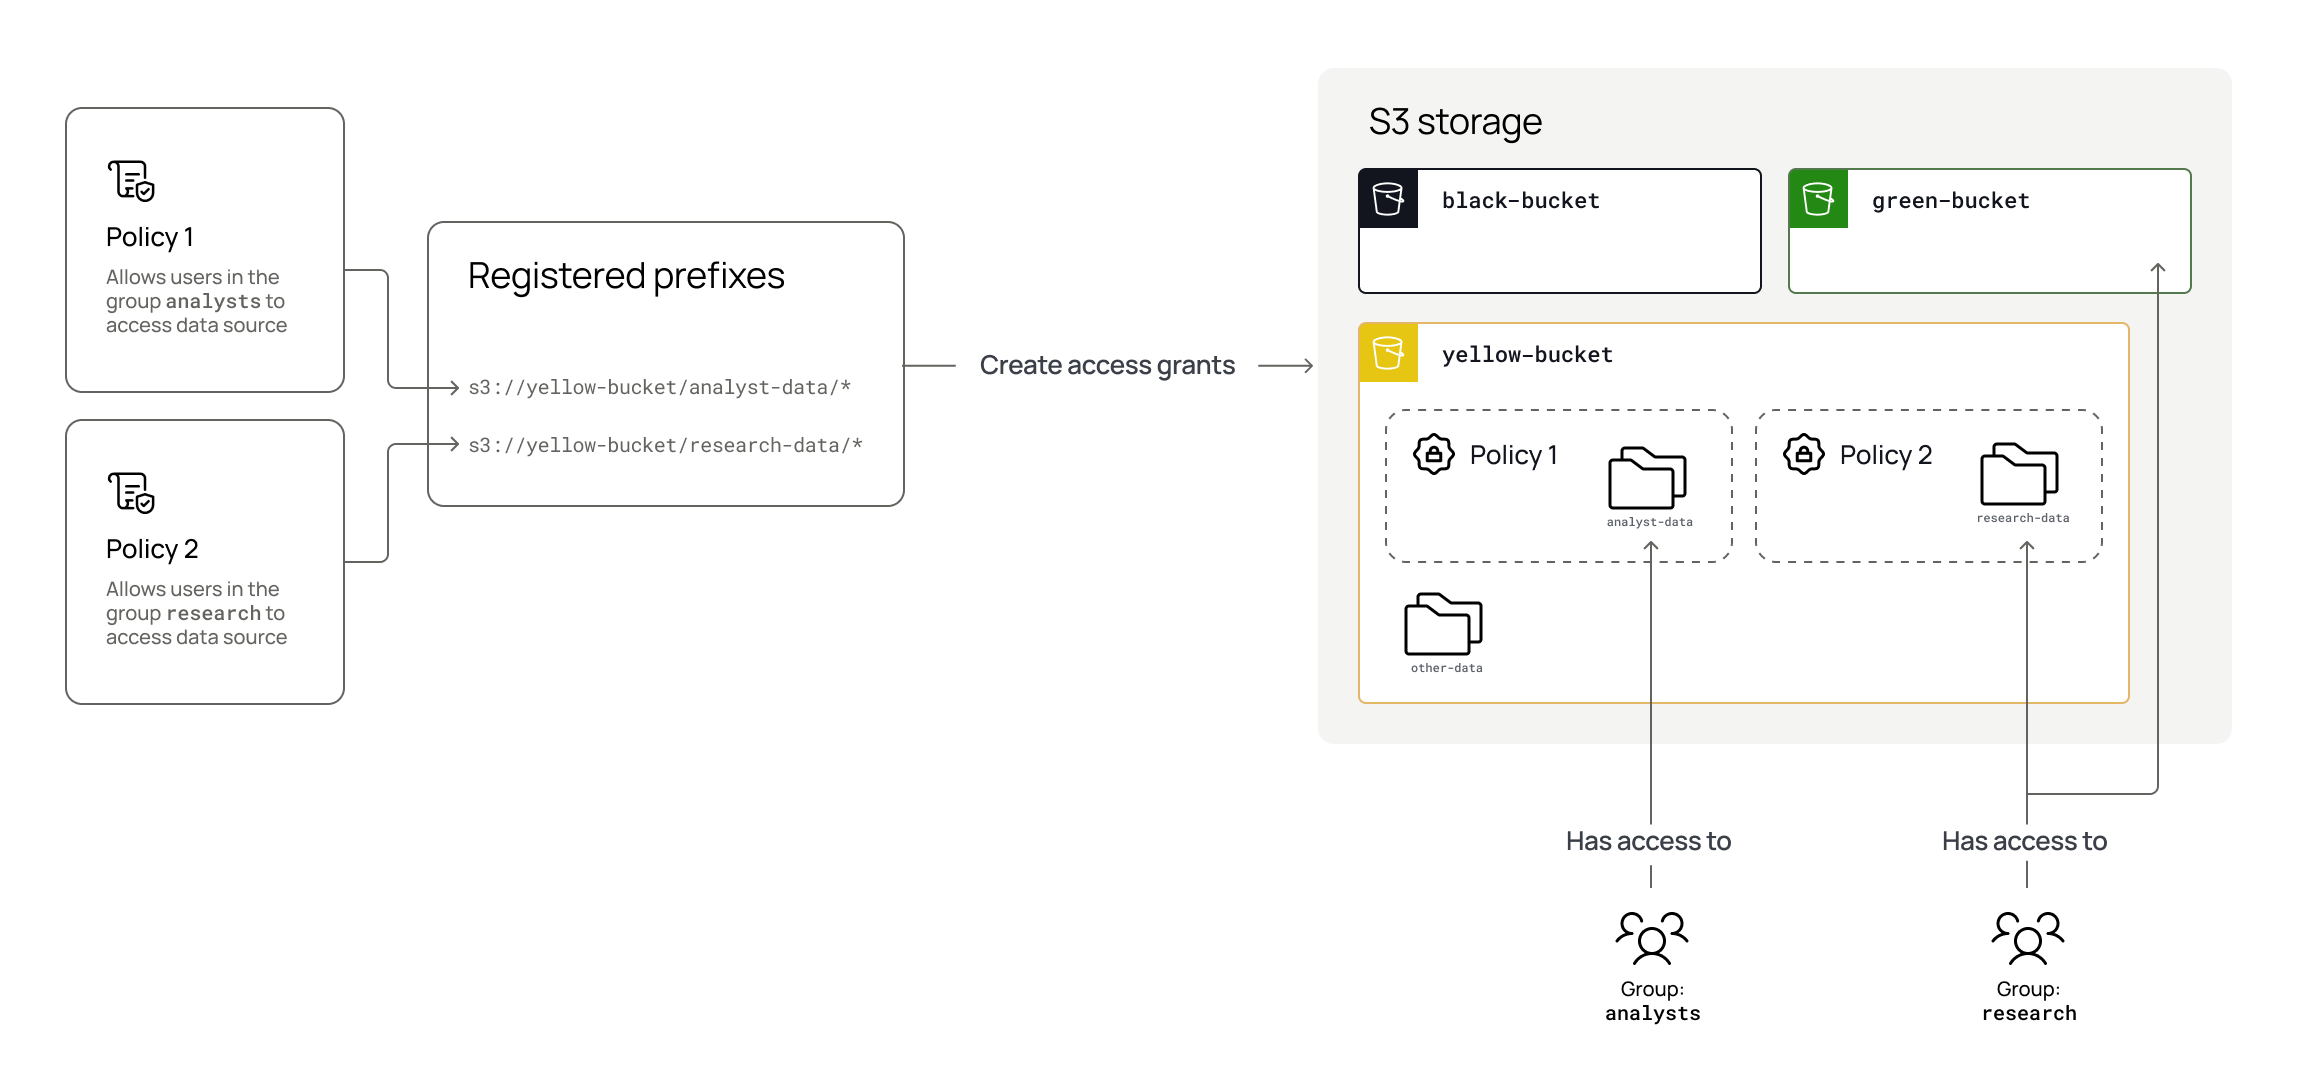
REFERENCES on all tables and views registered in Immuta.
SELECT on all tables and views registered in Immuta.
Server: hostname or IP address
Port: port configured for Snowflake, typically port 443
SSL: when enabled, ensures communication between Immuta and the remote database is encrypted
Warehouse: Snowflake warehouse that contains the remote database
Database: remote database
From the Select Authentication Method Dropdown, select either Username and Password, Key Pair Authentication or Snowflake External OAuth:
Username and Password
Enter a Username. This username will be used to connect to the remote database and retrieve records for this data source.
Enter a Password. This password will be used with the above username to connect to the remote database.
You can then choose to enter Additional Connection String Options or Upload Certificates to connect to the database.
Enter a Username. This username will be used to connect to the remote database and retrieve records for this data source.
If using an encrypted private key, enter the private key file password in the Additional Connection String Options. Use the following format: PRIV_KEY_FILE_PWD=<your_pw>.
Snowflake External OAuth
Fill out the Token Endpoint, which is where the generated token is sent.
Fill out the Client ID, which is the subject of the generated token.
Click the Test Connection button.
By default, all schemas and tables are selected. Select and deselect by clicking the checkbox for the schemas in the Import Schemas/Tables modal. You can create multiple data sources at one time by selecting an entire schema or multiple tables.
After making your selection(s), click Apply.
When selecting Create sources for all tables in this database and monitor for changes you may personalize this field as you wish, but it must include a schema macro.
When selecting Schema/Table this field is prepopulated with the recommended project name and you can edit freely.
Select the Data Source Name Format, which will be the format of the name of the data source in the Immuta UI.
<Tablename>: The data source name will be the name of the remote table, and the case of the data source name will match the case of the macro.
<Schema><Tablename>: The data source name will be the name of the remote schema followed by the name of the remote table, and the case of the data source name will match the cases of the macros.
Custom: Enter a custom template for the Data Source Name. You may personalize this field as you wish, but it must include a tablename macro. The case of the macro will apply to the data source name (i.e., <Tablename> will result in "Data Source Name," <tablename> will result in "data source name," and <TABLENAME> will result in "DATA SOURCE NAME").
Consider using Immuta’s API to either run the schema monitoring job when your ETL process adds new tables or to add new tables.
Activate the new column added templated global policy to protect potentially sensitive data. This policy will null the new columns until a data owner reviews new columns that have been added, protecting your data to avoid data leaks on new columns getting added without being reviewed first.
Amazon Redshift
✅
✅
✅
✅
❌
❌
Amazon S3
✅
❌
✅
❌
The table below illustrates the subscription policy access types supported by each integration. If a data platform isn't included in the table, that integration does not support any subscription policies. For more details about read and write access policy support for these data platforms, see the Subscription policy access types reference guide.
✅
❌ View-based integrations are read-only
✅
✅
The table below outlines the types of data policies supported for various data platforms. If a data platform isn't included in the table, that integration does not support any data policies.
For details about each of these policies, see the Data policy types page.
Cell-level masking
✅
✅
Identification has varied support for data sources from different technologies based on the identifier type. For details about how identification works in Immuta, see the Data identification page.
Amazon Redshift
✅
✅
✅
Amazon S3
❌
The table below outlines what information is included in the query audit logs for each integration where query audit is supported.
Table and user coverage
Registered data sources and users
All tables and users
Registered data sources and users
Registered data sources and users
Legend:
✅ This is available and the information is included in audit logs.
❌ This is not available and the information is not included in audit logs.
Databricks Spark integration
When exposing a table or view from an Immuta-enabled Databricks cluster, be sure that at least one of these traits is true:
The user exposing the tables has READ_METADATA and SELECT permissions on the target views/tables (specifically if Table ACLs are enabled).
The user exposing the tables is listed in the immuta.spark.acl.allowlist configuration on the target cluster.
The user exposing the tables is a Databricks workspace administrator.
Databricks Unity Catalog integration
When registering Databricks Unity Catalog securables in Immuta, use the service principal from the integration configuration and ensure it has the privileges listed below. Immuta uses this service principal continuously to orchestrate Unity Catalog policies and maintain state between Immuta and Databricks.
USE CATALOG and MANAGE on all catalogs containing securables registered as Immuta data sources.
USE SCHEMA on all schemas containing securables registered as Immuta data sources.
MODIFY and SELECT on all securables you want registered as Immuta data sources. The MODIFY privilege is not required for materialized views registered as Immuta data sources, since MODIFY is not a supported privilege on that object type in .
MANAGE and MODIFY are required so that the service principal can apply row filters and column masks on the securable; to do so, the service principal must also have SELECT on the securable as well as USE CATALOG on its parent catalog and USE SCHEMA on its parent schema. Since privileges are inherited, you can grant the service principal the MODIFY and SELECT privilege on all catalogs or schemas containing Immuta data sources, which automatically grants the service principal the MODIFY and SELECT privilege on all current and future securables in the catalog or schema. The service principal also inherits MANAGE from the parent catalog for the purpose of applying row filters and column masks, but that privilege must be set directly on the parent catalog in order for grants to be fully applied.
Azure Databricks Unity Catalog limitation
Set all table-level ownership on your Unity Catalog data sources to an individual user or service principal instead of a Databricks group before proceeding. Otherwise, Immuta cannot apply data policies to the table in Unity Catalog. See the Azure Databricks Unity Catalog limitation for details.
Performance recommendations
Register entire databases with Immuta and run schema monitoring jobs through the Python script provided during data source registration.
Use a Databricks administrator account to register data sources with Immuta using the UI or API; however, you should not test Immuta policies using a Databricks administrator account, as they are able to bypass controls.
Navigate to the Data Sources list page and click Register Data Source.
Select the Databricks tile in the Data Platform section. When exposing a table or view from an Immuta-enabled Databricks cluster, be sure that at least one of these traits is true:
The user exposing the tables has READ_METADATA and SELECT permissions on the target views/tables (specifically if Table ACLs are enabled).
The user exposing the tables is listed in the immuta.spark.acl.allowlist configuration on the target cluster.
The user exposing the tables is a Databricks workspace administrator.
Complete the first four fields in the Connection Information box:
Server: hostname or IP address
Port: port configured for Databricks, typically port 443
Select your authentication method from the dropdown:
Access Token:
Enter your Databricks API Token. Use a non-expiring token so that access to the data source is not lost unexpectedly.
If you are using a proxy server with Databricks, specify it in the Additional Connection String Options:
Click Test Connection.
Further considerations
Immuta pushes down joins to be processed on the remote database when possible. To ensure this happens, make sure the connection information matches between data sources, including host, port, ssl, username, and password. You will see performance degradation on joins against the same database if this information doesn't match.
If a client certificate is required to connect to the source database, you can add it in the Upload Certificates section.
Decide how to virtually populate the data source by selecting one of the options:
Create sources for all tables in this database: This option will create data sources and keep them in sync for every table in the dataset. New tables will be automatically detected and new Immuta views will be created.
Schema / Table: This option will allow you to specify tables or datasets that you want Immuta to register.
Opt to Edit in the table selection box that appears.
By default, all schemas and tables are selected. Select and deselect by clicking the checkbox to the left of the name in the Import Schemas/Tables menu. You can create multiple data sources at one time by selecting an entire schema or multiple tables.
After making your selection(s), click Apply.
Enter the SQL Schema Name Format to be the SQL name that the data source exists under in Immuta. It must include a schema macro but you may personalize it using lowercase letters, numbers, and underscores to personalize the format. It may have up to 255 characters.
Enter the Schema Project Name Format to be the name of the schema project in the Immuta UI. If you enter a name that already exists, the name will automatically be incremented. For example, if the schema project Customer table already exists and you enter that name in this field, the name for this second schema project will automatically become Customer table 2 when you create it.
When selecting Create sources for all tables in this database and monitor for changes you may personalize this field as you wish, but it must include a schema macro.
When selecting Schema/Table this field is prepopulated with the recommended project name and you can edit freely.
Select the Data Source Name Format, which will be the format of the name of the data source in the Immuta UI.
<Tablename>: The data source name will be the name of the remote table, and the case of the data source name will match the case of the macro.
<
Enter the SQL Table Name Format, which will be the format of the name of the table in Immuta. It must include a table name macro, but you may personalize the format using lowercase letters, numbers, and underscores. It may have up to 255 characters.
Note: This step will only appear if all tables within a server have been selected for creation.
Schema monitoring best practices
Schema monitoring is a powerful tool that ensures tables are all governed by Immuta.
Consider using schema monitoring later in your onboarding process, not during your initial setup and configuration when tables are not in a stable state.
Consider using to either run the schema monitoring job when your ETL process adds new tables or to add new tables.
Activate the to protect potentially sensitive data. This policy will null the new columns until a data owner reviews new columns that have been added, protecting your data to avoid data leaks on new columns getting added without being reviewed first.
Generate your Immuta API Key from your user profile page. The Immuta API key used in the Databricks notebook job for schema detection must either belong to an Immuta admin or the user who owns the schema detection groups that are being targeted.
On the data source creation page, click the checkbox to enable Schema Monitoring or Detect Column Changes.
Click Download Schema Job Detection Template and then the Click Here To Download text.
Before you can run the script, follow the to create the scope and secret using the Immuta API Key generated on your user profile page.
Import the Python script you downloaded into a Databricks workspace as a notebook. Note: The job template has commented out lines for specifying a particular database or table. With those two lines commented out, the schema detection job will run against ALL databases and tables in Databricks. Additionally, if you need to add proxy configuration to the job template, the template uses the , which has a simple mechanism for configuring proxies for a request.
Schedule the script as part of a notebook job to run as often as required. Each time the job runs, it will make an API call to Immuta to trigger schema detection queries, and these queries will run on the cluster from which the request was made. Note: Use the api_immuta cluster for this job. The job in Databricks must use an Existing All-Purpose Cluster so that Immuta can connect to it over ODBC. Job clusters do not support ODBC connections.
Although not required, completing these steps will help maximize the utility of your data source. Otherwise, click Create to save the data source.
This setting monitors when remote tables' columns have been changed, updates the corresponding data sources in Immuta, and notifies Data Owners of these changes.
To enable, select the checkbox in this section.
See the Schema projects overview page to learn more about column detection.
An Event Time column denotes the time associated with records returned from this data source. For example, if your data source contains news articles, the time that the article was published would be an appropriate Event Time column.
Click the Edit button in the Event Time section.
Select the column(s).
Click Apply.
Selecting an Event Time column will enable
more statistics to be calculated for this data source including the most recent record time, which is used for determining the freshness of the data source.
the creation of time-based restrictions in the policy builder.
Click Edit in the Latency section.
Complete the Set Time field, and then select MINUTES, HOURS, or DAYS from the subsequent dropdown menu.
Click Apply.
This setting impacts how often Immuta checks for new values in a column that is driving row-level redaction policies. For example, if you are redacting rows based on a country column in the data, and you add a new country, it will not be seen by the Immuta policy until this period expires.
Data owners can disable identification for their data sources in this section.
Click Edit in this section.
Select Enabled or Disabled in the window that appears, and then click Apply.
Adding tags to your data source allows users to search for the data source using the tags and Governors to apply Global policies to the data source. Note if Schema Detection is enabled, any tags added now will also be added to the tables that are detected.
To add tags,
Click the Edit button in the Data Source Tags section.
Begin typing in the Search by Tag Name box to select your tag, and then click Add.
Tags can also be added after you create your data source from the data source details page on the overview tab or the data dictionary tab.
Click Create to save the data source(s).
Databricks Unity Catalog behavior
If a registered data source has no subscription policy set on it, Immuta will REVOKE access to the data in Databricks for all Immuta users, even if they had been directly granted access to the table in Unity Catalog.
If you disable a Unity Catalog data source in Immuta, all existing grants and policies on that object will be removed in Databricks for all Immuta users. All existing grants and policies will be removed, regardless of whether they were set in Immuta or in Unity Catalog directly.
If a user is not registered in Immuta, Immuta will have no effect on that user's access to data in Unity Catalog.
See the for more details about permissions Immuta revokes and how to configure this behavior for your integration.
Starburst is based on open-source Trino. Consequently, this page occasionally refers to the Trino Execution Engine and Trino methods.
The Starburst (Trino) integration allows you to access policy-enforced data directly in your Starburst catalogs without rewriting queries or changing workflows. Instead of generating policy-enforced views and adding them to an Immuta catalog that users have to query (like in the legacy Starburst (Trino) integration), Immuta policies are translated into Starburst (Trino) rules and permissions and applied directly to tables within users’ existing catalogs.
Once an Immuta Application Admin configures the Starburst (Trino) integration, the ImmutaSystemAccessControl plugin is installed on the coordinator. This plugin provides policy decisions to the Trino Execution Engine whenever an Immuta user queries a Starburst (Trino) table registered in Immuta. Then, the Trino Execution Engine applies policies to the backing catalogs and retrieves the data with appropriate policy enforcement.
By default, this integration is designed to be minimally invasive: if a catalog is not registered as an Immuta data source, users will still have access to it in Starburst (Trino). However, this limited enforcement can be changed in the configuration file provided by Immuta. Additionally, you can continue to use Trino's file-based access control provider or Starburst (Trino) built-in access control system on catalogs that are not protected or controlled by Immuta.
When you configure the integration, Immuta generates an API key for you to add to your Immuta access control properties file for API authentication between Starburst (Trino) and Immuta. You can rotate this shared secret to mitigate potential security risks and comply with your organizational policies.
To rotate this API key, see the Starburst (Trino) integration API guide.
When a user queries a table in Starburst (Trino), the Trino Execution Engine reaches out to the Immuta plugin to determine what the user is allowed to see:
masking policies: For each column, Starburst (Trino) requests a view expression from the Immuta plugin. If there is a masking policy on the column, the Immuta plugin returns the corresponding view expression for that column. Otherwise, nothing is returned.
row-level policies: For each table, Starburst (Trino) requests the rows a user can see in a table from Immuta. If there is a WHERE clause policy on the data source, Immuta returns the corresponding view expression as a WHERE clause. Otherwise, nothing is returned.
The Immuta plugin then requests policy information about the tables being queried from the Immuta Web Service and sends this information to the Trino Execution Engine. Finally, the Trino Execution Engine constructs the SQL statement, executes it on the backing tables to apply the policies, and returns the response to the user.
See the integration support matrix on the Data policy types reference guide for a list of supported data policy types in Starburst (Trino).
Users cannot bypass Immuta controls by changing roles in their system access control provider.
Multiple system access control providers can be configured in the Starburst (Trino) integration. This approach allows Immuta to work with existing Starburst (Trino) installations that already have an access control provider configured.
Immuta does not manage all permissions in Starburst (Trino) and will default to allowing access to anything Immuta does not manage so that the Starburst (Trino) integration complements existing controls. For example, if the Starburst (Trino) integration is configured to allow users write access to tables that are not protected by Immuta, you can still lock down write access for specific non-Immuta tables using an additional access control provider.
If you have multiple access control providers configured, those providers interact in the following ways:
For a user to have access to a resource (catalog, schema, or a table), that user must have access in all of the configured access control providers.
In catalog, schema, or table filtering (such as show catalogs, show schemas, or show tables), the user will see the intersection of all access control providers. For example, if a Starburst (Trino) environment includes the catalogs public, demo, and restricted and one provider restricts a user from accessing the restricted catalog and another provider restricts the user from accessing the demo catalog, running show catalogs will only return the public catalog for that user.
Only one column masking policy can be applied per column across all system access control providers. If two or more access control providers return a mask for a column, Starburst (Trino) will throw an error at query time.
For row filtering policies, the expression for each system access control provider is applied one after the other.
See the Starburst (Trino) integration configuration page for instructions on configuring multiple access control providers.
Starburst (Trino) query passthrough is available in most connectors using the query table function or raw_query in the Elasticsearch connector. Consequently, Immuta blocks functions named raw_query or query, as those table functions would completely bypass Immuta’s access controls.
For example, without blocking those functions, this query would access the public.customer table directly:
select * from table(postgres.system.query(query => 'select * from public.customer limit 10'));
You can add or remove functions that are blocked by Immuta in the Starburst (Trino) integration configuration file. See the Starburst (Trino) integration configuration page for instructions.
An Immuta Application Administrator configures the Starburst (Trino) integration, adding the ImmutaSystemAccessControl plugin on their Starburst (Trino) node.
A data owner registers Starburst (Trino) tables in Immuta as data sources. A data owner, data governor, or administrator creates or changes a policy or user in Immuta.
Data source metadata, tags, user metadata, and policy definitions are stored in Immuta's Metadata Database.
A Starburst (Trino) user who is subscribed to the data source in Immuta directly in their Starburst catalog.
The Trino Execution Engine calls various methods on the interface to ask the ImmutaSystemAccessControl plugin where the policies should be applied. The masking and row-level security methods apply the actual policy expressions.
The Immuta System Access Control plugin calls the Immuta Web Service to retrieve policy information for that data source for the querying user, using the querying user's project, purpose, and entitlements.
The Immuta System Access Control plugin provides the SQL view expression (for masked columns) or WHERE clause SQL view expression (for row filtering) to the Trino Execution Engine.
The Trino Execution Engine constructs and executes the SQL statement on the backing catalogs and retrieves the data with appropriate policy enforcement.
User sees policy-enforced data.
The Starburst (Trino) integration supports the following authentication methods to create data sources in Immuta:
Username and password: You can authenticate with your Starburst (Trino) username and password.
OAuth 2.0: You can authenticate with OAuth 2.0. Immuta's OAuth authentication method uses the Client Credentials Flow; when you register a data source, Immuta reaches out to your OAuth server to generate a JSON web token (JWT) and then passes that token to the Starburst (Trino) cluster. Therefore, when using OAuth authentication to create data sources in Immuta, configure your Starburst (Trino) cluster to use JWT authentication, not OpenID Connect or OAuth.
Data owner fallback
When users query a Starburst (Trino) data source, Immuta sends the data owner username with the view SQL so that policies apply in the right context. However, there are two scenarios in which Immuta cannot retrieve and send the data owner username:
The Starburst (Trino) cluster has an error when Immuta queries for the owner
The data source has already been registered without an owner
If either of these scenarios occur, queries will fail. To avoid this error, follow the instructions on the to configure a global admin username that Immuta can use as a fallback username.
Table
✅
✅
View
✅
✅
The status of the integration is visible on the integrations tab of the Immuta application settings page. If errors occur in the integration, a banner will appear in the Immuta UI with guidance for remediating the error.
The definitions for each status and the state of configured data platform integrations is available in the response schema of the integrations API. However, the UI consolidates these error statuses and provides detail in the error messages.
Immuta policies can be applied to Starburst (Trino)-created logical views.
The descriptions below provide guidance for applying policies to Starburst (Trino)-created logical views in the
However, there are other approaches you can use to apply policies to Starburst (Trino)-created logical views. The examples below are the simplest approaches.
For views created using the DEFINER security mode,
ensure the user who created the view is configured as an admin user in the Immuta plugin so that policies are never applied to the underlying tables.
create Immuta data sources and apply policies to logical views exposing those tables.
lock down access to the underlying tables in Starburst (Trino) so that all end user access is provided through the views.
Applying policies to views or tables
Avoid creating data policies for both a logical view and its underlying tables. Instead, apply policies to the logical view or the underlying tables.
For views created using the INVOKER security mode, the querying user needs access to the logical view and underlying tables.
If non-Immuta table reads are disabled, provide access to the views and tables through Immuta. To do so, create Immuta data sources for the view and underlying tables, and grant access to the querying user in Immuta. If creating data policies, apply the policies to either the view or underlying tables, not both.
If non-Immuta table reads are enabled, the user already has access to the table and view. Create Immuta data sources and apply policies to the underlying table; this approach will enforce access controls for both the table and view in Starburst (Trino).
Impersonation allows users to query data as another Immuta user. The Starburst (Trino) integration supports the native Starburst or Trino impersonation approaches:
JDBC method: In your JDBC connection driver properties, set the sessionUser property to the Immuta user you want to impersonate. See the Starburst JDBC driver documentation for details.
Trino CLI method: Set the --session-user property to specify the session user as the Immuta user you want to impersonate when invoking the Trino CLI. See the Trino release notes for details.
User impersonation is automatically enabled with your Starburst (Trino) integration, but the authenticated user must be given the IMPERSONATE_USER permission in Immuta or match the Starburst (Trino) immuta.user.admin regex configuration property.
The Immuta Trino Event Listener allows Immuta to translate events into comprehensive audit logs for users with the Immuta AUDIT permission to view. For more information about what is included in those audit logs, see the Starburst (Trino) audit logs page.
Query audit is enabled by default on all Starburst (Trino) integrations, but you can disable it when configuring the integration with the following properties: immuta.audit.legacy.enabled and immuta.audit.uam.enabled.
You can configure multiple Starburst (Trino) integrations with a single Immuta tenant and use them dynamically. Configure the integration once in Immuta to use it in multiple Starburst (Trino) clusters. However, consider the following limitations:
Names of catalogs cannot overlap because Immuta cannot distinguish among them.
A combination of cluster types on a single Immuta tenant is supported unless your Trino cluster is configured to use a proxy. In that case, you can only connect either Trino clusters or Starburst clusters to the same Immuta tenant.
Limit your masked joins to columns with matching column types. Starburst truncates the result of the masking expression to conform to the native column type when performing the join, so joining two masked columns with different data types produces invalid results when one of the columns' lengths is less than the length of the masked value.
For example, if the value of a hashed column is 64 characters, joining a hashed varchar(50) and a hashed varchar(255) column will not be joined correctly, since the varchar(50) value is truncated and doesn’t match the varchar(255) value.
Deprecation notice
Support for configuring the Snowflake integration using this legacy workflow has been deprecated. Instead, configure your integration and register your data using connections.
Warehouse sizing recommendations
Before configuring the integration, review the to ensure that you use Snowflake compute resources cost effectively.
The permissions outlined in this section are the Snowflake privileges required for a basic configuration. See the for a list of privileges necessary for additional features and settings.
APPLICATION_ADMIN Immuta permission
The Snowflake user running the installation script must have the following privileges:
Different accounts
The setup account used to enable the integration must be different from the account used to register data sources in Immuta.
Snowflake resource names: Use uppercase for the names of the Snowflake resources you create below.
Click the App Settings icon in the navigation menu.
Click the Integrations tab.
Click the +Add Integration button and select Snowflake from the dropdown menu.
in Snowflake at the account level may cause unexpected behavior of the Snowflake integration in Immuta
The must be set to false (the default setting in Snowflake) at the account level. Changing this value to true causes unexpected behavior of the Snowflake integration.
You have two options for configuring your Snowflake environment:
: Grant Immuta one-time use of credentials to automatically configure your Snowflake environment and the integration.
: Run the Immuta script in your Snowflake environment yourself to configure your Snowflake environment and the integration.
Required permissions: When performing an automatic setup, the credentials provided must have the .
The setup will use the provided credentials to create a user called IMMUTA_SYSTEM_ACCOUNT and grant the following privileges to that user:
CREATE ROLE ON ACCOUNT WITH GRANT OPTION
APPLY MASKING POLICY ON ACCOUNT WITH GRANT OPTION
APPLY ROW ACCESS POLICY ON ACCOUNT WITH GRANT OPTION
Alternatively, you can use the and edit the provided script to grant the Immuta system account OWNERSHIP on the objects that Immuta will secure, instead of granting MANAGE GRANTS ON ACCOUNT. The current role that has OWNERSHIP on the securables will need to be granted to the Immuta system role. However, if granting OWNERSHIP instead of MANAGE GRANTS ON ACCOUNT, Immuta will not be able to manage the role that is granted to the account, so it is recommended to run the script as-is, without changes.
These credentials will be used to create and configure a new IMMUTA database within the specified Snowflake instance. The credentials are not stored or saved by Immuta, and Immuta doesn’t retain access to them after initial setup is complete.
You can create a new account for Immuta to use that has these privileges, or you can grant temporary use of a pre-existing account. By default, the pre-existing account with appropriate privileges is ACCOUNTADMIN. If you create a new account, it can be deleted after initial setup is complete.
From the Select Authentication Method Dropdown, select one of the following authentication methods:
Username and Password (): Complete the Username, Password, and Role fields.
:
Complete the Username field. This user must be .
Required permissions: When performing a manual setup, the Snowflake user running the script must have the .
It will create a user called IMMUTA_SYSTEM_ACCOUNT, and grant the following privileges to that user:
CREATE ROLE ON ACCOUNT WITH GRANT OPTION
APPLY MASKING POLICY ON ACCOUNT WITH GRANT OPTION
APPLY ROW ACCESS POLICY ON ACCOUNT WITH GRANT OPTION
Alternatively, you can grant the Immuta system account OWNERSHIP on the objects that Immuta will secure, instead of granting MANAGE GRANTS ON ACCOUNT. The current role that has OWNERSHIP on the securables will need to be granted to the Immuta system role. However, if granting OWNERSHIP instead of MANAGE GRANTS ON ACCOUNT, Immuta will not be able to manage the role that is granted to the account, so it is recommended to run the script as-is, without changes.
Select Manual.
Use the Dropdown Menu to select your Authentication Method:
Username and password (): Enter the Username and Password and set them in the bootstrap script for the Immuta system account credentials.
If you enabled a Snowflake workspace, select Warehouses from the dropdown menu that will be available to project owners when creating Snowflake workspaces. Select from a list of all the warehouses available to the privileged account entered above. Note that any warehouse accessible by the PUBLIC role does not need to be explicitly added.
Enter the Excepted Roles/User List. Each role or username (both case-sensitive) in this list should be separated by a comma. Wildcards are unsupported.
Excepted roles/users will have no policies applied to queries
Any user with the username or acting under the role in this list will have no policies applied to them when querying Immuta protected Snowflake tables in Snowflake. Therefore, this list should be used for service or system accounts and the default role of the account used to create the data sources in the Immuta projects (if you have Snowflake workspace enabled).
Click Save.
To allow Immuta to automatically import table and column tags from Snowflake, enable Snowflake tag ingestion in the external catalog section of the Immuta app settings page.
Requirements:
A configured Snowflake integration or connection
The Snowflake user configuring the Snowflake tag ingestion must have the following privileges and should be able to access all securables registered as data sources:
Navigate to the App Settings page.
Scroll to 2 External Catalogs, and click Add Catalog.
Enter a Display Name and select Snowflake from the dropdown menu.
.
{
"Version": "2012-10-17",
"Statement": [
{
"Sid": "Stmt1234567891011",
"Effect": "Allow",
"Principal": {
"Service":"access-grants.s3.amazonaws.com"
},
"Action": [
"sts:AssumeRole",
"sts:SetSourceIdentity"
]
}
]
} {
"Version": "2012-10-17",
"Statement": [
{
"Sid": "ObjectLevelReadPermissions",
"Effect": "Allow",
"Action": [
"s3:GetObject",
"s3:GetObjectVersion",
"s3:GetObjectAcl",
"s3:GetObjectVersionAcl",
"s3:ListMultipartUploadParts"
],
"Resource": [
<bucket arn>
]
},
{
"Sid": "ObjectLevelWritePermissions",
"Effect": "Allow",
"Action": [
"s3:PutObject",
"s3:PutObjectAcl",
"s3:PutObjectVersionAcl",
"s3:DeleteObject",
"s3:DeleteObjectVersion",
"s3:AbortMultipartUpload"
],
"Resource": [
<bucket arn>
]
},
{
"Sid": "BucketLevelReadPermissions",
"Effect": "Allow",
"Action": [
"s3:ListAllMyBuckets",
"s3:ListBucket"
],
"Resource": [
<bucket arn>
]
}
]
}{
"Version": "2012-10-17",
"Statement": [
{
"Sid": "RolePermissions",
"Effect": "Allow",
"Action": [
"iam:GetRole",
"iam:PassRole"
],
"Resource": "<role_arn>"
},
{
"Sid": "AccessGrants",
"Effect": "Allow",
"Action": [
"s3:CreateAccessGrant",
"s3:DeleteAccessGrantsLocation",
"s3:GetAccessGrantsLocation",
"s3:CreateAccessGrantsLocation",
"s3:GetAccessGrantsInstance",
"s3:GetAccessGrantsInstanceForPrefix",
"s3:GetAccessGrantsInstanceResourcePolicy",
"s3:ListAccessGrants",
"s3:ListAccessGrantsLocations",
"s3:ListAccessGrantsInstances",
"s3:DeleteAccessGrant",
"s3:GetAccessGrant"
],
"Resource": [
"<access_grants_instance_arn>"
]
}
]
}{
"Sid": "sso",
"Effect": "Allow",
"Action": [
"sso:DescribeInstance",
"sso:DescribeApplication",
"sso-directory:DescribeUsers"
],
"Resource": [
"<iam_identity_center_instance_arn>",
"<iam_identity_center_application_arn_for_s3_access_grants>",
"arn:aws:identitystore:::user/*",
"arn:aws:identitystore::<aws_account>:identitystore/<identity_store_id>"
]
}, {
"Sid": "idc",
"Effect": "Allow",
"Action": [
"identitystore:DescribeUser",
"identitystore:DescribeGroup"
],
"Resource": [
"<iam_identity_center_instance_arn>",
"<iam_identity_center_application_arn_for_s3_access_grants>",
"arn:aws:identitystore:::user/*",
"arn:aws:identitystore::<aws_account>:identitystore/<identity_store_id>"
]
}s3:DeleteAccessGrantsInstance
s3:GetAccessGrantsInstance
s3:GetAccessGrantsInstanceForPrefix
s3:GetAccessGrantsInstanceResourcePolicy
s3:ListAccessGrants
s3:ListAccessGrantsLocations
Click Select a File, and upload a Snowflake key pair file.
Opt to fill out the Resource field with a URI of the resource where the requested token will be used.
Enter the x509 Certificate Thumbprint. This identifies the corresponding key to the token and is often abbreviated as x5t or is called sub (Subject).
Upload the PEM Certificate, which is the client certificate that is used to sign the authorization request.
To pass a client secret, uncheck the Use Certificate checkbox and complete the fields below. You cannot use a certificate if you use this method for obtaining the access token.
Scope (string): The scope limits the operations and roles allowed in Snowflake by the access token. See the Snowflake documentation for details about creating scopes for External OAuth.
Client Secret (string): Immuta uses this secret to authenticate with the authorization server when it requests a token.
❌
❌
Azure Synapse Analytics
✅
✅
✅
✅
❌
❌
Databricks Spark
✅
✅
✅
✅
✅
❌
Databricks Unity Catalog
✅
✅
✅
❌
✅
✅
Google BigQuery
✅
✅
✅
❌
❌
❌
Snowflake
✅
✅
✅
Supported with caveats
✅
✅
Starburst (Trino)
✅
✅
✅
✅
✅
❌
✅
❌ View-based integrations are read-only
✅
❌ Write access is controlled through workspaces and scratch paths
✅
✅
✅
❌ View-based integrations are read-only
✅
✅
✅
✅
✅
✅
❌
✅
✅
Custom function
✅
✅
✅
✅
✅
✅
✅
Format preserving masking
❌
❌
❌
❌
❌
✅
❌
Hashing
✅
✅
✅
✅
✅
✅
✅
Masking fields within STRUCT columns
❌
❌
✅
Supported with caveats
❌
❌
❌
Minimize
✅
✅
✅
✅
✅
✅
✅
Only show data by time
✅
✅
✅
✅
✅
✅
✅
Only show rows (matching)
✅
✅
✅
✅
✅
✅
✅
Randomized response
❌
❌
❌
❌
❌
✅
❌
Regex
✅
❌
✅
✅
✅
✅
✅
Replace with NULL or constant
✅
✅
Supported with caveats
✅
✅
✅
✅
Reversible masking
✅
❌
✅
❌
❌
✅
✅
Rounding
✅
✅
✅
✅
✅
✅
✅
WHERE clause
✅
✅
✅
✅
✅
✅
✅
❌
✅
Azure Synapse Analytics
❌
❌
✅
Databricks
✅
✅
✅
Google BigQuery
❌
❌
✅
Snowflake
✅
✅
✅
Starburst (Trino)
✅
✅
✅
Object queried
✅
✅
✅
✅
Columns returned
❌
✅
✅
✅
Rows returned
❌
✅
✅
✅
Query text
✅
✅
✅
✅
Unauthorized information
✅
✅
Limited support
❌
Materialized view
✅
✅
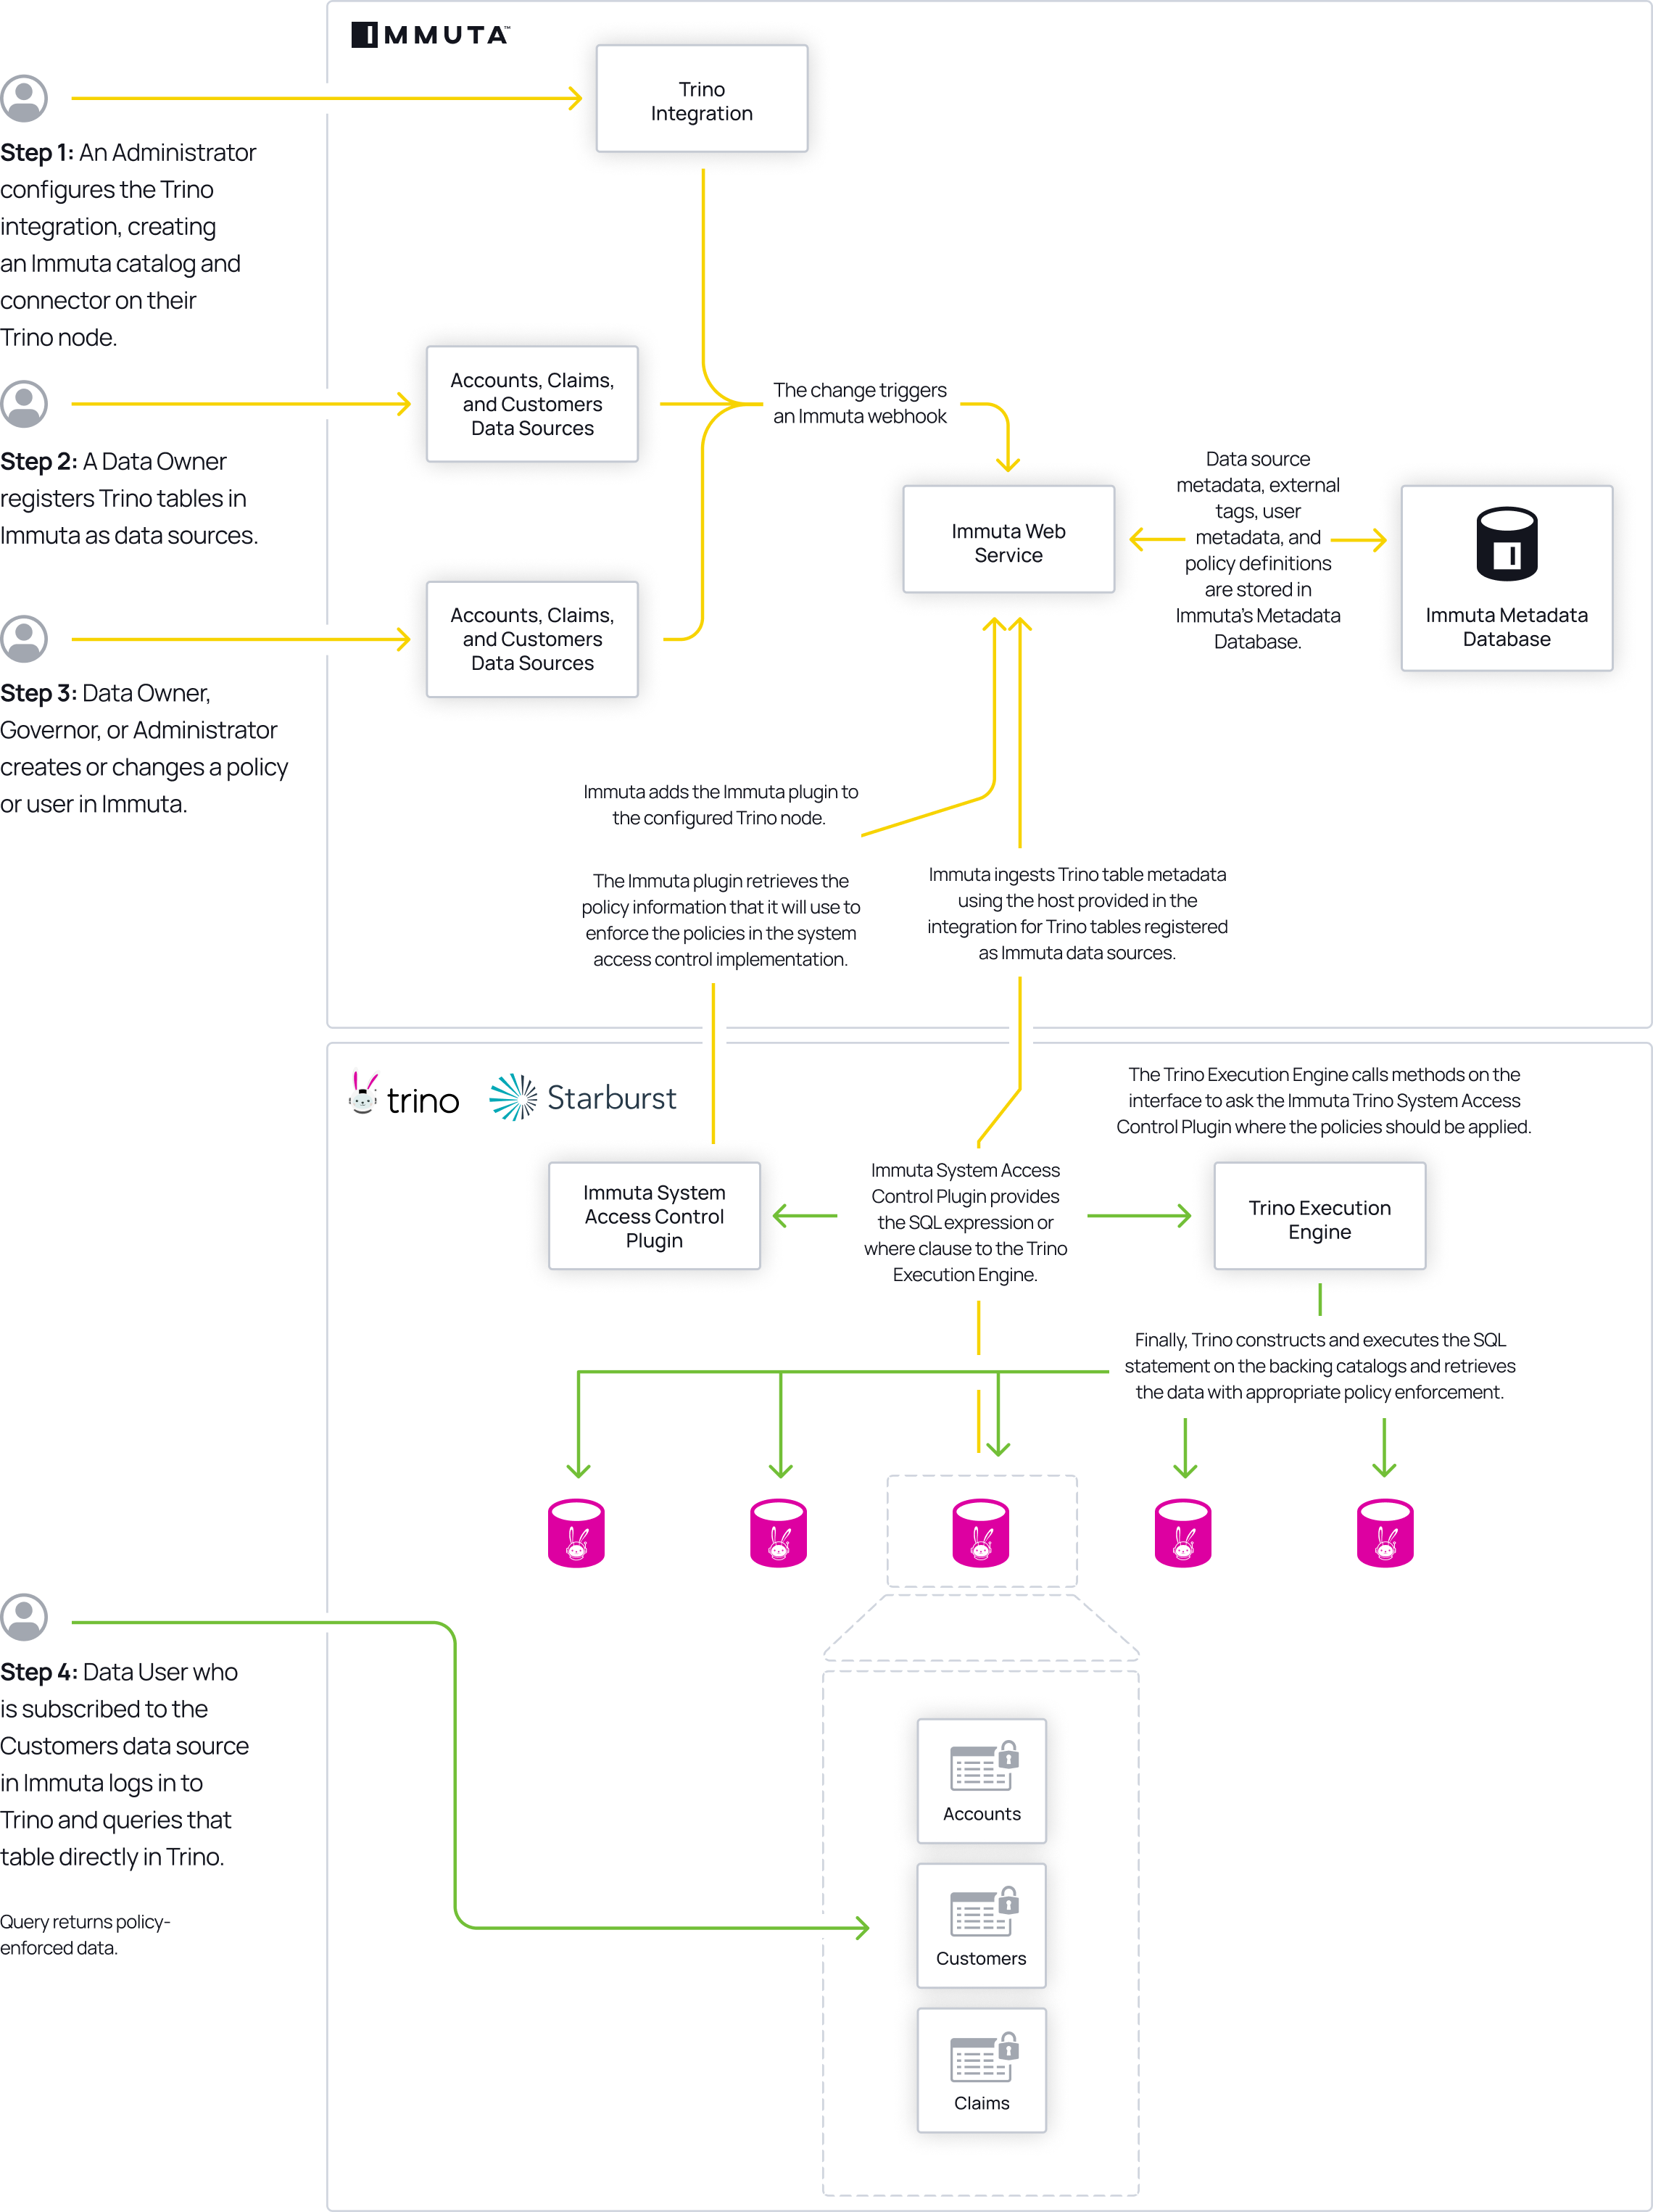
Database: the remote database
Enter the HTTP Path of your Databricks cluster or SQL warehouse.
OAuth machine-to-machine (M2M):
Enter the HTTP Path of your Databricks cluster or SQL warehouse.
Fill out the Token Endpoint with the full URL of the identity provider. This is where the generated token is sent. The default value is https://<your workspace name>.cloud.databricks.com/oidc/v1/token.
Fill out the Client ID. This is a combination of letters, numbers, or symbols, used as a public identifier and is the same as the .
Enter the Scope (string). The scope limits the operations and roles allowed in Databricks by the access token. See the for details about scopes.
Enter the Client Secret. Immuta uses this secret to authenticate with the authorization server when it requests a token.
TablenameCustom: Enter a custom template for the Data Source Name. You may personalize this field as you wish, but it must include a tablename macro. The case of the macro will apply to the data source name (i.e., <Tablename> will result in "Data Source Name," <tablename> will result in "data source name," and <TABLENAME> will result in "DATA SOURCE NAME").
CREATE DATABASE ON ACCOUNT WITH GRANT OPTIONCREATE ROLE ON ACCOUNT WITH GRANT OPTION
CREATE USER ON ACCOUNT WITH GRANT OPTION
MANAGE GRANTS ON ACCOUNT WITH GRANT OPTION
APPLY MASKING POLICY ON ACCOUNT WITH GRANT OPTION
APPLY ROW ACCESS POLICY ON ACCOUNT WITH GRANT OPTION
The Snowflake user registering data sources must have the following privileges on all securables:
USAGE on all databases and schemas with registered data sources
REFERENCES on all tables and views registered in Immuta
SELECT on all tables and views registered in Immuta
Opt to check the Enable Project Workspace box. This will allow for managed write access within Snowflake. Note: Project workspaces still use Snowflake views, so the default role of the account used to create the data sources in the project must be added to the Excepted Roles List. This option is unavailable when table grants is enabled.
Opt to check the Enable Impersonation box and customize the Impersonation Role to allow Immuta users to impersonate another user. You cannot edit this choice after you configure the integration.
Snowflake query audit is enabled by default.
Configure the audit frequency by scrolling to Integrations Settings and find the Snowflake Audit Sync Schedule section.
Enter how often, in hours, you want Immuta to ingest audit events from Snowflake as an integer between 1 and 24.
Continue with your integration configuration.
MANAGE GRANTS ON ACCOUNT WITH GRANT OPTION
When using an encrypted private key, enter the private key file password in the Additional Connection String Options. Use the following format: PRIV_KEY_FILE_PWD=<your_pw>
Click Key Pair (Required), and upload a Snowflake private key pair file.
Complete the Role field.
MANAGE GRANTS ON ACCOUNT WITH GRANT OPTION
Key Pair Authentication: Upload the Key Pair file and when using an encrypted private key, enter the private key file password in the Additional Connection String Options. Use the following format: PRIV_KEY_FILE_PWD=<your_pw>
Snowflake External OAuth:
Create a security integration for your Snowflake External OAuth. Note that if you have an existing security integration, then the Immuta system role must be added to the existing EXTERNAL_OAUTH_ALLOWED_ROLES_LIST. The Immuta system role will be the Immuta database provided above with _SYSTEM. If you used the default database name it will be IMMUTA_SYSTEM.
Fill out the Token Endpoint. This is where the generated token is sent.
Fill out the Client ID. This is the subject of the generated token.
Select the method Immuta will use to obtain an access token:
Certificate
Keep the Use Certificate checkbox enabled.
In the Setup section, click bootstrap script to download the script. Then, fill out the appropriate fields and run the bootstrap script in Snowflake.
IMPORTED PRIVILEGES ON DATABASE snowflakeAPPLY TAG ON ACCOUNT
Enter the Account.
Enter the Authentication information based on your authentication method:
Username and password: Fill out Username and Password.
Key pair:
Fill out Username.
Click Upload Certificates to enter in the Certificate Authority, Certificate File, and Key File.
Close the modal and opt to enter the Encrypted Key File Passphrase.
Enter the additional Snowflake details: Port, Default Warehouse, and Role.
Opt to enter the Proxy Host and Proxy Port.
Click the Test Connection button.
Click the Test Data Source Link.
Once both tests are successful, click Save.
Private preview: This integration is available to select accounts. Contact your Immuta representative for details.
The Google BigQuery integration allows users to query policy protected data directly in BigQuery as secure views within an Immuta-created dataset. Immuta controls who can see what within the views, allowing data governors to create complex ABAC policies and data users to query the right data within the BigQuery console.
Google BigQuery is configured through the Immuta console and a script provided by Immuta. While you can complete some steps within the BigQuery console, it is easiest to install using gcloud and the Immuta script.
Once Google BigQuery has been configured, BigQuery admins can start creating subscription and data policies to meet compliance requirements and users can start querying policy protected data directly in BigQuery.
Create a global or .
What permissions will Immuta have in my BigQuery environment?
You can find a list of the permissions the custom Immuta role has .
What integration features will Immuta support for BigQuery?
In this policy push integration, Immuta creates views that contain all policy logic. Each view has a 1-to-1 relationship with the original table. Access controls are applied in the view, allowing organizations to leverage Immuta’s powerful set of attribute-based policies and query data directly in BigQuery.
BigQuery is organized by projects (which can be thought of as databases), datasets (which can be compared to schemas), tables, and views. When you enable the integration, an Immuta dataset is created in BigQuery that contains the Immuta-required user entitlements information. These objects within the Immuta dataset are intended to only be used and altered by the Immuta application.
After data sources are registered, Immuta uses the custom user and role, created before the integration is enabled, to push the Immuta data sources as views into a mirrored dataset of the original table. Immuta manages grants on the created view to ensure only users subscribed to the Immuta data source will see the data.
The Immuta integration uses a mirrored dataset approach. That is, if the source dataset is named mydataset, Immuta will create a dataset named mydataset_secure, assuming that _secure is the specified Immuta dataset suffix. This mirrored dataset is an , allowing it to access the data of the original dataset. It will contain the Immuta-managed views, which have identical names to the original tables they’re based on.
Following the principle of least privilege, Immuta does not have permission to manage Google Cloud Platform users, specifically in granting or denying access to a project and its datasets. This means that data governors should limit user access to original datasets to ensure data users are accessing the data through the Immuta created views and not the backing tables. The only users who need to have access to the backing tables are the credentials used to register the tables in Immuta.
Additionally, a data governor must grant users access to the mirrored datasets that Immuta will create and populate with views. Immuta and BigQuery’s best practice recommendation is to grant access via groups in Google Cloud Platform. Because users still must be registered in Immuta and subscribed to an Immuta data source to be able to query Immuta views, all Immuta users can be granted access to the mirrored datasets that Immuta creates.
The status of the integration is visible on the integrations tab of the Immuta application settings page. If errors occur in the integration, a banner will appear in the Immuta UI with guidance for remediating the error.
The definitions for each status and the state of configured data platform integrations is available in the . However, the UI consolidates these error statuses and provides detail in the error messages.
This integration can only be enabled through a manual bootstrap using the Immuta API.
This integration can only be enabled to work in a single region.
BigQuery does not allow views partitioned by pseudo-columns. If you would like to partition a table by a pseudo-column and have Immuta govern it, take the following steps:
This integration supports the following policy types:
Column masking
Mask using hashing (SHA256())
Mask by making NULL
See the resources below to start implementing and using the BigQuery integration:
Building global and to govern data
Follow this guide to connect your Google BigQuery data warehouse to Immuta.
Google BigQuery integration (PrPr) enabled.
Immuta role with SYSTEM_ADMIN permissions and an .
.
The Google BigQuery integration requires you to create a Google Cloud service account and role that will be used by Immuta to
create a Google BigQuery dataset that will be used to store a table of user entitlements, UDFs for policy enforcement, etc.
manage the table of user entitlements via updates when entitlements change in Immuta.
create datasets and secure views with access control policies enforced, which mirror tables inside of datasets you ingest as Immuta data sources.
You have two options to create the required Google Cloud service account and role:
The bootstrap.sh script is a shell script provided by Immuta that creates prerequisite Google Cloud IAM objects for the integration to connect. When you run this script from your command line, it will create the following items, scoped at the project-level:
A new Google Cloud IAM role
A new Google Cloud service account, which will be granted the newly-created role
A JSON keyfile for the newly-created service account
You will need to use the objects created in these steps to .
Google Cloud IAM roles required to run the script
To execute bootstrap.sh from your command line, you must be authenticated to the gcloud CLI utility as a user with all of the following roles:
roles/iam.roleAdmin
roles/iam.serviceAccountAdmin
roles/serviceusage.serviceUsageAdmin
Having these three roles is the least-privilege set of Google Cloud IAM roles required to successfully run the bootstrap.sh script from your command line. However, having either of the following Google Cloud IAM roles will also allow you to run the script successfully:
roles/editor
roles/owner
Install .
Set the account property in the core section for Google Cloud CLI to the account gcloud should use for authentication. (You can run gcloud auth list to see your currently available accounts):
In Immuta, navigate to the App Settings page and click the Integrations tab.
Alternatively, you may use the Google Cloud Console to create the prerequisite role, service account, and private key file for the integration to connect to Google BigQuery.
with the following privileges:
bigquery.datasets.create
bigquery.datasets.delete
Once the Google Cloud IAM custom role and service account are created, you can enable the Google BigQuery integration. This section illustrates how to enable the integration on the Immuta app settings page. To configure this integration via the Immuta API, see the .
In Immuta, navigate to the App Settings page and click the Integrations tab.
Click Add Integration and select Google BigQuery from the dropdown menu.
Click Select Authentication Method and select Key File.
GCP location must match dataset region
The region set for the GCP location must match the region of your datasets. Set GCP location to a general region (for example, US) to include child regions.
You can disable the Google BigQuery integration automatically or manually.
Click the App Settings icon, and then click the Integrations tab.
Select the Google BigQuery integration you would like to disable, and select the Disable Integration checkbox.
Click Save.
The privileges required to run the cleanup script are the same as the Google Cloud IAM roles required to run the bootstrap.sh script.
Click the App Settings icon, and then click the Integrations tab.
Select the Google BigQuery integration you would like to disable, and click Download Scripts.
Click Save. Wait until Immuta has finished saving your configuration changes before proceeding.
Build and
to securely collaborate on analytical workloads
Deprecation notice
Support for configuring the Databricks Unity Catalog integration using this legacy workflow has been deprecated. Instead, configure your integration and register your data using .
allows you to manage and access data in your Databricks account across all of your workspaces. With Immuta’s Databricks Unity Catalog integration, you can write your policies in Immuta and have them enforced automatically by Databricks across data in your Unity Catalog metastore.
UseProxy=1;ProxyHost=my.host.com;ProxyPort=6789Enter the x509 Certificate Thumbprint. This identifies the corresponding key to the token and is often abbreviated as x5t or is called sub (Subject).
Upload the PEM Certificate, which is the client certificate that is used to sign the authorization request.
Client secret
Uncheck the Use Certificate checkbox.
Enter the Scope (string). The scope limits the operations and roles allowed in Snowflake by the access token. See the OAuth 2.0 scopes documentation for details about scopes.
Enter the Client Secret (string). Immuta uses this secret to authenticate with the authorization server when it requests a token.
Users query data from the Immuta created datasets directly in BigQuery.
For private preview, Immuta supports a basic version of the BigQuery integration where Immuta can enforce specific policies on data in a single BigQuery project. At this time, workspaces, tag ingestion, user impersonation, query audit, and multiple integrations are not supported.
Create a view in BigQuery of the partitioned table, with the pseudo-column aliased. For example,
Register this view as a BigQuery data source in Immuta.
Immuta will then be able to create Immuta-managed views off of this view with the pseudo-column aliased.
Mask using a regular expression
Mask by date rounding
Mask by numeric rounding
Mask using custom functions
Row-level masking
Row visibility based on user attributes and/or object attributes
Only show rows that fall within a given time window
Minimize rows
Filter rows using custom WHERE clause
Always hide rows
Click Select Authentication Method and select Key File.
Click Download Script(s).
Before you run the script, update your permissions to execute it:
Run the script, where
PROJECT_ID is the Google Cloud Platform project to operate on.
ROLE_ID is the name of the custom role to create.
NAME will create a service account with the provided name.
OUTPUT_FILE is the path where the resulting private key should be written. File system write permission will be checked on the specified path prior to the key creation.
undelete-role (optional) will undelete the custom role from the project. Roles that have been deleted for a long time can't be undeleted. This option can fail for the following reasons:
The role specified does not exist.
The active user does not have permission to access the given role.
enable-api (optional) provided you’ve been granted access to enable the Google BigQuery API, will enable the service.
bigquery.datasets.get
bigquery.datasets.update
bigquery.jobs.create
bigquery.jobs.get
bigquery.jobs.list
bigquery.jobs.listAll
bigquery.routines.create
bigquery.routines.delete
bigquery.routines.get
bigquery.routines.list
bigquery.routines.update
bigquery.tables.create
bigquery.tables.delete
bigquery.tables.export
bigquery.tables.get
bigquery.tables.getData
bigquery.tables.list
bigquery.tables.setCategory
bigquery.tables.update
bigquery.tables.updateData
bigquery.tables.updateTag
Create a service account and grant it the custom role you just created.
Upload your GCP Service Account Key File. This is the private key file generated in create a Google Cloud service account and role for Immuta to use to connect to Google BigQuery. Uploading this file will auto-populate the following fields:
Project Id: The Google Cloud Platform project to operate on, where your Google BigQuery data warehouse is located. A new dataset will be provisioned in this Google BigQuery project to store the integration configuration.
Service Account: The service account you created in create a Google Cloud service account and role for Immuta to use to connect to Google BigQuery.
Complete the following fields:
Immuta Dataset: The name of the Google BigQuery dataset to provision inside of the project. Important: if you are using multiple environments in the same Google BigQuery project, this dataset to provision must be unique across environments.
Immuta Role: The custom role you created in create a Google Cloud service account and role for Immuta to use to connect to Google BigQuery.
Dataset Suffix: The suffix that will be postfixed to the name of each dataset created to store secure views, one per dataset that you ingest a table for as a data source in Immuta. Important: if you are using multiple environments in the same Google BigQuery project, this suffix must be unique across environments.
GCP Location: The dataset’s location. After a dataset is created, the location can't be changed. Note that
If you choose EU for the dataset location, your Core BigQuery Customer Data resides in the EU.
Click Test Google BigQuery Integration.
Click Save.
Before you run the script, update your permissions to execute it:
Run the cleanup script.
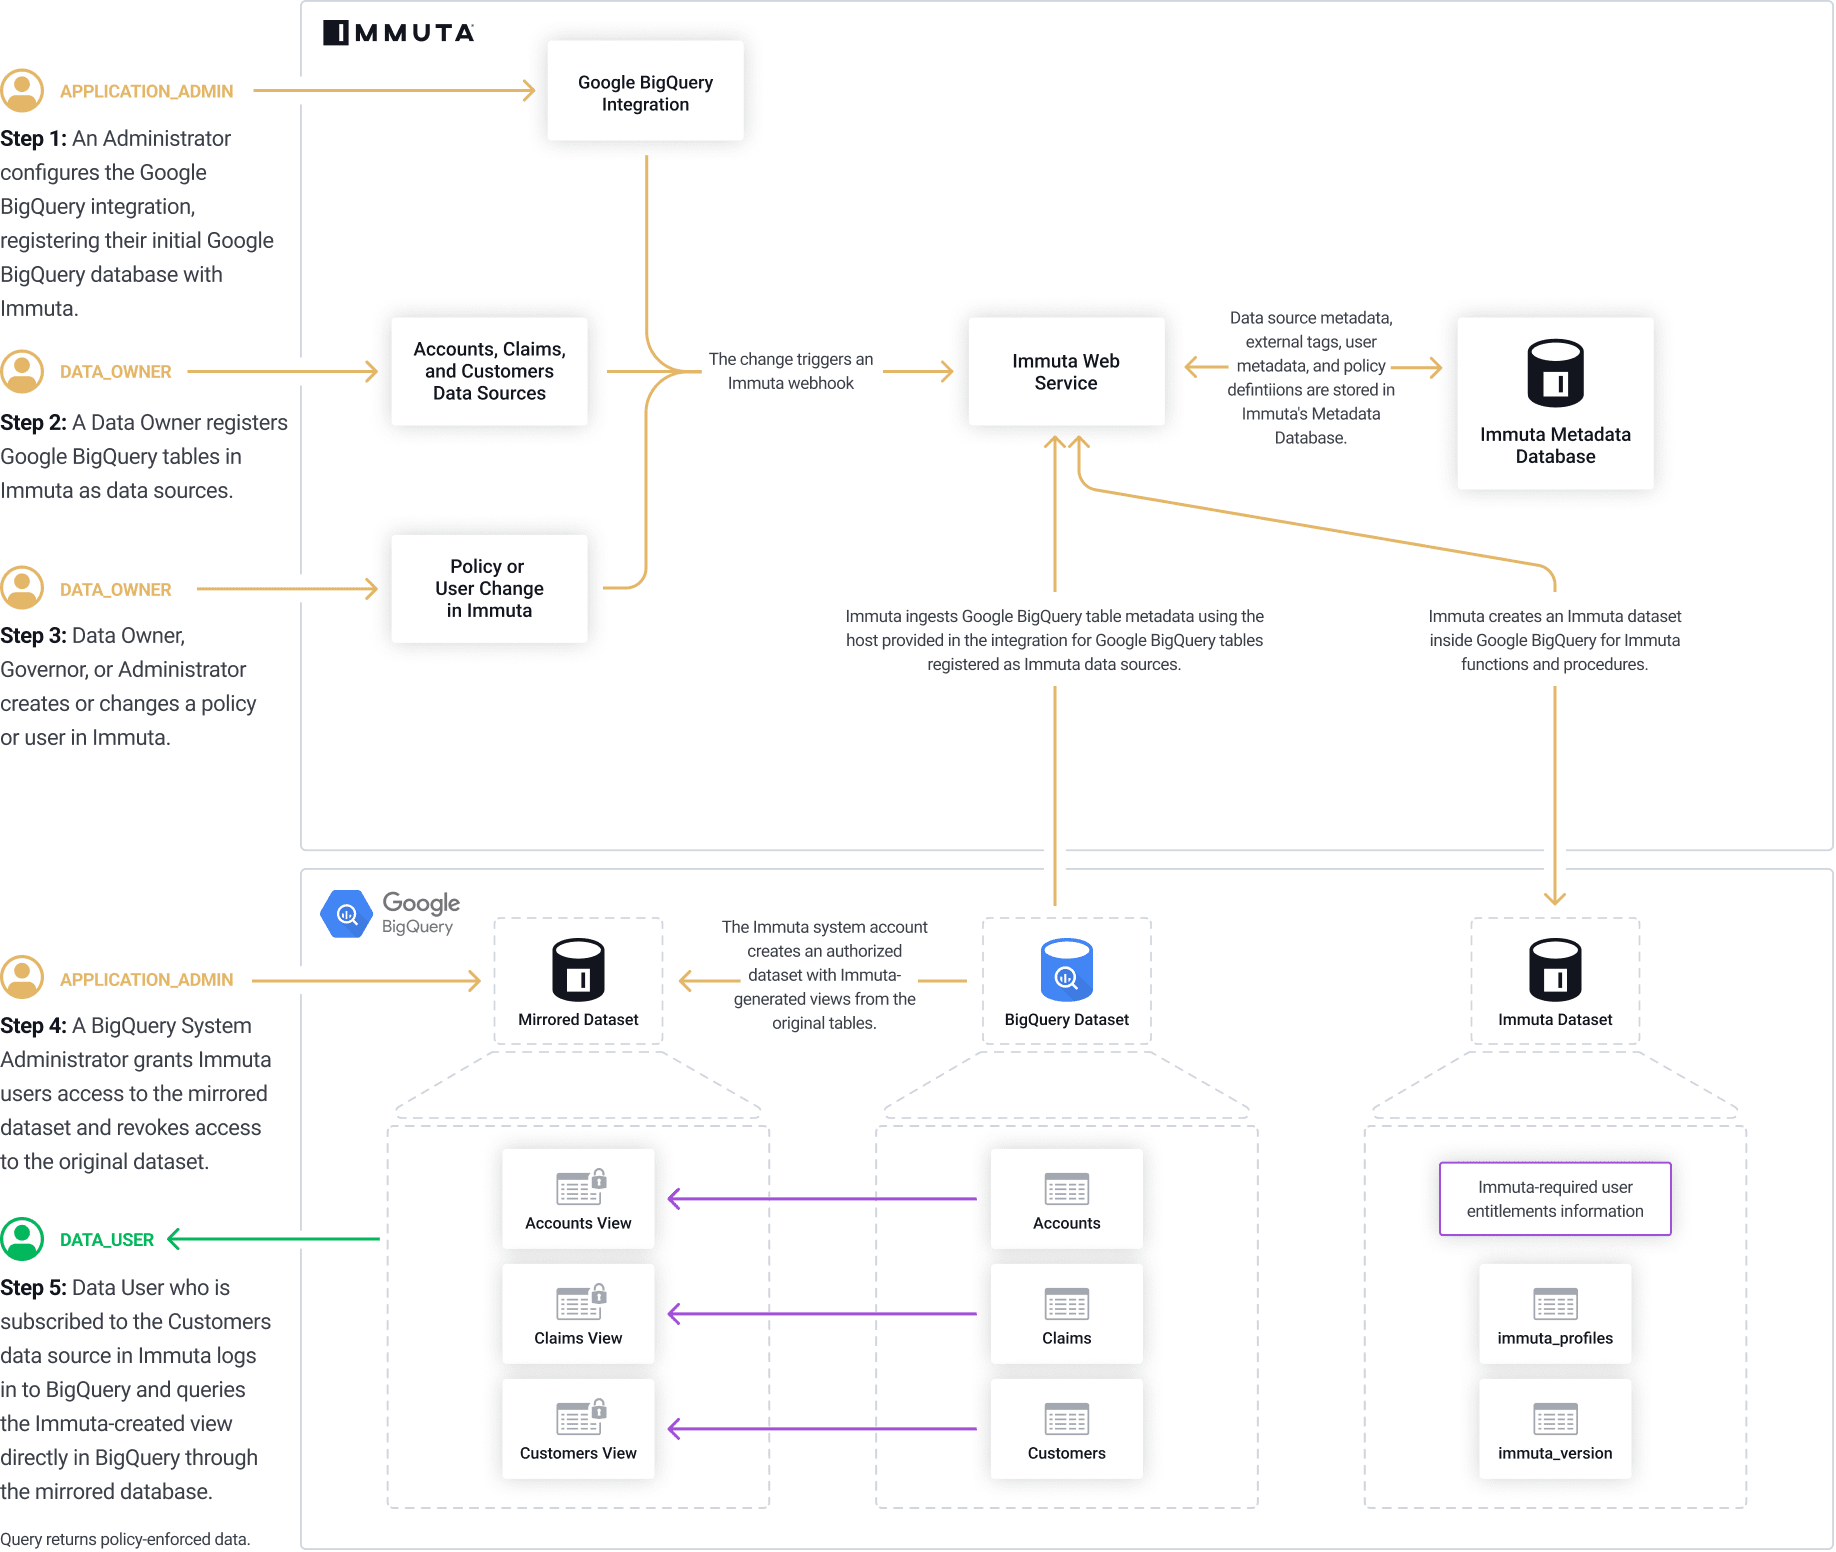
The permissions outlined in this section are the Databricks privileges required for a basic configuration. See the Databricks reference guide for a list of privileges necessary for additional features and settings.
APPLICATION_ADMIN Immuta permission
The Databricks user running the installation script must have the following privileges:
Account admin
CREATE CATALOG privilege on the Unity Catalog metastore to create an Immuta-owned catalog and tables
Metastore admin (only required if enabling query audit)
See the Databricks documentation for more details about Unity Catalog privileges and securable objects.
Before you configure the Databricks Unity Catalog integration, ensure that you have fulfilled the following requirements:
Unity Catalog metastore created and attached to a Databricks workspace. Immuta supports configuring a single metastore for each configured integration, and that metastore may be attached to multiple Databricks workspaces.
Unity Catalog enabled on your Databricks cluster or SQL warehouse. All SQL warehouses have Unity Catalog enabled if your workspace is attached to a Unity Catalog metastore. Immuta recommends linking a SQL warehouse to your Immuta tenant rather than a cluster for both performance and availability reasons.
If you select single user access mode for your cluster, you must
use Databricks Runtime 15.4 LTS and above. Unity Catalog row- and column-level security controls are unsupported for single user access mode on Databricks Runtime 15.3 and below. See the for details.
enable serverless compute for your workspace.
Unity Catalog best practices
Ensure your integration with Unity Catalog goes smoothly by following these guidelines:
Use a Databricks SQL warehouse to configure the integration. Databricks SQL warehouses are faster to start than traditional clusters, require less management, and can run all the SQL that Immuta requires for policy administration. A serverless warehouse provides nearly instant startup time and is the preferred option for connecting to Immuta.
Move all data into Unity Catalog before configuring Immuta with Unity Catalog. The default catalog used once Unity Catalog support is enabled in Immuta is the hive_metastore, which is not supported by the Unity Catalog integration. Data sources in the Hive Metastore must be managed by the Databricks Spark integration. Existing data sources will need to be re-created after they are moved to Unity Catalog and the Unity Catalog integration is configured.
Ensure that all Databricks clusters that have Immuta installed are stopped and the Immuta configuration is removed from the cluster. Immuta-specific cluster configuration is no longer needed with the Databricks Unity Catalog integration.
Move all data into Unity Catalog before configuring Immuta with Unity Catalog. Existing data sources will need to be re-created after they are moved to Unity Catalog and the Unity Catalog integration is configured. If you don't move all data before configuring the integration, metastore magic will protect your existing data sources throughout the migration process.
In Databricks, create a service principal with the privileges listed below. Immuta uses this service principal continuously to orchestrate Unity Catalog policies and maintain state between Immuta and Databricks.
USE CATALOG and MANAGE on all catalogs containing securables registered as Immuta data sources.
USE SCHEMA on all schemas containing securables registered as Immuta data sources.
MODIFY and SELECT on all securables you want registered as Immuta data sources. The MODIFY privilege is not required for materialized views registered as Immuta data sources, since MODIFY is not a supported privilege on that object type in .
MANAGE and MODIFY are required so that the service principal can apply row filters and column masks on the securable; to do so, the service principal must also have SELECT on the securable as well as USE CATALOG on its parent catalog and USE SCHEMA on its parent schema. Since privileges are inherited, you can grant the service principal the MODIFY and SELECT privilege on all catalogs or schemas containing Immuta data sources, which automatically grants the service principal the MODIFY and SELECT privilege on all current and future securables in the catalog or schema. The service principal also inherits MANAGE from the parent catalog for the purpose of applying row filters and column masks, but that privilege must be set directly on the parent catalog in order for grants to be fully applied.
See the Databricks documentation for more details about Unity Catalog privileges and securable objects.
If you will configure the integration using the manual setup option, the Immuta script you will use includes the SQL statements for granting required privileges to the service principal, so you can skip this step and continue to the manual setup section. Otherwise, manually grant the Immuta service principal access to the Databricks Unity Catalog system tables. For Databricks Unity Catalog audit to work, the service principal must have the following access at minimum:
USE CATALOG on the system catalog
USE SCHEMA on the system.access and system.query schemas
SELECT on the following system tables:
system.access.table_lineage
system.access.column_lineage
Access to system tables is governed by Unity Catalog. No user has access to these system schemas by default. To grant access, a user that is both a metastore admin and an account admin must grant USE_SCHEMA and SELECT permissions on the system schemas to the service principal. See Manage privileges in Unity Catalog for more details.
Existing data source migration: If you have existing Databricks data sources, complete these migration steps before proceeding.
You have two options for configuring your Databricks Unity Catalog integration:
Automatic setup: Immuta creates the catalogs, schemas, tables, and functions using the integration's configured service principal.
Manual setup: Run the Immuta script in Databricks yourself to create the catalog. You can also modify the script to customize your storage location for tables, schemas, or catalogs. The user running the script must have the Databricks privileges listed above.
Required permissions: When performing an automatic setup, the credentials provided must have the permissions listed above.
Click the App Settings icon in the navigation menu.
Click the Integrations tab.
Click + Add Integration and select Databricks Unity Catalog from the dropdown menu.
Complete the following fields:
Server Hostname is the hostname of your Databricks workspace.
HTTP Path is the HTTP path of your Databricks cluster or SQL warehouse.
Immuta Catalog is the name of the catalog Immuta will create to store internal entitlements and other user data specific to Immuta. This catalog will only be readable for the Immuta service principal and should not be granted to other users. The catalog name may only contain letters, numbers, and underscores and cannot start with a number.
Create a separate Immuta catalog for each Immuta tenant
If multiple Immuta tenants are connected to your Databricks environment, create a separate Immuta catalog for each of those tenants. Having multiple Immuta tenants use the same Immuta catalog causes failures in policy enforcement.
If using a proxy server with Databricks Unity Catalog, click the Enable Proxy Support checkbox and complete the Proxy Host and Proxy Port fields. The username and password fields are optional.
Opt to fill out the Exemption Group field with the name of an account-level group in Databricks that must be exempt from having data policies applied. This group is created and managed in Databricks and should only include privileged users and service accounts that require an unmasked view of data. Create this group in Databricks before configuring the integration in Immuta.
Exemption group cannot be changed after configuration is saved
The exemption group field cannot be edited after you save the integration configuration. If you need to change this group name, you can choose one of the following options:
Update the group name in Databricks to match what you have configured here.
Delete the integration in Immuta and create a new Databricks Unity Catalog integration with the new exemption group name.
For details about policy exemption groups, see the .
Unity Catalog query audit is enabled by default. Ensure you have enabled system tables in Unity Catalog and provided the required access to the Immuta service principal.
Opt to scope the query audit ingestion by entering in Unity Catalog Workspace IDs. Enter a comma-separated list of the workspace IDs that you want Immuta to ingest audit records for. If left empty, Immuta will audit all tables and users in Unity Catalog.
Configure the audit frequency by scrolling to Integrations Settings and find the Unity Catalog Audit Sync Schedule section.
Enter how often, in hours, you want Immuta to ingest audit events from Unity Catalog as an integer between 1 and 24.
Continue with your integration configuration.
Select your authentication method from the dropdown:
Access Token: Enter a Databricks Personal Access Token. This is the access token for the Immuta service principal. This service principal must have the for the metastore associated with the Databricks workspace. If this token is configured to expire, update this field regularly for the integration to continue to function.
OAuth machine-to-machine (M2M):
Click Save.
Required permissions: When performing a manual setup, the Databricks user running the script must have the permissions listed above.
Click the App Settings icon in the navigation menu.
Click the Integrations tab.
Click + Add Integration and select Databricks Unity Catalog from the dropdown menu.
Complete the following fields:
Server Hostname is the hostname of your Databricks workspace.
HTTP Path is the HTTP path of your Databricks cluster or SQL warehouse.
Immuta Catalog is the name of the catalog Immuta will create to store internal entitlements and other user data specific to Immuta. This catalog will only be readable for the Immuta service principal and should not be granted to other users. The catalog name may only contain letters, numbers, and underscores and cannot start with a number.
Create a separate Immuta catalog for each Immuta tenant
If multiple Immuta tenants are connected to your Databricks environment, create a separate Immuta catalog for each of those tenants. Having multiple Immuta tenants use the same Immuta catalog causes failures in policy enforcement.
If using a proxy server with Databricks Unity Catalog, click the Enable Proxy Support checkbox and complete the Proxy Host and Proxy Port fields. The username and password fields are optional.
Opt to fill out the Exemption Group field with the name of an account-level group in Databricks that must be exempt from having data policies applied. This group is created and managed in Databricks and should only include privileged users and service accounts that require an unmasked view of data. Create this group in Databricks before configuring the integration in Immuta.
Exemption group cannot be changed after configuration is saved
The exemption group field cannot be edited after you save the integration configuration. If you need to change this group name, you can choose one of the following options:
Update the group name in Databricks to match what you have configured here.
Delete the integration in Immuta and create a new Databricks Unity Catalog integration with the new exemption group name.
For details about policy exemption groups, see the .
Unity Catalog query audit is enabled by default. Ensure you have enabled system tables in Unity Catalog and provided the required access to the Immuta service principal.
Opt to scope the query audit ingestion by entering in Unity Catalog Workspace IDs. Enter a comma-separated list of the workspace IDs that you want Immuta to ingest audit records for. If left empty, Immuta will audit all tables and users in Unity Catalog.
Configure the audit frequency by scrolling to Integrations Settings and find the Unity Catalog Audit Sync Schedule section.
Enter how often, in hours, you want Immuta to ingest audit events from Unity Catalog as an integer between 1 and 24.
Continue with your integration configuration.
Select your authentication method from the dropdown:
Access Token: Enter a Databricks Personal Access Token. This is the access token for the Immuta service principal. This service principal must have the for the metastore associated with the Databricks workspace. If this token is configured to expire, update this field regularly for the integration to continue to function.
OAuth machine-to-machine (M2M):
Select the Manual toggle and copy or download the script. You can modify the script to customize your storage location for tables, schemas, or catalogs.
Run the script in Databricks.
Click Save.
If the usernames in Immuta do not match usernames in Databricks, map each Databricks username to each Immuta user account to ensure Immuta properly enforces policies using one of the methods linked below:
If the Databricks user doesn't exist in Databricks when you configure the integration, manually link their Immuta username to Databricks after they are created in Databricks. Otherwise, policies will not be enforced correctly for them in Databricks. Databricks user identities for Immuta users are automatically marked as invalid when the user is not found during policy application, preventing them from being affected by Databricks policy until their Immuta user identity is manually mapped to their Databricks identity.
Private preview
This feature is only available to select accounts. Reach out to your Immuta representative to enable this feature.
Requirements:
A configured Databricks Unity Catalog integration
Fewer than 10,000 Databricks Unity Catalog data sources registered in Immuta
To allow Immuta to automatically import table and column tags from Databricks Unity Catalog, enable Databricks Unity Catalog tag ingestion in the external catalog section of the Immuta app settings page.
Navigate to the App Settings page.
Scroll to 2 External Catalogs, and click Add Catalog.
Enter a Display Name and select Databricks Unity Catalog from the dropdown menu.
Click Save and confirm your changes.
In the Databricks Spark integration, Immuta installs an Immuta-maintained Spark plugin on your Databricks cluster. When a user queries data that has been registered in Immuta as a data source, the plugin injects policy logic into the plan Spark builds so that the results returned to the user only include data that specific user should see.
The sequence diagram below breaks down this process of events when an Immuta user queries data in Databricks.
A Databricks workspace with the Premium tier, which includes cluster policies (required to configure the Spark integration)
A cluster that uses one of these supported Databricks Runtimes:
11.3 LTS
14.3
Supported languages
Python
R (not supported for Databricks Runtime 14.3)
A Databricks cluster that is one of these supported compute types:
Custom access mode
A Databricks workspace and cluster with the ability to directly make HTTP calls to the Immuta web service. The Immuta web service also must be able to connect to and perform queries on the Databricks cluster, and to call .
The Databricks Spark integration only works with Spark 3.
When an administrator configures the Databricks Spark integration, Immuta generates a cluster policy that the administrator then applies to the Databricks cluster. When the cluster starts after the cluster policy has been applied, the Databricks cluster that Immuta provides downloads Spark plugin artifacts onto the cluster that has the init script and puts the artifacts in the appropriate locations on local disk for use by Spark.
Once the init script runs, the Spark application running on the Databricks cluster will have the appropriate artifacts on its CLASSPATH to use Immuta for authorization and policy enforcement.
Immuta adds the following artifacts to your Databricks environment:
The Databricks Spark integration injects this Immuta-maintained Spark plugin into the SparkSQL stack at cluster startup time. Policy determinations are obtained from the connected Immuta tenant and applied before returning results to the user. The plugin includes wrappers and Immuta analysis hook plan rewrites to enforce policies.
Note: The Security Manager is disabled for.
The Immuta Security Manager ensures users can't perform unauthorized actions when using Scala and R, since those languages have features that allow users to circumvent policies without the Security Manager enabled. The Immuta Security Manager blocks users from executing code that could allow them to gain access to sensitive data by only allowing select code paths to access sensitive files and methods. These select code paths provide Immuta's code access to sensitive resources while blocking end users from these sensitive resources directly.
Performance
The Security Manager must inspect the call stack every time a permission check is triggered, which adds overhead to queries. To improve Immuta's query performance on Databricks, Immuta disables the Security Manager when Scala and R are not being used.
immuta databaseWhen a table is registered in Immuta as a data source, users can see that table in the native Databricks database and in the immuta database. This allows for an option to use a single database (immuta) for all tables.
The immuta database on Immuta-enabled clusters allows Immuta to track Immuta-managed data sources separately from remote Databricks tables so that policies and other security features can be applied. However, Immuta supports raw tables in Databricks, so table-backed queries do not need to reference this database.
Once the Immuta-enabled cluster is running, the following user actions spur various processes. The list below provides an overview of each process:
: When a data owner registers a Databricks securable as a data source, the data source metadata (column type, securable name, column names, etc.) is retrieved from the Metastore and stored in the Immuta Metadata Database. If tags are then applied to the data source, Immuta stores this metadata in the Metadata Database as well.
Data source is deleted: When a data source is deleted, the data source metadata is deleted from the Metadata Database. Depending on the settings configured for the integration, users will either be able to query that data now that it is no longer registered in Immuta, or access to the securable will be revoked for all users. See the for details about this setting.
The image below illustrates these processes and how they interact.
The Databricks Spark integration allows users to author subscription and data policies to enforce access controls. See the corresponding pages for details about specific types of policies supported:
Immuta supports clusters on Databricks Runtime 14.3. The integration for this Databricks Runtime differs from the integration for other supported Runtimes in the following ways:
: The Security Manager is disabled for Databricks Runtime 14.3. Because the Security Manager is used to prevent users from circumventing access controls when using R and Scala, those languages are unsupported. Only Python and SQL clusters are supported.
Py4J security and process isolation automatically enabled: Immuta relies on Databricks process isolation and Py4J security to prevent user code from performing unauthorized actions. After selecting Runtime 14.3 during configuration, Immuta will automatically enable process isolation and Py4J security.
dbutils is unsupported: Immuta relies on Databricks process isolation and Py4J security to prevent user code from performing unauthorized actions. This means that dbutils is not supported for Databricks Spark integrations using Runtime 14.3.
The table below compares the features supported for clusters on Databricks Runtime 11.3 and Databricks Runtime 14.3.
The Databricks Spark integration supports the following authentication methods to configure the integration:
OAuth machine-to-machine (M2M): Immuta uses the to integrate with , which allows Immuta to authenticate with Databricks using a client secret. Once Databricks verifies the Immuta service principal’s identity using the client secret, Immuta is granted a temporary OAuth token to perform token-based authentication in subsequent requests. When that token expires (after one hour), Immuta requests a new temporary token. See the for more details.
Personal access token (PAT): This token gives Immuta temporary permission to push the cluster policies to the configured Databricks workspace and overwrite any cluster policy templates previously applied to the workspace when configuring the integration or to register securables as Immuta data sources.
Immuta captures the code or query that triggers the Spark plan in Databricks, making audit records more useful in assessing what users are doing. To audit what triggers the Spark plan, Immuta hooks into Databricks where notebook cells and JDBC queries execute and saves the cell or query text. Then, Immuta pulls this information into the audits of the resulting Spark jobs.
Immuta supports auditing all queries run on a Databricks cluster, regardless of whether users touch Immuta-protected data or not. To configure Immuta to do so, set the in the Spark cluster configuration when configuring your integration.
See the for more details about the audit capabilities in the Databricks Spark integration.
Non-administrator users on an Immuta-enabled Databricks cluster must not have access to view or modify Immuta configuration or the immuta-spark-hive.jar file, as this poses a security loophole around Immuta policy enforcement. allow you to securely apply environment variables to Immuta-enabled clusters.
Databricks secrets can be used in the environment variables configuration section for a cluster by referencing the secret path instead of the actual value of the environment variable. For example, if a user wanted to make the MY_SECRET_ENV_VAR=abcd_1234 value secret, they could instead create a Databricks secret and reference it as the value of that variable by following these steps:
Create the secret scope my_secrets and add a secret with the key my_secret_env_var containing the sensitive environment variable.
Reference the secret in the environment variables section as MY_SECRET_ENV_VAR={{secrets/my_secrets/my_secret_env_var}}.
At runtime, {{secrets/my_secrets/my_secret_env_var}} would be replaced with the actual value of the secret if the owner of the cluster has access to that secret.
There are limitations to isolation among users in Scala jobs on a Databricks cluster, even when using Immuta’s Security Manager. When data is broadcast, cached (spilled to disk), or otherwise saved to SPARK_LOCAL_DIR, it's impossible to distinguish between which user’s data is composed in each file/block. If you are concerned about this vulnerability, Immuta suggests that you
limit Scala clusters to Scala jobs only and
require equalized projects, which will force all users to act under the same set of attributes, groups, and purposes with respect to their data access. To require that Scala clusters be used in equalized projects and avoid the risk described above, set the to true.
Once this configuration is complete, users on the cluster will need to switch to an Immuta equalized project before running a job. Once the first job is run using that equalized project, all subsequent jobs, no matter the user, must also be run under that same equalized project. If you need to change a cluster's project, you must restart the cluster.
When data is read in Spark using an Immuta policy-enforced plan, the masking and redaction of rows is performed at the leaf level of the physical Spark plan, so a policy such as "Mask using hashing the column social_security_number for everyone" would be implemented as an expression on a project node right above the FileSourceScanExec/LeafExec node at the bottom of the plan. This process prevents raw data from being shuffled in a Spark application and, consequently, from ending up in SPARK_LOCAL_DIR.
This policy implementation coupled with an equalized project guarantees that data being dropped into SPARK_LOCAL_DIR will have policies enforced and that those policies will be homogeneous for all users on the cluster. Since each user will have access to the same data, if they attempt to manually access other users' cached data, they will only see what they have access to via equalized permissions on the cluster. If project equalization is not turned on, users could dig through that directory and find data from another user with heightened access, which would result in a data leak.
The has guidance for resolving issues with your installation.
You can customize the Databricks Spark integration settings using these components Immuta provides:
Immuta provides cluster policies that set the and configuration on your Databricks cluster once you apply that policy to your cluster. These policies generated by Immuta must be applied to your cluster manually. The includes instructions for generating and applying these cluster policies. Each cluster policy is described below.
This is the most performant policy configuration.
In this configuration, Immuta is able to rely on Databricks-native security controls, reducing overhead. The key security control here is the enablement of process isolation. This prevents users from obtaining unintentional access to the queries of other users. In other words, masked and filtered data is consistently made accessible to users in accordance with their assigned attributes. This Immuta cluster configuration relies on Py4J security being enabled. Consequently, the following Databricks features are unsupported:
Many Python ML classes (such as LogisticRegression
Additional overhead: Compared to the Python and SQL cluster policy, this configuration trades some additional overhead for added support of the R language.
In this configuration, you are able to rely on the Databricks-native security controls. The key security control here is the enablement of process isolation. This prevents users from obtaining unintentional access to the queries of other users. In other words, masked and filtered data is consistently made accessible to users in accordance with their assigned attributes.
Like the Python & SQL configuration, Py4j security is enabled for the Python & SQL & R configuration. However, because R has been added Immuta enables the Security Manager, in addition to Py4J security, to provide more security guarantees. For example, by default all actions in R execute as the root user; among other things, this permits access to the entire filesystem (including sensitive configuration data), and, without iptable restrictions, a user may freely access the cluster’s cloud storage credentials. To address these security issues, Immuta’s initialization script wraps the R and Rscript binaries to launch each command as a temporary, non-privileged user with limited filesystem and network access and installs the Immuta Security Manager, which prevents users from bypassing policies and protects against the above vulnerabilities from within the JVM.
Py4J security disabled: In addition to support for Python, SQL, and R, this configuration adds support for additional Python libraries and utilities by disabling Databricks-native Py4J security.
This configuration does not rely on Databricks-native Py4J security to secure the cluster, while process isolation is still enabled to secure filesystem and network access from within Python processes. On an Immuta-enabled cluster, once Py4J security is disabled the Immuta Security Manager is installed to prevent nefarious actions from Python in the JVM. Disabling Py4J security also allows for expanded Python library support, including many Python ML classes (such as LogisticRegression, StringIndexer, and DecisionTreeClassifier
Scala clusters: This configuration is for Scala-only clusters.
Where Scala language support is needed, this configuration can be used in the Custom .
According to Databricks’ cluster type support documentation, Scala clusters are intended for . However, nothing inherently prevents a Scala cluster from being configured for multiple users. Even with the Immuta Security Manager enabled, there are limitations to user isolation within a Scala job.
For a secure configuration, it is recommended that clusters intended for Scala workloads are limited to Scala jobs only and are made homogeneous through the use of or externally via convention/cluster ACLs. (In homogeneous clusters, all users are at the same level of groups/authorizations; this is enforced externally, rather than directly by Immuta.)
Single-user clusters recommended: Like Databricks, Immuta recommends single-user clusters for sparklyr when user isolation is required. A single-user cluster can either be a job cluster or a cluster with credential passthrough enabled. Note: spark-submit jobs are not currently supported.
Two cluster types can be configured with sparklyr: Single-User Clusters (recommended) and Multi-User Clusters (discouraged).
: Credential Passthrough (required on Databricks) allows a single-user cluster to be created. This setting automatically configures the cluster to assume the role of the attached user when reading from storage. Because Immuta requires that raw data is readable by the cluster, the instance profile associated with the cluster should be used rather than a role assigned to the attached user.
The lists the various possible settings controlled by these variables that you can set in your cluster policy before attaching it to your cluster.
In some cases it is necessary to add sensitive configuration to SparkSession.sparkContext.hadoopConfiguration to allow Spark to read data.
For example, when accessing external tables stored in Azure Data Lake Gen2, Spark must have credentials to access the target containers or filesystems in Azure Data Lake Gen2, but users must not have access to those credentials. In this case, an additional configuration file may be provided with a storage account key that the cluster may use to access Azure Data Lake Gen2.
To use an additional Hadoop configuration file, set the to be the full URI to this file.
Databricks non-privileged users will only see sources to which they are subscribed in Immuta, and this can present problems if organizations have a data lake full of non-sensitive data and Immuta removes access to all of it. Immuta addresses this challenge by allowing Immuta users to access any tables that are not protected by Immuta (i.e., not registered as a data source or a table in a native workspace). Although this is similar to how privileged users in Databricks operate, non-privileged users cannot bypass Immuta controls.
Protected until made available by policy: This setting means that users can only see tables that Immuta has explicitly subscribed them to.
Behavior change in Immuta v2025.1 and newer
If a table is registered in Immuta and does not have a subscription policy applied to it, that data will be visible to users, even if the Protected until made available by policy setting is enabled.
If you have enabled this setting, author an "Allow individually selected users" that applies to all data sources.
Available until protected by policy: This setting means all tables are open until explicitly registered and protected by Immuta. This setting allows both non-Immuta reads and non-Immuta writes:
: Immuta users with regular (non-privileged) Databricks roles may SELECT from tables that are not registered in Immuta. This setting does not allow reading data directly with commands like spark.read.format("x"). Users are still required to read data and query tables using Spark SQL. When non-Immuta reads are enabled through the cluster policy, Immuta users will see all databases and tables when they run show databases or show tables. However, this does not mean they will be able to query all of them.
The includes instructions for applying these settings to your cluster.
In Immuta, a Databricks data source is considered ephemeral, meaning that the compute resources associated with that data source will not always be available.
Ephemeral data sources allow the use of ephemeral overrides, user-specific connection parameter overrides that are applied to Immuta metadata operations.
When a user runs a Spark job in Databricks, the Immuta plugin automatically submits ephemeral overrides for that user to Immuta for all applicable data sources to use the current cluster as compute for all subsequent metadata operations for that user against the applicable data sources.
For more details about ephemeral overrides and how to configure or disable them, see the .
Immuta projects combine users and data sources under a common purpose. Sometimes this purpose is for a single user to organize their data sources or to control an entire schema of data sources through a single projects screen; however, most often this is an Immuta purpose for which the data has been approved to be used and will restrict access to data and streamline team collaboration. Consequently, data owners can restrict access to data for a specified purpose through projects.
When a user is working within the context of a project, data users will only see the data in that project. This helps to prevent data leaks when users collaborate. Users can switch project contexts to access various data sources while acting under the appropriate purpose. Consider adjusting the following project settings to suit your organization's needs:
Project UDFs (web service and on-cluster caches): Immuta caches a mapping of user accounts and users' current projects in the Immuta Web Service and on-cluster. When users change their project with UDFs instead of the Immuta UI, Immuta invalidates all the caches on-cluster (so that everything changes immediately) and the cluster submits a request to change the project context to a web worker. Immediately after that request, another call is made to a web worker to refresh the current project. To allow use of project UDFs in Spark jobs, . Otherwise, caching could cause dissonance among the requests and calls to multiple web workers when users try to change their project contexts.
Preventing users from changing projects within a session: If your compliance requirements restrict users from changing projects within a session, you can block the use of Immuta's project UDFs on a Databricks Spark cluster. To do so, .
This section describes how Immuta interacts with common Databricks features.
Databricks users can see the Databricks change data feed (CDF) on queried tables if they are allowed to read raw data and meet specific qualifications. Immuta does not support applying policies to the changed data, and the CDF cannot be read for data source tables if the user does not have access to the raw data in Databricks or for .
The CDF can be read if the querying user is allowed to read the raw data and ONE of the following statements is true:
the table is in the current workspace
the table is in a scratch path
non-Immuta reads are enabled AND the table does not intersect with a workspace under which the current user is not acting
Security vulnerability
Using this feature could create a security vulnerability, depending on the third-party library. For example, if a library exposes a public method named readProtectedFile that displays the contents of a sensitive file, then trusting that library would allow end users access to that file. Work with your Immuta support professional to determine if the risk does not apply to your environment or use case.
The trusted libraries feature allows Databricks cluster administrators to avoid Immuta Security Manager errors when using third-party libraries. An administrator can specify an installed library as trusted, which will enable that library's code to bypass the Immuta security manager. This feature does not impact Immuta's ability to apply policies; trusting a library only allows code through that otherwise would have been blocked by the Security Manager.
The following types of libraries are supported when installing a third-party library using the Databricks UI or the Databricks Libraries API:
Library source is Upload, DBFS or DBFS/S3 and the Library Type is Jar.
Library source
When users install third-party libraries, those libraries will be denied access to sensitive resources by default. However, cluster administrators can specify which of the installed Databricks libraries should be trusted by Immuta. See the to add a trusted library to your configuration.
Limitations
Installing trusted libraries outside of the Databricks Libraries API (e.g., ADD JAR ...) is not supported.
Databricks installs libraries right after a cluster has started, but there is no guarantee that library installation will complete before a user's code is executed. If a user executes code before a trusted library installation has completed, Immuta will not be able to identify the library as trusted. This can be solved by either
waiting for library installation to complete before running any third-party library commands or
Connect any of these to work with your Databricks Spark integration so data owners can tag their data.
Immuta supports the use of external metastores in :
Local mode: The metastore client running inside a cluster connects to the underlying metastore database directly via JDBC.
Remote mode: Instead of connecting to the underlying database directly, the metastore client connects to a separate metastore service via the Thrift protocol. The metastore service connects to the underlying database. When running a metastore in remote mode, DBFS is not supported.
For more details about these deployment modes, see .
Download the metastore jars and point to them as specified in . Metastore jars must end up on the cluster's local disk at this explicit path: /databricks/hive_metastore_jars.
If using DBR 7.x with Hive 2.3.x, either
Set spark.sql.hive.metastore.version
To use AWS Glue Data Catalog as the metastore for Databricks, see the .
Users on Databricks Runtimes 8+ can manage notebook-scoped libraries with .
However, this functionality differs from the , and Python libraries are not supported as trusted libraries. The Immuta Security Manager will deny the code of libraries installed with %pip access to sensitive resources.
Scratch paths are cluster-specific remote file paths that Databricks users are allowed to directly read from and write to without restriction. The creator of a Databricks cluster specifies the set of remote file paths that are designated as scratch paths on that cluster when they configure a Databricks cluster. Scratch paths are useful for scenarios where non-sensitive data needs to be written out to a specific location using a Databricks cluster protected by Immuta.
To configure a scratch path, use the .
This feature is available to all 2025.1+ tenants. Contact your Immuta representative to enable this feature.
Connections allow you to register your data objects in a technology through a single connection, making data registration more scalable for your organization. Instead of registering schema and databases individually, you can register them all at once and allow Immuta to monitor your data platform for changes so that data sources are added and removed automatically to reflect the state of data on your data platform.
This document is meant to guide you to connections from a configured integration. If you are a new user without any current integrations, see the Connections reference guide instead.
Exceptions
Do not upgrade to connections if you meet any of the criteria below:
You are using the Databricks Spark integration
Integrations are now connections. Once the upgrade is complete, you will control most integration settings at the connection level via the Connections tab in Immuta.
Snowflake OAuth
Username and password
Key pair
Personal Access Token
M2M OAuth
Username and password
OAuth 2.0
Unsupported technologies
The following technologies are not yet supported with connections:
Azure Synapse Analytics
Additional connection string options
When registering data sources using the legacy method, there is a field for Additional Connection String Options that your Immuta representative may have instructed you to use. If you did enter any additional connection information there, check to ensure the information you included is supported with connections. Only the following Additional Connection String Options inputs are supported:
The tables below outline Immuta features, their availability with integrations, and their availability with connections.
There will be no policy downtime on your data sources while performing the upgrade.
See the integration's reference guide for the supported object types for each technology:
With connections, your data sources are ingested and presented to reflect the infrastructure hierarchy of your connected data platform. For example, this is what the new hierarchy will look like for a Snowflake connection:
Connections will not change any tags currently applied on your data sources.
, use tag ingestion to automatically apply tags from your data platform onto your Immuta data sources.
If you want all data objects from connections to have data tags ingested from the data provider into Immuta, ensure the credentials provided on the Immuta app settings page for the external catalog feature can access all the data objects. Any data objects the credentials do not have access to will not be tagged in Immuta. In practice, it is recommended to just use the same credentials for the connection and tag ingestion.
If you previously ingested data sources using the V2 /data endpoint this limitation applies to you.
The V2 /data endpoint allows users to register data sources and attach a tag automatically when the data sources are registered in Immuta.
The V2 /data endpoint is not supported with a connection, and there is no substitution for this behavior at this time. If you require default tags for newly onboarded data sources, reach out to your Immuta support professional before upgrading.
Schema monitoring is renamed to object sync with connections, as it can also monitor for changes at database and connection level.
During object sync, Immuta crawls your connection to ingest metadata for every database, schema, and table that the Snowflake role or Databricks account credentials you provided during the configuration has access to. Upon completion of the upgrade, the tables' states depend on your previous schema monitoring settings:
If you had schema monitoring enabled on a schema: All tables from that schema will be registered in Immuta as enabled data sources.
If you had schema monitoring disabled on a schema: All tables from that schema (that were not already registered in Immuta) will be registered as disabled data objects. They are visible from the Data Objects tab in Immuta, but are not listed as data sources until they are enabled.
After the initial upgrade, object sync runs on your connection every 24 hours (at 1:00 AM UTC) to keep your tables in Immuta in sync. Additionally, users can also or API.
With integrations, many settings and the connection details for data sources were controlled in the schema project, including schema monitoring. This functionality is no longer needed with connections and now you can control connection details in a central spot.
Schema project owners
With integrations, schema project owners can become schema monitoring owners, control connection settings, and manage subscription policies on the schema project.
These schema project owners will not be represented in connections, and if you want them to have similar abilities, .
Object sync provides additional controls compared to schema monitoring:
Object status: Connections, databases, schemas and tables can be marked enabled, which for tables make them appear as data sources, or disabled. These statuses are inherited to all lower objects by default, but that can be overridden. For example, if you make a database disabled, all schemas and tables within that database will inherit the status to be disabled. However, if you want one of those tables to be a data source, you can manually enable it.
Enable new data objects: This setting controls what state new objects are registered as in Immuta when found by object sync.
Connections use a new architectural pattern resulting in an improved performance when monitoring for metadata changes in your data platform, particularly with large numbers of data sources. The following scenarios are regularly tested in an isolated environment in order to provide a benchmark. These numbers can vary based on a number of factors such as (but not limited to) number and type of policies applied, overall API and user activity in the system, connection latency to your data platform.
Data sources with integrations required users to . However, this job has been fully automated on data sources with connections, and this step is no longer necessary.
Consolidating integration setup and data source registration into a single connection significantly simplifies programmatic interaction with the Immuta APIs. Actions that used to be managed through multiple different endpoints can now be achieved through one simple and standardized one. As a result, multiple API endpoints are blocked once a user has upgraded their connection.
All blocked APIs will send an error indicating "400 Bad Request - [...]. Use the /data endpoint." This error indicates that you will need to update your processes that are calling the Immuta APIs to leverage the new /data endpoint instead. For details, see the .
create view `sales`.`emea`.`sales_view` as SELECT *, _PARTITIONTIME as __partitiontime from `sales`.`emea`.`sales`chmod 755 <path to downloaded script>chmod 755 <path to downloaded script>gcloud config set account ACCOUNT$ bootstrap.sh \
--project PROJECT_ID \
--role ROLE_ID \
--service_account NAME \
--keyfile OUTPUT_FILE \
[--undelete-role] \
[--enable-api]system.access.auditsystem.query.history
AWS Databricks:
Follow Databricks documentation to create a client secret for the Immuta service principal and assign this service principal the privileges listed above for the metastore associated with the Databricks workspace.
Fill out the Token Endpoint with the full URL of the identity provider. This is where the generated token is sent. The default value is https://<your workspace name>.cloud.databricks.com/oidc/v1/token.
Fill out the Client ID. This is a combination of letters, numbers, or symbols, used as a public identifier and is the .
Enter the Scope (string). The scope limits the operations and roles allowed in Databricks by the access token. See the for details about scopes.
Enter the Client Secret you created above. Immuta uses this secret to authenticate with the authorization server when it requests a token.
Azure Databricks:
Follow Databricks documentation to create a service principal within Azure and then populate to your Databricks account and workspace.
Assign this service principal the privileges listed above for the metastore associated with the Databricks workspace.
Within Databricks, . This completes your Databricks-based service principal setup.
Within Immuta, fill out the Token Endpoint with the full URL of the identity provider. This is where the generated token is sent. The default value is https://<your workspace name>.azuredatabricks.net/oidc/v1/token.
Fill out the Client ID. This is a combination of letters, numbers, or symbols, used as a public identifier and is the (note that Azure Databricks uses the Azure SP Client ID; it will be identical).
Enter the Scope (string). The scope limits the operations and roles allowed in Databricks by the access token. See the for details about scopes.
Enter the Client Secret you created above. Immuta uses this secret to authenticate with the authorization server when it requests a token.
SQL
The cluster init script checks the cluster’s configuration and automatically removes the Security Manager configuration when
spark.databricks.repl.allowedlanguages is a subset of {python, sql}
IMMUTA_SPARK_DATABRICKS_PY4J_STRICT_ENABLED is true
When the cluster is configured this way, Immuta can rely on Databricks' process isolation and Py4J security to prevent user code from performing unauthorized actions.
Note: Immuta still expects the spark.driver.extraJavaOptions and spark.executor.extraJavaOptions to be set and pointing at the Security Manager.
Beyond disabling the Security Manager, Immuta will skip several startup tasks that are required to secure the cluster when Scala and R are configured, and fewer permission checks will occur on the Driver and Executors in the Databricks cluster, reducing overhead and improving performance.
Caveats
There are still cases that require the Security Manager; in those instances, Immuta creates a fallback Security Manager to check the code path, so the IMMUTA_INIT_ALLOWED_CALLING_CLASSES_URI environment variable must always point to a valid calling class file.
Databricks’ dbutils is blocked by their Py4J security; therefore, it can’t be used to access scratch paths.
immuta from any calls to SHOW DATABASES so that users are not confused or misled by that database. Hiding the database does not disable access to it. Queries can still be performed against tables in the immuta database using the Immuta-qualified table name (e.g., immuta.my_schema_my_table) regardless of whether or not this database is hidden.To hide the immuta database, use the following environment variable in the Spark cluster configuration when configuring your integration:
Then, Immuta will not show this database when a SHOW DATABASES query is performed.
Policy is deleted: When a policy is deleted, the policy information is deleted from the Metadata Database. If users were granted access to the data source by that policy, their access is revoked.
Databricks user is mapped to Immuta: When a Databricks user is mapped to Immuta, their metadata is stored in the Metadata Database.
Databricks user queries data: When a user queries the data in Databricks, Immuta intercepts the call from Spark down to the Metastore. Then, the Immuta-maintained Spark plugin retrieves the policy information, the user metadata, and the data source metadata from the Metadata Database and injects this information as policy logic into the Spark logical plan. Once the physical plan is applied, Databricks returns policy-enforced data to the user.
Databricks Connect is unsupported: Databricks Connect is unsupported because Py4J security must be enabled to use it.
✅
✅
✅
✅
Non-Immuta reads and writes
✅
✅
✅
✅
✅
✅
Python
✅
✅
SQL
✅
✅
R
✅
❌
Scala
✅
❌
Immuta project workspaces
✅
❌
Smart mask ordering
✅
❌
Masking and tagging complex columns (STRUCT, ARRAY, MAP)
✅
❌
Photon support
✅
❌
dbutils
✅
❌
Databricks Connect
✅
❌
Write policies
❌
❌
Support for allowlisting networks or local filesystem paths
❌
✅
Subscription policies
✅
✅
Data policies
✅
✅


StringIndexerDecisionTreeClassifierdbutils.fs
Databricks Connect client library
For full details on Databricks’ best practices in configuring clusters, read their governance documentation.
Consequently, the cost of introducing R is that the Security Manager incurs a small increase in performance overhead; however, average latency will vary depending on whether the cluster is homogeneous or heterogeneous. (In homogeneous clusters, all users are at the same level of groups/authorizations; this is enforced externally, rather than directly by Immuta.)
When users install third-party Java/Scala libraries, they will be denied access to sensitive resources by default. However, cluster administrators can specify which of the installed Databricks libraries should be trusted by Immuta.
The following Databricks features are unsupported when this cluster policy is applied:
Many Python ML classes (such as LogisticRegression, StringIndexer, and DecisionTreeClassifier)
dbutils.fs
Databricks Connect client library
For full details on Databricks’ best practices in configuring clusters, read their governance documentation.
By default, all actions in R will execute as the root user. Among other things, this permits access to the entire filesystem (including sensitive configuration data). And without iptable restrictions, a user may freely access the cluster’s cloud storage credentials. To properly support the use of the R language, Immuta’s initialization script wraps the R and Rscript binaries to launch each command as a temporary, non-privileged user. This user has limited filesystem and network access. The Immuta Security Manager is also installed to prevent users from bypassing policies and protects against the above vulnerabilities from within the JVM.
The Security Manager will incur a small increase in performance overhead; average latency will vary depending on whether the cluster is homogeneous or heterogeneous. (In homogeneous clusters, all users are at the same level of groups/authorizations; this is enforced externally, rather than directly by Immuta.)
When users install third-party Java/Scala libraries, they will be denied access to sensitive resources by default. However, cluster administrators can specify which of the installed Databricks libraries should be trusted by Immuta.
A homogeneous cluster is recommended for configurations where Py4J security is disabled. If all users have the same level of authorization, there would not be any data leakage, even if a nefarious action was taken.
For full details on Databricks’ best practices in configuring clusters, read their governance documentation.
For full details on Databricks’ best practices in configuring clusters, read their governance documentation.
Multi-User Clusters: Because Immuta cannot guarantee user isolation in a multi-user sparklyr cluster, it is not recommended to deploy a multi-user cluster. To force all users to act under the same set of attributes, groups, and purposes with respect to their data access and eliminate the risk of a data leak, all sparklyr multi-user clusters must be equalized either by convention (all users able to attach to the cluster have the same level of data access in Immuta) or by configuration (detailed below).
Single-user cluster configuration
1 - Enable sparklyr
In addition to the configuration for an Immuta cluster with R, add this environment variable to the Environment Variables section of the cluster:
This configuration makes changes to the iptables rules on the cluster to allow the sparklyr client to connect to the required ports on the JVM used by the sparklyr backend service.
2 - Set up a sparklyr connection in Databricks
Install and load libraries into a notebook. Databricks includes the stable version of sparklyr, so library(sparklyr) in an R notebook is sufficient, but you may opt to install the latest version of sparklyr from CRAN. Additionally, loading library(DBI) will allow you to execute SQL queries.
Set up a sparklyr connection:
Pass the connection object to execute queries:
3 - Configure a single-user cluster
Add the following items to the Spark Config section of the cluster:
The trustedFileSystems setting is required to allow Immuta’s wrapper FileSystem (used in conjunction with the Security Manager for data security purposes) to be used with credential passthrough. Additionally, the InstanceProfileCredentialsProvider must be configured to continue using the cluster’s instance profile for data access, rather than a role associated with the attached user.
Multi-user cluster configuration
Avoid deploying multi-user clusters with sparklyr configuration
It is possible, but not recommended, to deploy a multi-user cluster sparklyr configuration. Immuta cannot guarantee user isolation in a multi-user sparklyr configuration.
The configurations in this section enable sparklyr, require project equalization, map sparklyr sessions to the correct Immuta user, and prevent users from accessing Immuta native workspaces.
Add the following environment variables to the Environment Variables section of your cluster configuration:
Add the following items to the Spark Config section:
Limitations
Immuta’s integration with sparklyr does not currently support
spark-submit jobs
UDFs
IMMUTA_SPARK_DATABRICKS_ALLOW_NON_IMMUTA_WRITES: Immuta users with regular (non-privileged) Databricks roles can run DDL commands and data-modifying commands against tables or spaces that are not registered in Immuta. With non-Immuta writes enabled through the cluster policy, users on the cluster can mix any policy-enforced data they may have access to via any registered data sources in Immuta with non-Immuta data and write the ensuing result to a non-Immuta write space where it would be visible to others. If this is not a desired possibility, the cluster should instead be configured to only use Immuta’s project workspaces.
Mavenexecuting a Spark query. This will force Immuta to wait for any trusted Immuta libraries to complete installation before proceeding.
When installing a library using Maven as a library source, Databricks will also install any transitive dependencies for the library. However, those transitive dependencies are installed behind the scenes and will not appear as installed libraries in either the Databricks UI or using the Databricks Libraries API. Only libraries specifically listed in the IMMUTA_SPARK_DATABRICKS_TRUSTED_LIB_URIS environment variable will be trusted by Immuta, which does not include installed transitive dependencies. This effectively means that any code paths that include a class from a transitive dependency but do not include a class from a trusted third-party library can still be blocked by the Immuta security manager. For example, if a user installs a trusted third-party library that has a transitive dependency of a file-util library, the user will not be able to directly use the file-util library to read a sensitive file that is normally protected by the Immuta security manager.
In many cases, it is not a problem if dependent libraries aren't trusted because code paths where the trusted library calls down into dependent libraries will still be trusted. However, if the dependent library needs to be trusted, there is a workaround:
Add the transitive dependency jar paths to the . In the driver log4j logs, Databricks outputs the source jar locations when it installs transitive dependencies. In the cluster driver logs, look for a log message similar to the following:
In the above example, where slf4j is the transitive dependency, you would add the path dbfs:/FileStore/jars/maven/org/slf4j/slf4j-api-1.7.25.jar to the IMMUTA_SPARK_DATABRICKS_TRUSTED_LIB_URIS environment variable and restart your cluster.
2.3.7spark.sql.hive.metastore.jarsbuiltinDownload the metastore jars and set spark.sql.hive.metastore.jars to /databricks/hive_metastore_jars/* as before.
Databricks Spark
Google BigQuery
Redshift
S3
Snowflake data sources with the private key file password set using Additional Connection String Options
Trino data sources with proxy set using Additional Connection String Options
Trino data sources with SSL/TLS enabled and certificate validation disabled using Additional Connection String Options
Not supported
Supported
Workspace-catalog binding
Supported
Not supported
Project workspaces
Not supported
Not supported
User impersonation
Not supported
Not supported
Snowflake lineage
Supported
Supported
Query audit
Supported
Supported
Query audit
Supported
Supported
Tag ingestion
Not supported
Not supported
Manage data sources
Data source
Manage data objects
Connection, database, schema, data source
Disable: This is the default. New data objects found by object sync will be disabled.
Enable or disable from the schema project
Object sync cannot be disabled
Default schedule
Every 24 hours
Every 24 hours (at 1:00 AM UTC)
Can you adjust the default schedule?
No
No
New tags applied automatically
New tags are applied automatically for a data source being created, a column being added, or a column type being updated on an existing data source
New tags are applied automatically for a column being added or a column type being updated on an existing data source
Integrations are set up from the Immuta app settings page or via the API. These integrations establish a relationship between Immuta and your data platform for policy orchestration. Then tables are registered as data sources through an additional step with separate credentials. Schemas and databases are not reflected in the UI.
Integrations and data sources are set up together with a single connection per account between Immuta and your data platform. Based on the privileges granted to the Immuta system user, metadata from databases, schemas, and tables is automatically pulled into Immuta and continuously monitored for any changes.
Query audit
Supported
Supported
Tag ingestion
Supported
Supported
Integration
Connection
-
Database
-
Schema
Data source
APPLICATION_ADMIN
Configure integration
Integration
CREATE_DATA_SOURCE
Register tables
Data source
APPLICATION_ADMIN
Register the connection
Connection, database, schema, data source
GOVERNANCE or APPLICATION_ADMIN
Manage all connections
Connection, database, schema, data source
Name
Schema monitoring and column detection
Object sync
Where to turn on
Enable (optionally) when configuring a data source
Enabled by default
Scenario 1 Running object sync on a schema with 10,000 data sources with 50 columns each
172.2 seconds on average
Scenario 2 Running object sync on a schema with 1,000 data sources with 10 columns each
9.38 seconds on average
Scenario 3 Running object sync on a schema with 1 data source with 50 columns
0.512 seconds on average
Data source (once enabled, becomes available for policy enforcement)
Data owner
Data owner
Where to update the feature
IMMUTA_SPARK_SHOW_IMMUTA_DATABASE=falsesc <- spark_connect(method = "databricks")IMMUTA_DATABRICKS_SPARKLYR_SUPPORT_ENABLED=true
IMMUTA_SPARK_REQUIRE_EQUALIZATION=true
IMMUTA_SPARK_CURRENT_USER_SCIM_FALLBACK=falseimmuta.spark.acl.assume.not.privileged true
immuta.api.key=<user’s API key>IMMUTA_DATABRICKS_SPARKLYR_SUPPORT_ENABLED=truespark.databricks.passthrough.enabled true
spark.databricks.pyspark.trustedFilesystems com.databricks.s3a.S3AFileSystem,shaded.databricks.azurebfs.org.apache.hadoop.fs.azurebfs.SecureAzureBlobFileSystem,shaded.databricks.v20180920_b33d810.org.apache.hadoop.fs.azurebfs.SecureAzureBlobFileSystem,com.databricks.adl.AdlFileSystem,shaded.databricks.V2_1_4.com.google.cloud.hadoop.fs.gcs.GoogleHadoopFileSystem,shaded.databricks.org.apache.hadoop.fs.azure.NativeAzureFileSystem,shaded.databricks.org.apache.hadoop.fs.s3a.S3AFileSystem,org.apache.hadoop.fs.ImmutaSecureFileSystemWrapper
spark.hadoop.fs.s3a.aws.credentials.provider com.amazonaws.auth.InstanceProfileCredentialsProviderdbGetQuery(sc, "show tables in immuta")INFO LibraryDownloadManager: Downloaded library dbfs:/FileStore/jars/maven/org/slf4j/slf4j-api-1.7.25.jar as
local file /local_disk0/tmp/addedFile8569165920223626894slf4j_api_1_7_25-784af.jarTag ingestion
Supported
Supported
Not supported
Supported
Project workspaces
Not supported
Not supported
User impersonation
Not supported
Not supported
Not supported
Supported
User impersonation
Not supported
Not supported
Multi-cluster support
Not supported
Supported
Immuta’s integration with Unity Catalog allows you to enforce fine-grained access controls on Unity Catalog securable objects with Immuta policies. Instead of manually creating UDFs or granting access to each table in Databricks, you can author your policies in Immuta and have Immuta manage and orchestrate Unity Catalog access-control policies on your data in Databricks clusters or SQL warehouses:
Subscription policies: Immuta subscription policies automatically grant and revoke access to specific Databricks securable objects.
Data policies: Immuta data policies enforce row- and column-level security.
Unity Catalog uses the following hierarchy of data objects:
Metastore: Created at the account level and is attached to one or more Databricks workspaces. The metastore contains metadata of all the catalogs, schemas, and tables available to query. All clusters on that workspace use the configured metastore and all workspaces that are configured to use a single metastore share those objects.
Catalog: Sits on top of schemas (also called databases) and tables to manage permissions across a set of schemas
Schema: Organizes tables and views
For details about the Unity Catalog object model, see the .
The Databricks Unity Catalog integration supports
:
applying column masks and row filters on specific securable objects
Unity Catalog supports managing permissions account-wide in Databricks through controls applied directly to objects in the metastore. To establish a connection with Databricks and apply controls to securable objects within the metastore, Immuta requires a service principal with privileges to manage all data protected by Immuta. (OAuth M2M) or a personal access token (PAT) can be provided for Immuta to authenticate as the service principal. See the for a list of specific Databricks privileges.
Immuta uses this service principal to run queries that set up user-defined functions (UDFs) and other data necessary for policy enforcement. Upon enabling the integration, Immuta will create a catalog that contains these schemas:
immuta_system: Contains internal Immuta data.
immuta_policies_n: Contains policy UDFs.
When policies require changes to be pushed to Unity Catalog, Immuta updates the internal tables in the immuta_system schema with the updated policy information. If necessary, new UDFs are pushed to replace any out-of-date policies in the immuta_policies_n schemas and any row filters or column masks are updated to point at the new policies. Many of these operations require compute on the configured Databricks cluster or SQL warehouse, so compute must be available for these policies to succeed.
Workspace-catalog binding allows users to leverage Databricks’ catalog isolation mode to limit catalog access to specific Databricks workspaces. The default isolation mode is OPEN, meaning all workspaces can access the catalog (with the exception of the automatically-created ), provided they are in the metastore attached to the catalog. Setting this mode to ISOLATED allows the catalog owner to specify a workspace-catalog binding, which means the owner can dictate which workspaces are authorized to access the catalog. This prevents other workspaces from accessing the specified catalogs. To bind a catalog to a specific workspace in Databricks Unity Catalog, see the .
Typical use cases for binding a catalog to specific workspaces include
Ensuring users can only access production data from a production workspace environment.
For example, you may have production data in a prod_catalog, as well as a production workspace you are introducing to your organization. Binding the prod_catalog to the prod_workspace ensures that workspace admins and users can only access prod_catalog from the prod_workspace environment.
Immuta’s Databricks Unity Catalog integration allows users to configure additional workspace connections to support using Databricks' . Users can configure additional workspace connections in their Immuta integrations to be consistent with the workspace-catalog bindings that are set up in Databricks. Immuta will use each additional workspace connection to govern the catalog(s) that workspace is bound to in Databricks. If desired, each set of bound catalogs can also be configured to run on its own compute.
To use this feature, you should first . Once that is configured, you can use Immuta's Integrations API to configure an additional workspace connection. This can be added when you or by .
Limitations
Additional workspace connections in Databricks Unity Catalog are not currently supported in Immuta's .
Each additional workspace connection must be in the same metastore as the primary workspace used to set up the integration.
No two additional workspace connections can be responsible for the same catalog.
The privileges the Databricks Unity Catalog integration requires align to the least privilege security principle. The table below describes each privilege required in Databricks Unity Catalog for the setup user and the Immuta service principal.
Immuta’s Unity Catalog integration applies Databricks table-, row-, and column-level security controls that are enforced natively within Databricks. Immuta's management of these Databricks security controls is automated and ensures that they synchronize with Immuta policy or user entitlement changes.
Table-level security: Immuta manages and privileges on Databricks securable objects that have been registered as Immuta data sources. When you register a data source in Immuta, Immuta uses the Unity Catalog API to issue GRANTS or REVOKES against the catalog, schema, or table in Databricks for every user registered in Immuta.
Row-level security: Immuta applies SQL UDFs to restrict access to rows for querying users.
On securable objects
If you enable a Databricks Unity Catalog object in Immuta and it has no subscription policy set on it, Immuta will REVOKE access to that object in Databricks for all Immuta users, even if they had been directly granted access to that object outside of Immuta.
If you disable a Unity Catalog data source in Immuta, all existing grants and policies on that object will be removed in Databricks for all Immuta users. All existing grants and policies will be removed, regardless of whether they were set in Immuta or in Unity Catalog directly.
If a user is not registered in Immuta, Immuta will have no effect on that user's access to data in Unity Catalog.
On schemas and catalogs
By default, Immuta will revoke Immuta users' USE CATALOG and USE SCHEMA privileges in Unity Catalog for users that do not have access to any of the resources within that catalog/schema. This includes any USE CATALOG or USE SCHEMA privileges that were granted outside of Immuta.
If you disable this setting, Immuta will only revoke the permissions granted on the securable objects themselves, and users' USE CATALOG and USE SCHEMA permissions will remain even if the user does not have access to any resource in that catalog/schema.
See the on changing this setting.
The Unity Catalog integration supports the following policy types:
Conditional masking
The privileges Immuta issues to users when they are subscribed to a data source vary depending on the object type. See an outline of privileges granted by Immuta on the .
Project-scoped purpose exceptions for Databricks Unity Catalog integrations allow you to apply to Databricks data sources in a project. As a result, users can only access that data when they are working within that specific project.
If you are using views in Databricks Unity Catalog, one of the following must be true for project-scoped purpose exceptions to apply to the views in Databricks:
The view and underlying table are registered as Immuta data sources and added to a project: If a view and its underlying table are both added as Immuta data sources, both of these assets must be added to the project for the project-scoped purpose exception to apply. If a view and underlying table are both added as data sources but the table is not added to an Immuta project, the purpose exception will not apply to the view because Databricks does not support fine-grained access controls on views.
Only the underlying table is registered as an Immuta data source and added to a project: If only the underlying table is registered as an Immuta data source but the view is not registered, the purpose exception will apply to both the table and corresponding view in Databricks. Views are the only Databricks object that will have Immuta policies applied to them even if they're not registered as Immuta data sources (as long as their underlying tables are registered).
This feature allows masked columns to be joined across data sources that belong to the same project. When data sources do not belong to a project, Immuta uses a unique salt per data source for hashing to prevent masked values from being joined. (See the guide for an explanation of that behavior.) However, once you add Databricks Unity Catalog data sources to a project and enable masked joins, Immuta uses a consistent salt across all the data sources in that project to allow the join.
For more information about masked joins and enabling them for your project, see the of documentation.
The Databricks group configured as the policy exemption group in Immuta will be exempt from Immuta data policy enforcement. This account-level group is created and managed in Databricks, not in Immuta.
If you have service or system accounts that need to be exempt from masking and row-level policy enforcement, add them to an account-level group in Databricks and include this group name in the Databricks Unity Catalog configuration in Immuta. Then, group members will be excluded from having data policies applied to them when they query Immuta-protected tables in Databricks.
Typically, service or system accounts that perform the following actions are added to an exemption group in Databricks:
Automated queries
ETL
Report generation
If you have multiple groups that must be exempt from data policies, add each group to a single group in Databricks that you then set as the policy exemption group in Immuta.
The service principal used to register data sources in Immuta will be automatically added to the exemption group for the Databricks securables it registers. Consequently, accounts added to the exemption group and used to register data sources in Immuta should be limited to service accounts.
For guidance on configuring a policy exemption group on the Immuta app settings page, see the . Alternatively, this group can be configured via the or the using the groupPattern object.
hive_metastoreWhen enabling Unity Catalog support in Immuta, the catalog for all Databricks data sources will be updated to point at the default hive_metastore catalog. Internally, Databricks exposes this catalog as a proxy to the workspace-level Hive metastore that schemas and tables were kept in before Unity Catalog. Since this catalog is not a real Unity Catalog catalog, it does not support any Unity Catalog policies. Therefore, Immuta will ignore any data sources in the hive_metastore in any Databricks Unity Catalog integration, and policies will not be applied to tables there.
However, with you can use hive_metastore and enforce subscription and data policies with the .
The Databricks Unity Catalog integration supports the following authentication methods to configure the integration and create data sources:
Personal access token (PAT): This is the access token for the Immuta service principal. This service principal must have the metastore privileges listed in the section for the metastore associated with the Databricks workspace. If this token is configured to expire, update this field regularly for the integration to continue to function.
OAuth machine-to-machine (M2M): Immuta uses the to integrate with , which allows Immuta to authenticate with Databricks using a client secret. Once Databricks verifies the Immuta service principal’s identity using the client secret, Immuta is granted a temporary OAuth token to perform token-based authentication in subsequent requests. When that token expires (after one hour), Immuta requests a new temporary token. See the for more details.
The Unity Catalog data object model introduces a 3-tiered namespace, as . Consequently, your Databricks tables registered as data sources in Immuta will reference the catalog, schema (also called a database), and table.
External data connectors and query-federated tables are preview features in Databricks. See the for details about the support and limitations of these features before registering them as data sources in the Unity Catalog integration.
Access requirements
For Databricks Unity Catalog audit to work, Immuta must have, at minimum, the following access:
USE CATALOG on the system catalog
Immuta uses Databricks tables from the system catalog to understand the queries users make and present them in the query audit logs. See the for details about the contents of the logs.
The audit ingest is set when and can be scoped to only ingest specific workspaces if needed. The default ingest frequency is every hour, but this can be configured to a different frequency on the . Additionally, audit ingestion can be manually requested at any time from the Immuta audit page. When manually requested, it will only search for new queries that were created since the last query that had been audited. The job is run in the background, so the new queries will not be immediately available.
Private preview: This feature is only available to select accounts. Contact your Immuta representative to enable this feature.
You can enable tag ingestion to allow Immuta to ingest Databricks Unity Catalog table and column tags so that you can use them in Immuta policies to enforce access controls. When you enable this feature, Immuta uses the credentials and connection information from the Databricks Unity Catalog integration to pull tags from Databricks and apply them to data sources as they are registered in Immuta. If Databricks data sources preexist the Databricks Unity Catalog tag ingestion enablement, those data sources will automatically sync to the catalog and tags will apply.
Immuta checks for changes to tags in Databricks and syncs Immuta data sources to those changes every hour by default. Immuta's tag ingestion process has a delta logic in order to establish all resources that have had a tag or description change inside Databricks Unity Catalog within a given timeframe to reduce excessive processing time and reduce compute cost.
Access requirements for Databricks Unity Catalog tag ingestion (delta logic)
Since the delta logic leverages the system.access.audit table in Databricks, Immuta must have a minimum of the following access:
USE CATALOG
Once external tags are applied to Databricks data sources, those tags can be used to create and .
To enable Databricks Unity Catalog tag ingestion, see the page.
After making changes to tags in Databricks, you can so that the changes immediately apply to the data sources in Immuta. Otherwise, tag changes will automatically sync within a one hour timeframe. Please note that you may see this timeframe being exceeded in cases where Immuta has to process a lot of tag changes.
When syncing data sources to Databricks Unity Catalog tags, Immuta pulls the following information:
Table tags: These tags apply to the table and appear on the data source details tab. Databricks tags' key and value pairs are reflected in Immuta as a hierarchy with each level separated by a . delimiter. For example, the Databricks Unity Catalog tag Location: US would be represented as Location.US in Immuta.
Column tags: These tags are applied to data source columns and appear on the columns listed in the data dictionary tab. Databricks tags' key and value pairs are reflected in Immuta as a hierarchy with each level separated by a . delimiter. For example, the Databricks Unity Catalog tag
Only tags that apply to Databricks data sources in Immuta are available to build policies in Immuta. Immuta will not pull tags in from Databricks Unity Catalog unless those tags apply to registered data sources.
Cost implications: Tag ingestion in Databricks Unity Catalog requires compute resources. Therefore, having many Databricks data sources or frequently manually syncing data sources to Databricks Unity Catalog may incur additional costs.
Databricks Unity Catalog tag ingestion only supports tenants with fewer than 10,000 data sources registered.
for a list of requirements.
Row access policies with more than 1023 columns are unsupported. This is an underlying limitation of UDFs in Databricks. Immuta will only create row access policies with the minimum number of referenced columns. This limit will therefore apply to the number of columns referenced in the policy and not the total number in the table.
If you disable table grants, Immuta revokes the grants. Therefore, if users had access to a table before enabling Immuta, they’ll lose access.
If multiple Immuta tenants are connected to your Databricks environment, you must create a separate Immuta catalog for each of those tenants during configuration. Having multiple Immuta tenants use the same Immuta catalog causes failures in policy enforcement.
If a registered data source is owned by a Databricks group at the table level, then the Unity Catalog integration cannot apply data masking policies to that table in Unity Catalog.
Therefore, set all table-level ownership on your Unity Catalog data sources to an individual user or service principal instead of a Databricks group. Catalogs and schemas can still be owned by a Databricks group, as ownership at that level doesn't interfere with the integration.
The following features are currently unsupported:
Immuta project workspaces
Multiple IAMs on a single cluster
Row filters and column masking policies on the following object types:
.
Deprecation notice
Support for configuring the Starburst (Trino) integration using this legacy workflow has been deprecated. Instead, configure your integration and register your data using connections.
The plugin comes pre-installed with Starburst Enterprise, so this page provides separate sets of guidelines for configuration:
: These instructions are specific to Starburst Enterprise clusters.
: These instructions are specific to open-source Trino clusters.
A valid .
Starburst does not support using Starburst built-in access control (BIAC) concurrently with any other access control providers such as Immuta. If Starburst BIAC is in use, it must be disabled to allow Immuta to enforce policies on cluster.
Click the App Settings icon in the navigation menu.
Click the Integrations tab.
Click Add Integration and select Trino from the Integration Type dropdown menu.
If you are using OAuth or asynchronous authentication to create Starburst (Trino) data sources and you encounter , configure the globalAdminUsername property in the advanced configuration section of the Immuta app settings page.
Click the App Settings page icon.
Click Advanced Settings and scroll to Advanced Configuration.
Paste the following YAML configuration snippet in the text box, replacing the email address below with your admin username:
Default configuration property values
If you use the default property values in the configuration file described in this section,
you will give users read and write access to tables that are not registered in Immuta and
TLS Certificate Generation
If you provided your own TLS certificates during Immuta installation, you must ensure that the hostname in your certificate matches the hostname specified in the Starburst (Trino) configuration.
If you did not provide your own TLS certificates, Immuta generated these certificates for you during installation. See notes about your specific deployment method below for details.
Create the Immuta access control configuration file in the Starburst configuration directory (/etc/starburst/immuta-access-control.properties for Docker installations or <starburst_install_directory>/etc/immuta-access-control.properties for standalone installations).
The table below describes the properties that can be set during configuration.
The example configuration snippet below uses the default configuration settings for immuta.allowed.immuta.datasource.operations and immuta.allowed.non.immuta.datasource.operations, which allow read access for data registered as Immuta data sources and read and write access on data that is not registered in Immuta. See the for details about customizing and enforcing read and write access controls in Starburst.
to add users to Immuta.
when configuring your IAM (or map usernames manually) to Immuta.
All Starburst users must map to Immuta users or match the immuta.user.admin regex configured on the cluster, and their Starburst username must be mapped to Immuta so they can query policy-enforced data.
.
Click the App Settings icon in the navigation menu.
Click the Integrations tab.
Click Add Integration and select Trino from the dropdown menu.
If you are using OAuth or asynchronous authentication to create Starburst (Trino) data sources and you encounter , configure the globalAdminUsername property in the advanced configuration section of the Immuta app settings page.
Click the App Settings page icon.
Click Advanced Settings and scroll to Advanced Configuration.
Paste the following YAML configuration snippet in the text box, replacing the email address below with your admin username:
Default configuration property values
If you use the default property values in the configuration file described in this section,
you will give users read and write access to tables that are not registered in Immuta and
TLS Certificate Generation
If you provided your own TLS certificates during Immuta installation, you must ensure that the hostname in your certificate matches the hostname specified in the Starburst (Trino) configuration.
If you did not provide your own TLS certificates, Immuta generated these certificates for you during installation. See notes about your specific deployment method below for details.
The Immuta Trino plugin version matches the version of the corresponding Trino releases. For example, the Immuta plugin version supporting Trino version 403 is simply version 403. Navigate to the for a list of supported Trino versions. Immuta follows , but you can contact your Immuta representative for a specific Trino OSS release.
Download the assets for the release that corresponds to your Trino version.
Enable Immuta on your cluster. Select the tab below that corresponds to your installation method for instructions:
Docker installations
Follow to install the plugin archive on all nodes in your cluster.
Create the Immuta access control configuration file in the Trino configuration directory: /etc/trino/immuta-access-control.properties.
Configure the properties described in the table below.
Enable the Immuta access control plugin in Trino's configuration file (/etc/trino/config.properties for Docker installations or <trino_install_directory>/etc/config.properties for standalone installations). For example,
The example configuration snippet below uses the default configuration settings for immuta.allowed.immuta.datasource.operations and immuta.allowed.non.immuta.datasource.operations, which allow read access for data registered as Immuta data sources and read and write access on data that is not registered in Immuta. See the for details about customizing and enforcing read and write access controls in Starburst.
to add users to Immuta.
when configuring your IAM (or map usernames manually) to Immuta.
All Trino users must map to Immuta users or match the immuta.user.admin regex configured on the cluster, and their Trino username must be mapped to Immuta so they can query policy-enforced data.
.
Table-etc: Table (managed or external tables), view, volume, model, and function
enforcing Unity Catalog access controls, even if Immuta becomes disconnected
allowing non-Immuta reads and writes
using Photon
using a proxy server
Limiting the environments from which users can access sensitive data helps better secure your organization’s data. Limiting access to one workspace also simplifies any monitoring, auditing, and understanding of which users are accessing specific data. This would entail a similar setup as the example above.
Giving users read-only access to production data from a developer workspace.
This enables your organization to effectively conduct development and testing, while minimizing risk to production data. All user access to this catalog from this workspace can be specified as read-only, ensuring developers can access the data they need for testing without risk of any unwanted updates.
Setup user
This privilege is required only if enabling query audit, which requires granting access to system tables to the Immuta service principal. To grant access, a user that is both a metastore admin and an account admin must grant USE and SELECT permissions on the system schemas to the service principal. See for more details.
USE CATALOG and MANAGE on all catalogs containing securables registered as Immuta data sources
USE SCHEMA on all schemas containing securables registered as Immuta data sources
Immuta service principal
These privileges allow the service principal to apply row filters and column masks on the securable.
MODIFY and SELECT on all securables registered as Immuta data sources
Immuta service principal
These privileges allow the service principal to apply row filters and column masks on the securable. Additionally, they are required for to run on the securable.
OWNER on the Immuta catalog
Immuta service principal
The Immuta service principal must own the catalog Immuta creates during setup that stores the Immuta policy information. The Immuta setup script grants ownership of this catalog to the Immuta service principal when you configure the integration.
USE CATALOG on the system catalog
USE SCHEMA on the system.access and system.query schemas
Immuta service principal
These privileges allow Immuta to audit user queries in Databricks Unity Catalog.
Column-level security: Immuta applies column-mask SQL UDFs to tables for querying users. These column-mask UDFs run for any column that requires masking.
Custom masking
Hashing
Null (including on ARRAY, MAP, and STRUCT type columns)
Regex: You must use the global regex flag (g) when creating a regex masking policy in this integration. You cannot use the case insensitive regex flag (i) when creating a regex masking policy in this integration. See the limitations section for examples.
Rounding (date and numeric rounding)
Matching (only show rows where)
Custom WHERE
Never
Where user
Where value in column
Minimization
Time-based restrictions
✅
✅
Streaming table
✅
✅
External table
✅
✅
Foreign table
✅
✅
Volumes (external and managed) (Public preview)
✅
❌
Models (Public preview)
✅
❌
Functions (Public preview)
✅
❌
Delta Shares
✅
❌
USE SCHEMA on the system.access and system.query schemas
SELECT on the following system tables:
system.access.table_lineage
system.access.column_lineage
system.access.audit
system.query.history
systemUSE SCHEMA on the system.access schema
SELECT on the following system table:
system.access.audit
Note that without these permissions, Immuta will not be able to process any tag changes post the initial onboarding of data sources.
Location: USLocation.USTable comments field: This content appears as the data source description on the data source details tab.
Column comments field: This content appears as dictionary column descriptions on the data dictionary tab.
You must use the global regex flag (g) when creating a regex masking policy in this integration, and you cannot use the case insensitive regex flag (i) when creating a regex masking policy in this integration. See the examples below for guidance:
regex with a global flag (supported): /^ssn|social ?security$/g
regex without a global flag (unsupported): /^ssn|social ?security$/
regex with a case insensitive flag (unsupported): /^ssn|social ?security$/gi
regex without a case insensitive flag (supported): /^ssn|social ?security$/g
Models
Views
Volumes
Mixing masking policies on the same column
R and Scala cluster support
Scratch paths
User impersonation
Policy enforcement on raw Spark reads
Python UDFs for advanced masking functions
Direct file-to-SQL reads
Data policies (except for masking with NULL) on ARRAY, MAP, or STRUCT type columns
Shallow clones
Account admin
Setup user
This privilege allows the setup user to grant the Immuta service principal the necessary permissions to orchestrate Unity Catalog access controls and maintain state between Immuta and Databricks Unity Catalog.
CREATE CATALOG on the Unity Catalog metastore
Setup user
This privilege allows the setup user to create an Immuta-owned catalog and tables.
Table
✅
✅
View
✅
❌
Metastore admin
Materialized view
Click Save.
results for SHOW queries will not be filtered on table metadata.
These default settings help ensure that a new Starburst integration installation is minimally disruptive for existing Starburst deployments, allowing you to then add Immuta data sources and update configuration to enforce more controls as you see fit.
However, the access-control.config-files property can be configured to allow Immuta to work with existing Starburst installations that have already configured an access control provider. For example, if the Starburst integration is configured to allow users write access to tables that are not protected by Immuta, you can still lock down write access for specific non-Immuta tables using an additional access control provider.
Kubernetes Deployment: Immuta generates a local certificate authority (CA) that signs certificates for each service by default. Ensure that the externalHostname you specified in the Immuta Enterprise Helm chart matches the Immuta hostname name specified in the Starburst (Trino) configuration.
If the hostnames in your certificate don't match the hostname specified in your Starburst (Trino) integration, you can set immuta.disable-hostname-verification to true in the Immuta access control config file to get the integration working in the interim.
The Starburst (Trino) integration uses the immuta.ca-file property to communicate with Immuta. When configuring the plugin in Starburst (outlined below), specify a path to your CA file using the immuta.ca-file property in the Immuta access control configuration file.
access-control.name
392 and newer
Required
This property enables the integration.
access-control.config-files
392 and newer
Optional
Starburst allows you to enable multiple system access control providers at the same time. To do so, add providers to this property as comma-separated values. Immuta has tested the Immuta system access control provider alongside the . This approach allows Immuta to work with existing Starburst installations that have already configured an access control provider. Immuta does not manage all permissions in Starburst and will default to allowing access to anything Immuta does not manage so that the Starburst integration complements existing controls. For example, if the Starburst integration is configured to allow users write access to tables that are not protected by Immuta, you can still lock down write access for specific non-Immuta tables using an additional access control provider.
immuta.allowed.immuta.datasource.operations
413 and newer
Optional
Enable the Immuta access control plugin in Starburst's configuration file (/etc/starburst/config.properties for Docker installations or <starburst_install_directory>/etc/config.properties for standalone installations). For example,
A user impersonating a different user in Starburst requires the IMPERSONATE_USER permission in Immuta. Both users must be mapped to an Immuta user, or the querying user must match the configured immuta.user.admin regex.
results for SHOW queries will not be filtered on table metadata.
These default settings help ensure that a new Starburst integration installation is minimally disruptive for existing Trino deployments, allowing you to then add Immuta data sources and update configuration to enforce more controls as you see fit.
However, the access-control.config-files property can be configured to allow Immuta to work with existing Trino installations that have already configured an access control provider. For example, if the Starburst (Trino) integration is configured to allow users write access to tables that are not protected by Immuta, you can still lock down write access for specific non-Immuta tables using an additional access control provider.
Kubernetes Deployment: Immuta generates a local certificate authority (CA) that signs certificates for each service by default. Ensure that the externalHostname you specified in the Immuta Helm Chart matches the Immuta hostname name specified in the Starburst (Trino) configuration.
If the hostnames in your certificate don't match the hostname specified in your Starburst (Trino) integration, you can set immuta.disable-hostname-verification to true in the Immuta access control config file to get the integration working in the interim.
The Starburst (Trino) integration uses the immuta.ca-file property to communicate with Immuta. When configuring the plugin in Starburst (outlined below), specify a path to your CA file using the immuta.ca-file property in the Immuta access control configuration file.
For Trino versions 414 and newer, an immuta-trino Docker image that includes the Trino plugin jars is available from ocir.immuta.com. Before using this image, consider the following factors:
This image was designed to provide a method for organizations to quickly set up and validate the integration, so it should be used in a development environment. Use the Docker installation method above for production environments.
Immuta only supports the Immuta Trino plugin on the Docker image, not any other software packaged on the image.
If you experience an issue with the image outside of the scope of the Immuta plugin, you must rebuild your own version of the image using the Docker installation method above.
To use this image,
Pull the image and start the container. The example below specifies the Immuta Trino plugin version 414 with the 414 tag, but any supported Trino version newer than 414 can be used:
Create the Immuta access control configuration file in the Trino configuration directory: /etc/trino/immuta-access-control.properties.
Standalone installations
Follow Trino's documentation to install the plugin archive on all nodes in your cluster.
Create the Immuta access control configuration file in the Trino configuration directory: <trino_install_directory>/etc/immuta-access-control.properties.
Trino allows you to enable multiple system access control providers at the same time. To do so, add providers to this property as comma-separated values. This approach allows Immuta to work with existing Trino installations that have already configured an access control provider. Immuta does not manage all permissions in Trino and will default to allowing access to anything Immuta does not manage so that the Starburst (Trino) integration complements existing controls. For example, if the Starburst (Trino) integration is configured to allow users write access to tables that are not protected by Immuta, you can still lock down write access for specific non-Immuta tables using an additional access control provider.
immuta.allowed.immuta.datasource.operations
413 and newer
Optional
This property defines a comma-separated list of allowed operations for Starburst (Trino) users on tables registered as Immuta data sources: READ,WRITE, and OWN. (See the for details about the OWN operation.) When set to WRITE, all querying users are allowed read and write operations to data source schemas and tables. By default, this property is set to READ, which blocks write operations on data source tables and schemas. If are enabled for your Immuta tenant, this property is set to READ,WRITE by default, so users are allowed read and write operations to data source schemas and tables.
immuta.allowed.non.immuta.datasource.operations
392 and newer
Optional
This property defines a comma-separated list of allowed operations users will have on tables not registered as Immuta data sources: READ, WRITE, CREATE, and OWN. (See the for details about CREATE and OWN operations.) When set to READ, users are allowed read operations on tables not registered as Immuta data sources. When set to WRITE, users are allowed read and write operations on tables not registered as Immuta data sources. If this property is left empty, users will not get access to any tables outside Immuta. By default, this property is set to READ,WRITE. If
immuta.apikey
392 and newer
Required
This should be set to the Immuta API key displayed when enabling the integration on the app settings page. To rotate this API key, use the to generate a new API key, and then replace the existing immuta.apikey value with the new one.
immuta.audit.legacy.enabled
435 and newer
Optional
This property allows you to turn off Starburst (Trino) audit. Must set both immuta.audit.legacy.enabled and immuta.audit.uam.enabled to false to fully disable query audit.
immuta.audit.uam.enabled
435 and newer
Optional
This property allows you to turn off Starburst (Trino) audit. Must set both immuta.audit.legacy.enabled and immuta.audit.uam.enabled to false to fully disable query audit.
immuta.ca-file
392 and newer
Optional
This property allows you to specify a path to your CA file.
immuta.cache.views.seconds
392 and newer
Optional
Amount of time in seconds for which a user's specific representation of an Immuta data source will be cached for. Changing this will impact how quickly policy changes are reflected for users actively querying Trino. By default, cache expires after 30 seconds.
immuta.cache.datasource.seconds
392 and newer
Optional
Amount of time in seconds for which a user's available Immuta data sources will be cached for. Changing this will impact how quickly data sources will be available due to changing projects or subscriptions. By default, cache expires after 30 seconds.
immuta.endpoint
392 and newer
Required
The protocol and fully qualified domain name (FQDN) for the Immuta instance used by Trino (for example, https://my.immuta.instance.io). This should be set to the endpoint displayed when enabling the integration on the app settings page.
immuta.filter.unallowed.table.metadata
392 and newer
Optional
When set to false, Immuta won't filter unallowed table metadata, which helps ensure Immuta remains noninvasive and performant. If this property is set to true, running show catalogs, for example, will reflect what that user has access to instead of returning all catalogs. By default, this property is set to false.
immuta.group.admin
420 and newer
Required if immuta.user.admin is not set
This property identifies the Trino group that is the Immuta administrator. The users in this group will not have Immuta policies applied to them. Therefore, data sources should be created by users in this group so that they have access to everything. This property can be used in conjunction with the immuta.user.admin property, and regex filtering can be used (with a | delimiter at the end of each expression) to assign multiple groups as the Immuta administrator. Note that you must escape regex special characters (for example, john\\.doe+svcacct@immuta\\.com).
immuta.http.timeout.milliseconds
464 and newer
Optional
The timeout for all HTTP calls made to Immuta in milliseconds. Defaults to 30000 (30 seconds).
immuta.user.admin
392 and newer
Required if immuta.group.admin is not set
This property identifies the Trino user who is an Immuta administrator (for example, immuta.user.admin=immuta_system_account). This user will not have Immuta policies applied to them because this account will run the subqueries. Therefore, data sources should be created by this user so that they have access to everything. This property can be used in conjunction with the immuta.group.admin property, and regex filtering can be used (with a | delimiter at the end of each expression) to assign multiple users as the Immuta administrator. Note that you must escape regex special characters (for example, john\\.doe+svcacct@immuta\\.com).
A user impersonating a different user in Trino requires the IMPERSONATE_USER permission in Immuta. Both users must be mapped to an Immuta user, or the querying user must match the configured immuta.user.admin regex.
access-control.name
392 and newer
Required
This property enables the integration.
access-control.config-files
392 and newer
Optional
Snowflake Enterprise Edition required
In this integration, Immuta manages access to Snowflake tables by administering Snowflake and on those tables, allowing users to query tables directly in Snowflake while dynamic policies are enforced.
Like with all Immuta integrations, Immuta can inject its ABAC model into policy building and administration to remove policy management burden and significantly reduce role explosion.
trino:
globalAdminUsername: "[email protected]"access-control.config-files=/etc/starburst/immuta-access-control.properties# Enable the Immuta System Access Control (v2) implementation.
access-control.name=immuta
# The Immuta endpoint that was displayed when enabling the Starburst integration in Immuta.
immuta.endpoint=http://service.immuta.com:3000
# The Immuta API key that was displayed when enabling the Starburst integration in Immuta.
immuta.apikey=45jdljfkoe82b13eccfb9c
# The administrator user regex. Starburst usernames matching this regex will not be subject to
# Immuta policies. This regex should match the user name provided at Immuta data source
# registration.
immuta.user.admin=immuta_system_account
# Optional argument (default is shown).
# A CSV list of operations allowed on schemas/tables registered as Immuta data sources.
immuta.allowed.immuta.datasource.operations=READ
# Optional argument (default is shown).
# A CSV list of operations allowed on schemas/tables not registered as Immuta data sources.
# Set to empty to allow no operations on non-Immuta data sources.
immuta.allowed.non.immuta.datasource.operations=READ,WRITE
# Optional argument (default is shown).
# Controls table metadata filtering for inaccessible tables.
# - When this property is enabled and non-Immuta reads are also enabled, a user performing
# 'show catalogs/schemas/tables' will not see metadata for a table that is registered as
# an Immuta data source but the user does not have access to through Immuta.
# - When this property is enabled and non-Immuta reads and writes are disabled, a user
# performing 'show catalogs/schemas/tables' will only see metadata for tables that the
# user has access to through Immuta.
# - When this property is disabled, a user performing 'show catalogs/schemas/tables' can see
# all metadata.
immuta.filter.unallowed.table.metadata=falsetrino:
globalAdminUsername: "[email protected]"access-control.config-files=/etc/trino/immuta-access-control.properties# Enable the Immuta System Access Control (v2) implementation.
access-control.name=immuta
# The Immuta endpoint that was displayed when enabling the Starburst integration in Immuta.
immuta.endpoint=http://service.immuta.com:3000
# The Immuta API key that was displayed when enabling the Starburst integration in Immuta.
immuta.apikey=45jdljfkoe82b13eccfb9c
# The administrator user regex. Starburst usernames matching this regex will not be subject to
# Immuta policies. This regex should match the user name provided at Immuta data source
# registration.
immuta.user.admin=immuta_system_account
# Optional argument (default is shown).
# A CSV list of operations allowed on schemas/tables registered as Immuta data sources.
immuta.allowed.immuta.datasource.operations=READ
# Optional argument (default is shown).
# A CSV list of operations allowed on schemas/tables not registered as Immuta data sources.
# Set to empty to allow no operations on non-Immuta data sources.
immuta.allowed.non.immuta.datasource.operations=READ,WRITE
# Optional argument (default is shown).
# Controls table metadata filtering for inaccessible tables.
# - When this property is enabled and non-Immuta reads are also enabled, a user performing
# 'show catalogs/schemas/tables' will not see metadata for a table that is registered as
# an Immuta data source but the user does not have access to through Immuta.
# - When this property is enabled and non-Immuta reads and writes are disabled, a user
# performing 'show catalogs/schemas/tables' will only see metadata for tables that the
# user has access to through Immuta.
# - When this property is disabled, a user performing 'show catalogs/schemas/tables' can see
# all metadata.
immuta.filter.unallowed.table.metadata=falseSELECT on the following system tables:
system.access.table_lineage
system.access.column_lineage
system.access.audit
system.query.history
READ,WRITE,OWN,CREATEThis property defines a comma-separated list of allowed operations for Starburst (Trino) users on tables registered as Immuta data sources: READ,WRITE, and OWN. (See the Customize read and write access policies for Starburst (Trino) guide for details about the OWN operation.) When set to WRITE, all querying users are allowed read and write operations to data source schemas and tables. By default, this property is set to READ, which blocks write operations on data source tables and schemas. If write policies are enabled for your Immuta tenant, this property is set to READ,WRITE by default, so users are allowed read and write operations to data source schemas and tables.
immuta.allowed.non.immuta.datasource.operations
392 and newer
Optional
This property defines a comma-separated list of allowed operations users will have on tables not registered as Immuta data sources: READ, WRITE, CREATE, and OWN. (See the Customize read and write access policies for Starburst (Trino) guide for details about CREATE and OWN operations.) When set to READ, users are allowed read operations on tables not registered as Immuta data sources. When set to WRITE, users are allowed read and write operations on tables not registered as Immuta data sources. If this property is left empty, users will not get access to any tables outside Immuta. By default, this property is set to READ,WRITE. If write policies are enabled for your Immuta tenant, this property is set to READ,WRITE,OWN,CREATE by default.
immuta.apikey
392 and newer
Required
This should be set to the Immuta API key displayed when enabling the integration on the app settings page. To rotate this API key, use the Integrations API to generate a new API key, and then replace the existing immuta.apikey value with the new one.
immuta.audit.legacy.enabled
435 and newer
Optional
This property allows you to turn off Starburst (Trino) audit. Must set both immuta.audit.legacy.enabled and immuta.audit.uam.enabled to false to fully disable query audit.
immuta.audit.uam.enabled
435 and newer
Optional
This property allows you to turn off Starburst (Trino) audit. Must set both immuta.audit.legacy.enabled and immuta.audit.uam.enabled to false to fully disable query audit.
immuta.ca-file
392 and newer
Optional
This property allows you to specify a path to your CA file.
immuta.cache.views.seconds
392 and newer
Optional
Amount of time in seconds for which a user's specific representation of an Immuta data source will be cached for. Changing this will impact how quickly policy changes are reflected for users actively querying Starburst. By default, cache expires after 30 seconds.
immuta.cache.datasource.seconds
392 and newer
Optional
Amount of time in seconds for which a user's available Immuta data sources will be cached for. Changing this will impact how quickly data sources will be available due to changing projects or subscriptions. By default, cache expires after 30 seconds.
immuta.endpoint
392 and newer
Required
The protocol and fully qualified domain name (FQDN) for the Immuta tenant used by Starburst (for example, https://my.immuta.tenant.io). This should be set to the endpoint displayed when enabling the integration on the app settings page.
immuta.filter.unallowed.table.metadata
392 and newer
Optional
When set to false, Immuta won't filter unallowed table metadata, which helps ensure Immuta remains noninvasive and performant. If this property is set to true, running show catalogs, for example, will reflect what that user has access to instead of returning all catalogs. By default, this property is set to false.
immuta.group.admin
420 and newer
Required if immuta.user.admin is not set
This property identifies the Starburst group that is the Immuta administrator. The users in this group will not have Immuta policies applied to them. Therefore, data sources should be created by users in this group so that they have access to everything. This property can be used in conjunction with the immuta.user.admin property, and regex filtering can be used (with a | delimiter at the end of each expression) to assign multiple groups as the Immuta administrator. Note that you must escape regex special characters (for example, john\\.doe+svcacct@immuta\\.com).
immuta.http.timeout.milliseconds
464 and newer
Optional
The timeout for all HTTP calls made to Immuta in milliseconds. Defaults to 30000 (30 seconds).
immuta.user.admin
392 and newer
Required if immuta.group.admin is not set
This property identifies the Starburst user who is an Immuta administrator (for example, immuta.user.admin=immuta_system_account). This user will not have Immuta policies applied to them because this account will run the subqueries. Therefore, data sources should be created by this user so that they have access to everything. This property can be used in conjunction with the immuta.group.admin property, and regex filtering can be used (with a | delimiter at the end of each expression) to assign multiple users as the Immuta administrator. Note that you must escape regex special characters (for example, john\\.doe+svcacct@immuta\\.com).
docker run ocir.immuta.com/immuta/immuta-trino:414When an administrator configures the Snowflake integration with Immuta, Immuta creates an IMMUTA database and schemas (immuta_procedures, immuta_policies, and immuta_functions) within Snowflake to contain policy definitions and user entitlements. Immuta then creates a system role and gives that system account the privileges required to orchestrate policies in Snowflake and maintain state between Snowflake and Immuta. See the Snowflake privileges section for a list of privileges, the user they must be granted to, and an explanation of why they must be granted.
An Immuta application administrator configures the Snowflake integration and registers Snowflake warehouse and databases with Immuta.
Immuta creates a database inside the configured Snowflake warehouse that contains Immuta policy definitions and user entitlements.
A data owner registers Snowflake tables in Immuta as data sources.
If was enabled during the configuration, Immuta uses the host provided in the configuration and ingests internal tags on Snowflake tables registered as Immuta data sources.
A data owner, data governor, or administrator creates or changes a policy or a in Immuta.
The Immuta web service calls a stored procedure that modifies the user entitlements or policies.
Immuta manages and applies and to Snowflake tables that are registered as Immuta data sources.
If is not enabled, Snowflake object owner or user with the global MANAGE GRANTS privilege grants on relevant Snowflake tables to users. Note: Although they are GRANTed access, if they are not subscribed to the table via Immuta-authored policies, they will not see data.
A Snowflake user who is subscribed to the data source in Immuta queries the corresponding table directly in Snowflake and sees policy-enforced data.
When Immuta users create policies, they are then pushed into the Immuta database within Snowflake; there, the Immuta system account orchestrates Snowflake row access policies and column masking policies directly onto Snowflake tables. Changes in Immuta policies, user attributes, or data sources trigger webhooks that keep the Snowflake policies up-to-date.
For a user to query Immuta-protected data, they must meet two qualifications:
They must be subscribed to the Immuta data source.
They must be granted SELECT access on the table by the Snowflake object owner or automatically via the Snowflake table grants feature.
After a user has met these qualifications they can query Snowflake tables directly.
See the integration support matrix on the Data policy types reference guide for a list of supported data policy types in Snowflake.
The privileges Immuta issues to users when they are subscribed to a data source vary depending on the object type. See an outline of privileges granted by Immuta on Snowflake object types on the Subscription policy access types page.
When a user applies a masking policy to a Snowflake data source, Immuta truncates masked values to align with Snowflake column length (VARCHAR(X) types) and precision (NUMBER (X,Y) types) requirements.
Consider these columns in a data source that have the following masking policies applied.
Column A (VARCHAR(6)): Mask using hashing for everyone
Column B (VARCHAR(5)): Mask using a constant REDACTED for everyone
Column C (VARCHAR(6)): Mask by making null for everyone
Column D (NUMBER(3, 0)): Mask by rounding to the nearest 10 for everyone
Querying this data source in Snowflake would return the following values:
5w4502
REDAC
null
990
6e3611
REDAC
Hashing collisions
Hashing collisions are more likely to occur across or within Snowflake columns restricted to short lengths, since Immuta truncates the hashed value to the limit of the column. (Hashed values truncated to 5 characters have a higher risk of collision than hashed values truncated to 20 characters.) Therefore, avoid applying hashing policies to Snowflake columns with such restrictions.
For more details about Snowflake column length and precision requirements, see the Snowflake behavior change release documentation.
When a policy is applied to a column, Immuta uses Snowflake memoizable functions to cache the result of the called function. Then, when a user queries a column that has that policy applied to it, Immuta uses that cached result to dramatically improve query performance.
The privilege grants the Snowflake integration requires align to the least privilege security principle. The table below describes each privilege required in Snowflake for the setup user, the IMMUTA_SYSTEM_ACCOUNT user, or the metadata registration user. The references to IMMUTA_DB , IMMUTA_WH, and IMMUTA_IMPERSONATOR_ROLE in the table can be replaced with what you chose for the name of your Immuta database, warehouse, and impersonation role when setting up the integration, respectively.
CREATE DATABASE ON ACCOUNT WITH GRANT OPTION
Setup user
All
The setup script this user runs creates an Immuta database in your organization's Snowflake account where all Immuta managed objects (UDFs, masking policies, row access policies, and user entitlements) will be written and stored.
CREATE ROLE ON ACCOUNT WITH GRANT OPTION
Setup user
The definitions for each status and the state of configured data platform integrations is available in the response schema of the integrations API.
Register Snowflake data sources using a dedicated Snowflake role. Avoid using individual user accounts for data source onboarding. Instead, create a service account (Snowflake user account TYPE=SERVICE) with SELECT access for onboarding data sources. No policies will apply to that account, ensuring that your integration works with the following use cases:
Snowflake project workspaces: Snowflake workspaces generate static views with the credentials used to register the table as an Immuta data source. Those tables must be registered in Immuta by an excepted role so that policies applied to the backing tables are not applied to the project workspace views.
Using views and tables within Immuta: Because this integration uses Snowflake governance policies, users can register tables and views as Immuta data sources. However, if you want to register views and apply different policies to them than their backing tables, the owner of the view must be an excepted role; otherwise, the backing table’s policies will be applied to that view.
Private preview: This feature is available to select accounts. Contact your Immuta representative to enable this feature.
Bulk data source creation is the more efficient process when loading more than 5000 data sources from Snowflake and allows for data sources to be registered in Immuta before running identification or applying policies.
To use this feature, see the Bulk create Snowflake data sources guide.
Based on performance tests that create 100,000 data sources, the following minimum resource allocations need to be applied to the appropriate pods in your Kubernetes environment for successful bulk data source creation.
Memory
4Gi
16Gi
CPU
2
4
Performance gains are limited when enabling identification at the time of data source creation.
External catalog integrations are not recognized during bulk data source creation. Users must manually trigger a catalog sync for tags to appear on the data source through the data source's health check.
Excepted roles and users are assigned when the integration is installed, and no policies will apply to these users' queries, despite any Immuta policies enforced on the tables they are querying. Credentials used to register a data source in Immuta will be automatically added to this excepted list for that Snowflake table. Consequently, roles and users added to this list and used to register data sources in Immuta should be limited to service accounts.
Immuta excludes the listed roles and users from policies by wrapping all policies in a CASE statement that will check if a user is acting under one of the listed usernames or roles. If a user is, then the policy will not be acted on the queried table. If the user is not, then the policy will be executed like normal. Immuta does not distinguish between role and username, so if you have a role and user with the exact same name, both the user and any user acting under that role will have full access to the data sources and no policies will be enforced for them.
The Snowflake integration supports the following authentication methods to configure the integration and create data sources.
Username and password: Users can authenticate with their Snowflake username and password.
Key pair: Users can authenticate with a Snowflake key pair authentication.
Snowflake External OAuth: Users can authenticate with Snowflake External OAuth.
Immuta's OAuth authentication method uses the Client Credentials Flow to integrate with Snowflake External OAuth. When a user configures the Snowflake integration or connects a Snowflake data source, Immuta uses the token credentials (obtained using a certificate or passing a client secret) to craft an authenticated access token to connect with Snowflake. This allows organizations that already use Snowflake External OAuth to use that secure authentication with Immuta.
An Immuta application administrator configures the Snowflake integration or creates a data source.
Immuta creates a custom token and sends it to the authorization server.
The authorization server confirms the information sent from Immuta and issues an access token to Immuta.
Immuta sends the access token it received from the authorization server to Snowflake.
Snowflake authenticates the token and grants access to the requested resources from Immuta.
The integration is connected and users can query data.
The Immuta Snowflake integration supports Snowflake external tables. However, you cannot add a masking policy to an external table column while creating the external table in Snowflake because masking policies cannot be attached to virtual columns.
Table
✅
✅
View
✅
✅
Immuta project workspaces: Users can have additional write access in their integration using project workspaces.
Tag ingestion: Immuta automatically ingests Snowflake object tags from your Snowflake instance and adds them to the appropriate data sources.
User impersonation: Impersonation allows users to query data as another Immuta user. Impersonation is not supported in Snowflake if table grants or low row access policy mode is enabled. To enable impersonation, see the Configure a Snowflake integration guide.
: Immuta audits queries run in Snowflake against Snowflake data registered as Immuta data sources.
: The Snowflake low row access policy mode improves query performance in Immuta's Snowflake integration by decreasing the number of Snowflake row access policies Immuta creates.
: This feature allows Immuta to manage privileges on your Snowflake tables and views according to the subscription policies on the corresponding Immuta data sources.
Deprecation notice
Support for this feature has been deprecated. See the Deprecations and EOL page for EOL dates.
Immuta system account required Snowflake privileges
CREATE [OR REPLACE] PROCEDURE
DROP ROLE
REVOKE ROLE
Users can have additional write access in their integration using project workspaces. For more details, see the Snowflake project workspaces page.
To use project workspaces with the Snowflake integration, the default role of the account used to create data sources in the project must be added to the "Excepted Roles/Users List." If the role is not added, you will not be able to query the equalized view using the project role in Snowflake.
You can enable Snowflake tag ingestion so that Immuta will ingest Snowflake object tags from your Snowflake instance into Immuta and add them to the appropriate data sources.
The Snowflake tags' key and value pairs will be reflected in Immuta as two levels: the key will be the top level and the value the second. As Snowflake tags are hierarchical, Snowflake tags applied to a database will also be applied to all of the schemas in that database, all of the tables within those schemas, and all of the columns within those tables. For example: If a database is tagged PII, all of the tables and columns in that database will also be tagged PII.
Snowflake tag ingestion supports two authentication methods:
Username and password
Key pair
To enable Snowflake tag ingestion, see the Configure a Snowflake integration page.
Credentials
If you want all Snowflake data sources to have Snowflake data tags ingested into Immuta, ensure the credentials provided on the Immuta app settings page for the external catalog feature can access all the data sources registered in Immuta. Any data sources the credentials do not have access to will not be tagged in Immuta. In practice, it is recommended to just use the same credentials for the data source registration and tag ingestion.
Snowflake has some natural data latency. If you manually refresh the governance page to see all tags created globally, users can experience a delay of up to two hours. However, if you run schema detection or a health check to find where those tags are applied, the delay will not occur because Immuta will only refresh tags for those specific tables.
The Snowflake integration audits Immuta user queries run in the integration's warehouses by running a query in Snowflake to retrieve user query histories. Those histories are then populated into audit logs. See the Snowflake audit page for details about the contents of the logs.
The audit ingest is set when configuring the integration. The default ingest frequency is every hour, but this can be configured to a different frequency on the Immuta app settings page. Additionally, audit ingestion can be manually requested at any time from the Immuta audit page. When manually requested, it will only search for new queries that were created since the last query that had been audited. The job is run in the background, so the new queries will not be immediately available.
A user can configure multiple integrations of Snowflake to a single Immuta tenant and use them dynamically.
There can only be one integration connection with Immuta per host.
The host of the data source must match the host of the integration for policies to apply.
Projects can only be configured to use one Snowflake host.
If there are errors in generating or applying policies natively in Snowflake, the data source will be locked and only users on the excepted roles/users list and the credentials used to create the data source will be able to access the data.
Once a Snowflake integration is disabled in Immuta, the user must remove the access that was granted in Snowflake. If that access is not revoked, users will be able to access the raw table in Snowflake.
Migration must be done using the credentials and credential method (automatic or bootstrap) used to configure the integration.
When configuring one Snowflake instance with multiple Immuta tenants, the user or system account that enables the integration on the app settings page must be unique for each Immuta tenant.
You cannot add a masking policy to an external table column while creating the external table because a masking policy cannot be attached to a virtual column.
If you create an Immuta data source from a Snowflake view created using a select * from query, Immuta column detection will not work as expected because . To remedy this, you can create views that have the specific columns you want or you can CREATE AND REPLACE the view in Snowflake whenever the backing table is updated and on the data source page.
If a user is created in Snowflake after that user is already registered in Immuta, Immuta does not grant usage on the per-user role automatically - meaning Immuta does not govern this user's access without manual intervention. If a Snowflake user is created after that user is registered in Immuta, the user account must be and re-enabled to trigger a sync of Immuta policies to govern that user. Whenever possible, Snowflake users should be created before registering those users in Immuta.
Snowflake tables from imported databases are not supported. Instead, create a view of the table and register that view as a data source.
Impersonation is not supported in Snowflake if or is enabled.
The Immuta Snowflake integration uses Snowflake governance features to let users query data natively in Snowflake. This means that Immuta also inherits some Snowflake limitations using correlated subqueries with row access policies and column-level security. These limitations appear when writing custom WHERE policies, but do not remove the utility of row-level policies.
Requirement for a custom WHERE policy: The Immuta system account must have SELECT privileges on all tables/views referenced in a subquery. The Immuta system role name is specified by the user, and the role is created when the Snowflake instance is integrated.
Any subqueries that error in Snowflake will also error in Immuta.
Including one or more subqueries in the Immuta policy condition may cause errors in Snowflake. If an error occurs, it may happen during policy creation or at query-time. To avoid these errors, limit the number of subqueries, limit the number of JOIN operations, and simplify WHERE clause conditions.
For more information on the Snowflake subquery limitations see
null
750
9s7934
REDAC
null
380
All
The setup script this user runs creates a ROLE for Immuta that will be used to manage the integration once it has been initialized.
CREATE USER ON ACCOUNT WITH GRANT OPTION
Setup user
All
The setup script this user runs creates the IMMUTA_SYSTEM_ACCOUNT user that Immuta will use to manage the integration.
MANAGE GRANTS ON ACCOUNT
Setup user
All
The user configuring the integration must be able to GRANT global privileges and access to objects within the Snowflake account. All privileges that are documented here are granted to the IMMUTA_SYSTEM_ACCOUNT user by this setup user.
OWNERSHIP ON ROLE IMMUTA_IMPERSONATOR_ROLE
IMMUTA_SYSTEM_ACCOUNT user
Impersonation
If impersonation is enabled, Immuta must be able to manage the Snowflake roles used for impersonation, which is created when the setup script runs, in order to manage the impersonation feature.
ALL PRIVILEGES ON DATABASE IMMUTA_DB
ALL PRIVILEGES ON ALL SCHEMAS IN DATABASE IMMUTA_DB
USAGE ON FUTURE PROCEDURES IN SCHEMA IMMUTA_DB.IMMUTA_PROCEDURES
IMMUTA_SYSTEM_ACCOUNT user
All
The setup script grants the Immuta system account user these privileges because Immuta must have full ownership of the Immuta database where Immuta objects are managed.
USAGE ON WAREHOUSE IMMUTA_WH
IMMUTA_SYSTEM_ACCOUNT user
All
To make changes to state in the Immuta database, Immuta requires access to compute (a Snowflake warehouse). Some state changes are DDL operations, and others are DML and require compute.
IMPORTED PRIVILEGES ON DATABASE SNOWFLAKE
IMMUTA_SYSTEM_ACCOUNT user
Audit
To ingest audit information from Snowflake, Immuta must have access to the SNOWFLAKE.ACCOUNT_USAGE.ACCESS_HISTORY view. See the Snowflake documentation for details.
APPLY MASKING POLICY ON ACCOUNT
APPLY ROW ACCESS POLICY ON ACCOUNT
IMMUTA_SYSTEM_ACCOUNT user
Snowflake integration with governance features enabled
Immuta must be able to apply policies to objects throughout your organization's Snowflake account and query for existing policies on objects using the POLICY_REFERENCES table function.
MANAGE GRANTS ON ACCOUNT
IMMUTA_SYSTEM_ACCOUNT user
Table grants
Immuta must be able to MANAGE GRANTS on objects throughout your organization's Snowflake account.
CREATE ROLE ON ACCOUNT
IMMUTA_SYSTEM_ACCOUNT user
Table grants
When using the table grants feature, Immuta must be able to create roles as targets for Immuta subscription policy permissions in your organization’s Snowflake account.
USAGE on all databases and schemas with registered data sources
REFERENCES on all tables and views registered in Immuta
Metadata registration user
Data source registration
Immuta must be able to see metadata on securables to register them as data sources and populate the data dictionary.
SELECT on all tables and views registered in Immuta
Metadata registration user
Identification and specialized masking policies that require fingerprinting
Immuta must have this privilege to run the necessary queries for identification on your data sources.
APPLY TAG ON ACCOUNT
Metadata registration user
Tag ingestion
To ingest table, view, and column tag information from Snowflake, Immuta must have this permission. Immuta reads from the TAG_REFERENCES table function.
IMPORTED PRIVILEGES ON DATABASE SNOWFLAKE
Metadata registration user
Tag ingestion
To ingest table, view, and column tag information from Snowflake, Immuta must have access to the SNOWFLAKE.ACCOUNT_USAGE.ACCESS_HISTORY view. See the Snowflake documentation for details.
USAGE ON DATABASE IMMUTA_DB
USAGE ON SCHEMA IMMUTA_DB.IMMUTA_PROCEDURES
USAGE ON SCHEMA IMMUTA_DB.IMMUTA_FUNCTIONS
USAGE ON FUTURE FUNCTIONS IN SCHEMA IMMUTA_DB.IMMUTA_FUNCTIONS
USAGE ON SCHEMA IMMUTA_DB.IMMUTA_SYSTEM
SELECT ON IMMUTA_DB.IMMUTA_SYSTEM.USER_PROFILE
PUBLIC role
All
Immuta has stored procedures and functions that are used for policy enforcement and do not expose or contain any sensitive information. These objects must be accessible by all users to facilitate the use and creation of policies or views to enforce Immuta policies in Snowflake.
SELECT ON IMMUTA_DB.IMMUTA_SYSTEM.ALLOW_LIST
PUBLIC role
All
Immuta retains a list of excepted roles and users when using the Snowflake integration. The roles and users in this list will be exempt from policies applied to tables in Snowflake to give organizations flexibility in case there are entities that should not be bound to Immuta policies in Snowflake (for example, a system or application role or user).
Storage
8Gi
24Gi
Materialized view
✅
✅
External table
✅
✅
Event table
✅
✅
Iceberg table
✅
✅
Dynamic table
✅
✅